Article Archive
Simplified Calibration of Radiometric Equipment
Michael R. Sharlon, President
ACS Calibrations
1215 Sturgis Road
Conway, AR 72034
501-513-9901
Abstract
To ensure measurement accuracy, infrared radiometers must be periodically calibrated. Simply stated, the practice of comparing one article to another, better-defined article is calibration. Although thermographers frequently cite and discuss calibration, there is confusion as to its application and meaning with respect to radiometric instruments. This paper discusses the art and science of calibrating infrared instruments, calibration reference sources and maintaining records that are traceable to known standards.
Introduction: History of Calibration
A few thousand years ago, Egyptians developed a system of traceable measurement, now known as Metrology. In the days of the Pharaohs and Kings, a carved granite block measured from a Pharaoh’s forearm to the tip his index finger plus the width of his palm was made and became the reference for length (the Royal Cubit Master). Architects and craftsmen in the building of the Pyramids, tombs, and temples then compared to this reference. The result of this measure and the traceability to the Royal Cubit Master mandated is still one of today’s wonders. The Pyramids were built to a total tolerance (loosely translated, error) of +/- 0.05%. That means that for every 125 feet, the Egyptian builders were off by less than an inch! One might note that if the holders of the Royal Cubit Master copies did not bring in their copy weekly for comparison to the master, the penalty was death! (If interested in the rest of this bite from history and to give credit where it is due, please visit: www.ncsli.org).
What Is Calibration Of An Instrument And What Does It Accomplish?
Calibration of an instrument is the act of comparing that instrument’s fundamental unit(s) of measure (that it derives) with another instrument. This comparison instrument is capable of an even more accurate reading of the same measured stimulus and that has itself been compared to an even more accurate instrument. This chain of ever tightening comparisons is tied to a national or international source. In the U.S., this source would be the National Institute of Standards and Technology (NIST).
NIST uses natural phenomena in physics to establish the most finite or repeatable unit(s) of measure. In the measure of volt, amperage, and resistance, the reference cell (providing an exact voltage) is one workhorse. In temperature, more finite measurement of temperature incorporates the use of Standard 100 ohm .0385 Platinum Resistance Detectors (SPRTD or SRTD) in conjunction with the freezing point of certain metals or the triple point of water (a phenomena in nature that few elements or compounds share, the temperature/pressure point at which distilled water is solid/liquid/gas). For radiant energy measurements, an environmental enclosure will be added to a contact temperature detector embedded in a nearly perfect radiator material. These sources are referred to as primary standards. A primary standard is considered as accurate a measure as you are going to obtain.
When accuracies are combined to form a total uncertainty for your instrument, the result is used to measure a stimulus with a degree of certainty in your measurement. This provides you with an opportunity to obtain a measurement point capable of being repeated (when taken under similar conditions) at another time and anywhere on the planet. This further establishes a basis for an expected occurrence, i.e., ice cubes will begin to thaw at or around 32 degrees F and higher at sea level.
When discussing calibration of any instrument, the terms accuracy, tolerance and uncertainty are often interchanged and assumed similar. They are not. These terms can become very detailed in explanation and simply said, are subjects within themselves. For the purpose of this presentation, accuracy is a statement of possible limits of error for a given parameter of an instrument under specific conditions. The total errors for just that instrument would be the tolerance of the instrument. Most measuring instruments will have several errors capable of affecting the displayed measurement. When these errors are combined, first with each other (those associated directly with one instrument, tolerance) and then with other total errors of additional instrument(s) used in conjunction with providing a displayed value (i.e., an instrument loop), the result is a total uncertainty of the viewed reading.
Why Calibrate?
Perhaps an example might be in order. Let’s say the recommended air pressure in a name brand tire is found to cause rollovers in a model of vehicle. A subsequent bulletin informs users of this pressure and the new recommended pressure. At this point, what provides the user with the assurance that the tire pressure read by a device is in fact that pressure or that the tested pressure was in fact the reported pressure? Taken one step further, what assures the same user when the pressure is read on another continent with a different instrument? The answer is a science known as Metrology; the calibration and records system required to provide assurance of a traceably accurate (to NIST or similar) instrument.
Another example might be the chair you are sitting in. Odds are that the parts used to build, cover and package the chair were manufactured at more than one site. How then did the back fit so well into the seat, the paint or chrome adhere to the metal in an even process, or the print on the corrugated packaging become so evenly applied on what must have been quite a few containers? The answer lies in repeatably accurate measurements from instruments sharing a similar chain of measured accuracy.
Now then, why calibrate your radiometry? The answer to this question lies in your use of the equipment and being right about your viewed possible exceptions.
If you:
-
a. Provide specific IR related temperatures
-
b. Provide Delta IR related temperatures
-
c. Provide Images with corresponding shades implying temperatures of the image displayed
-
d. Provide comparative IR related data to other instrumentation
You might be a thermographer.
If you are a thermographer, you will provide the most correct thermally related information. That can ONLY be accomplished with calibrated instruments. Uncalibrated instruments are sometimes good enough to provide an indication that an object might be hot or cold. The fact that it is could not be proven.
Proving your findings is a fundamental reason for calibration. If your instrument is calibrated and your customer (or their attorney) asks: “Was the object in question as hot or cold as you reported?” The simple answer is yes. The more complex answer would include a degree of tolerance.
Still not convinced? Try telling your customer that they have a 45 C degree delta in a bolted part of a bus carrying a few thousand amps. Then find out that they scheduled a tear down of your reported system with contracted electricians who report no problem found. You will hear about it. Sometimes to the tune of a bill!
Accuracy Of Your Imagery And Calibration Standard
The basic statement of accuracy for your imager will not (typically) include the compiled inaccuracies of your equipment. It will typically state the viewed temperature will be +/- some value (often 2% of full scale reading) up to a set temperature and some greater value above this temperature. The calibrating instrument’s accuracy should be at least 1/3 to 1/4 of your instrument’s accuracy (i.e., for a 2% instrument, a standard must be at 0.67 to 0.5% of full-scale reading). As an example, consider:
An imager’s accuracy is +/- 2 degrees C to 100 degrees C or +/- 2% of the reading, whichever is greatest. With this stated value, at say 250 degrees C, your instrument may actually be reading 245 to 255 degrees C (+/- 5 deg C).
When dealing with radiant temperatures, this kind of accuracy (i.e., 0.5%) is difficult to obtain. The reason is that Emissivity/Absorbtance (E/A), Reflectivity (R) and Transmittance (T) tend to induce errors at or greater than 2% of the displayed value. For this reason, primary radiant energy standards are usually laboratory blackbodies. These standards are designed to greatly reduce ERT errors. R and T in these standards will be negligible and E will be 0.995 and greater in most. These standards are themselves set at (typically) +/- 1 to 2% or less of reading or full scale. It is important to note that these standards often derive their temperature value and oven/refrigeration control from imbedded thermometry and because of this can be calibrated to an even tighter tolerance, if required.
Calibration Certification
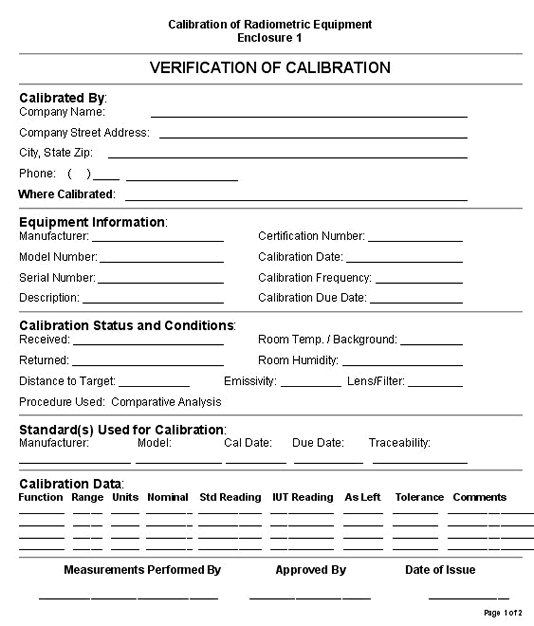
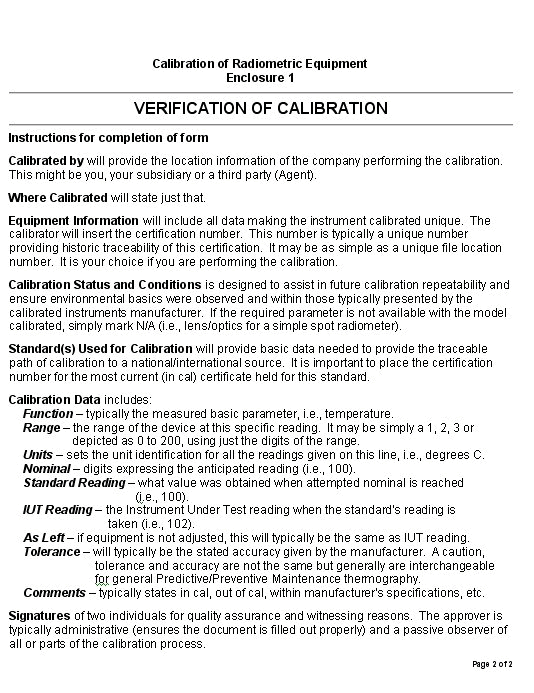
Certification of calibration is intended to provide a quality and legal tool for a manufacturer, user, or customer’s assurance of a physical values actuality. In its simplest format, the certification is a document intended to prove traceable and repeatable accuracy and identity statements for instrumentation, instrumentation holder(s) and the performers of the calibration.
Calibration Standard for Infrared Imagery
If you send your equipment in for calibration, odds are that a blackbody will be used. These primary standards range in cost from used at approximately $500.00 to new at $1,500.00 and up, plus the cost of traceable certificates. So how then can you calibrate an instrument at home or office, say, less expensively?
One of the more common techniques is to bring distilled water to a freezing slush or just to a boil and observe the temperature of the vessel with your radiometry. To do so requires:
-
1. Assurance that your vessel is large enough to ensure that your radiometry’s
spot size is less than the observed surface. -
2. That the vessel surface observed by your radiometry is flat and perpendicular
to the observed plane. -
3. That you can reasonably determine the vessel surface E (i.e., painting it with a high temperature paint) and exercising your Level II skills.
-
4. That lighting and other heat sources are minimally (RT) impacting.
-
5. That you use contact traceable thermometry to ensure the expected reading
is at or close to approx. 0 or 100 degrees C. Calibrated (and traceable)
thermometry is not that expensive. New and used equipment may be
obtained for under a hundred dollars and calibrated for $50.00 and up
(typically and annually).
Notes:
Maintain your records much as you do when maintaining your reports to your clients. You will need to exercise repeatability between obtaining your annual readings so consider the where, when and how when performing your calibration.
How Often Should The Instrument Be Calibrated Or Validated
Typically IR instruments are calibrated or verified as, “in cal” annually. Simple single point validation of your radiometry is often performed prior to performing a scan. Validation is a self-assurance concept and typically does not require the time consumed in calibration or multipoint cal verification. One of the simplest “slap on the door” validators can be calibrated, and used daily. It costs about $25.00 (uncalibrated). It is Omni Controls model WD-35625-55 (see enclosure 2).
Cost to Calibrate
The cost to calibrate radiometry by using a third party, like a calibrations lab or manufacturer’s calibration lab is broad at best. Manufacturers will typically be the only source for correction of radiometry found out of calibration. This is due to the use of proprietary software in the radiometry. Calibrations labs outside of the manufacturer of your radiometry’s loop will only be able to provide traceable proof that your radiometry is within manufacturer’s or your specifications.
If you intend to spend the extra dollars to obtain your own blackbody (highly recommended if you practice Level II thermography), some sources have been listed in Enclosure 2.
The most comprehensive description of traceability and an excellent source for key terms in calibration are provided by NIST on the internet at http://www.nist.gov/traceability/ and http://www.nist.gov/traceability/suppl_matls_for_nist_policy_rev.htm
References
1. ANSI/NCSL Z540-2-1997 American National Standard for Expressing Uncertainty, US Guide to the Expression of Uncertainty in Measurement2. NCSL RP-1 January 1996 National Conference of Standards Laboratories Recommended Practices for Establishment and Adjustment of Calibration Intervals3. NCSL RP-3 January 11, 1990 National Conference of Standards Laboratories Recommended Practices for Calibration Procedures for Measuring & Test Equipment, Measurement Standards, and Measurement/Test Systems4. Website to the National Institute of Standards and Technology: http://www.nist.gov5. Infraspection Institute’s Level II Certified Infrared Thermographer Reference Manual
HART: http://www.alphacontrols.com/Hart_Handheld_infrared_Calibrator.htm
Omni (calomat): http://www.omnicontrols.net/index.html?catalog140_0.html
Williamson IR: http://www.williamsonir.com
TTI Incorporated: http://www.instrumart.com/
Isotech North America: http://www.isotechna.com/
Advertisement


