Article Archive
Interpreting the Images: Data Errors in Thermography – Electrical & Roofs
Harley Denio, President
Level III Certified Thermographer
Oregon Infrared
PO Box 6252
Aloha, OR 97007
Ph: 503-628-7212
Abstract
Over the last couple decades, there have been many changes to infrared imagers and audio/visual equipment that make data gathering easier and more accurate. Since infrared thermography companies have been servicing the industrial, manufacturing, commercial, residential and so many other industries, many new applications have been developed and more are being discovered and presented at forums like this all around the world.
My time in infrared has been a learning experience. Over the last 15 years as an infrared thermographer, and 10 years in business, Oregon Infrared has performed inspections for a wide array of applications and has captured over 100,000 images.
I have run across some examples of common problems in gathering accurate data which I call “data errors”. In this presentation I will illustrate some of the issues I have learned from and hope to help my fellow thermographers avoid some of the mistakes I have made over the years. Also included will be some tips and tricks to help make an infrared survey more efficient.
Introduction
Every time a thermographer goes out into the field to perform a survey, the conditions change. For electrical scanning, it may be in a factory that has heat generating equipment all around, or in an office building that has only one electrical room on each floor, and is lightly loaded. You could be scanning all day on the roof of a complex, looking at AC units on a sunny day, or in a computer room that is air-conditioned. Different types of equipment have different heat signatures (fuses, contactors, breakers, load) and for accuracy, must be considered on an individual basis.
Discussion
For roof surveys, special attention must be given to various factors such as composition of roof material, type of decking, age of roof, the environment below the roof, and the weather conditions at the time of scan. Ignoring these data points can result in inaccurate information, which may result in problems that are missed, or non-existent issues which “look” like problems but really are not. Either way, the result may incur an unwanted or surprise expense to the customer, and taint your reputation as a thermographer.
Building energy loss and home inspections are becoming the fastest growing segment of the infrared thermography field today. This discipline has its own set of special conditions. Weather, building materials, and insulation type and quantity, all play important roles in gathering good data.
Every situation requires the thermographer to look around at the surrounding environment and make a judgment as to what special conditions exist and how to gather data accurately. This presentation will attempt to address some of the “lessons learned” in these disciplines that I have gathered through the years as an independent thermographer. These lessons are by no means complete, just a composite of what I have learned so far in this ever-changing industry.
General Thermography
1. Camera Set-up
- Set as many parameters at the job site as possible
- Atmospheric temperature setting
- Background temperature
- Emissivity of targets
- Distance to target
These are all done on the camera and should be addressed at each change of environment. For example, going from inside to outside the building.
2. Safety
- When doing electrical scanning, wear all necessary personal protective equipment as required by NFPA 70E
- Always take a look around, above, and below when changing position while scanning
- Keep the “other” eye open, if possible
- Never work alone, if possible
- Don’t wear things hanging around you when working around rotating equipment. Put them away when scanning, e.g., lens cap on string, ID tags, hanging clipboard, etc.
- Always have a means for communication such as cell phone or radio
- If for any reason you have to scan from a ladder, have an assistant hold it steady
3. Data Gathering
- Talk to customer about any special safety hazards
- Talk to customer about any recent failures such as leaks, tripped breakers, failed motors, moisture in building, bad recent storms, etc.
- Use a PDA or laptop for data entry. Use paper for backup, if necessary
- Don’t rely on memory. Always take the time to enter data when making the scan list or recording exceptional temperatures
- Start an “accumulated images” file on the computer and save every image, both thermal and visual, to it. This is a backup and is very valuable
- Get a good visual camera and use it instead of the camera on the radiometer. Use a high megapixel setting. Yes, it’s extra work, but worth it for the better detail
- Make sure all batteries needed for the job are fully charged
Electrical Scanning: Tips and Tricks
- Be a licensed electrician in the State you are working in before removing any covers
- Wear safety gear. Minimum (when not touching the equipment) is hard hat, safety glasses, ear protection (when required), and protective boots. Minimum (when removing covers) is mandated by NFPA 70E.
- Observe that all screws are in place before removing any covers, especially on the deadfronts. Otherwise, a slipped cover can cause injury or a tripped breaker. Both are BAD!
- Look for burnt wires visually. There may have been a problem in the past, but if there is no load at the time of scanning there will be no heat signature
- Form an exit strategy when entering an area in case of any problems
- Use all senses for any indications of problems. Smell the heat, hear the failing motor, see the arcing connection
- Remove all jewelry when working with electricity
- Do not reset any tripped breakers without communicating with customer. This means anything you may have found or have done
Electrical Scanning: Data Errors
Reflections
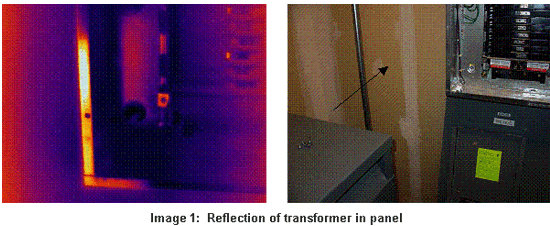
When scanning highly reflective, low emissivity targets such as bus bars, be sure to change angle to eliminate the heat source in the image. The reflection could be of your body heat, or some heat source in the area, like a transformer, a piece of machinery, or light bulbs. This will give incorrect data in the thermal image, and if not understood, it is a data error.
Mismatched and Wrong Size Fuses
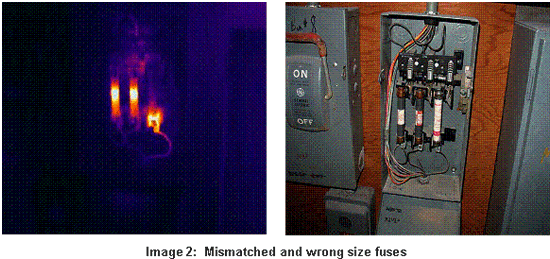
Sometimes in facility maintenance work, a piece of equipment will cause a fuse to fail, and it needs to be up and running right away. Maybe it continues to fail regularly and becomes a nuisance. Often, the repair personnel will rummage through a box of spare fuses and will put in a fuse of the same size amperage rating but of a different brand and fail setting. Also, when a piece of equipment fails regularly, due to a PROBLEM, the maintenance person will install a fuse of the next size up in amperage rating just to make the problem go away. I’m not saying this is right, just that it happens….a lot! Fuses installed this way have a heat signature. This is an error that can be found with thermography. If the fuse is too large, the fuse in question will read cool as opposed to the others in the group. If it is too small, then of course, it will read hotter than the group. If there is a different trip setting in the mismatched fuse, it will also have a different heat signature.
Trip Sensors
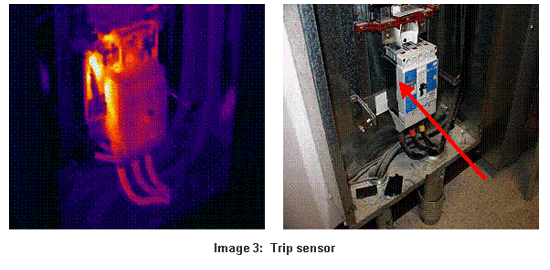
A trip sensor is an electrical device in a breaker that measures temperatures or amperages in the device, and when it reaches above a set limit, it trips the breaker. These devices put out a thermal signature. It is sometimes misdiagnosed as an internal failure in the breaker. It is a data error. GFCI breakers and receptacles also have the same signature.
Bad Photo Angle
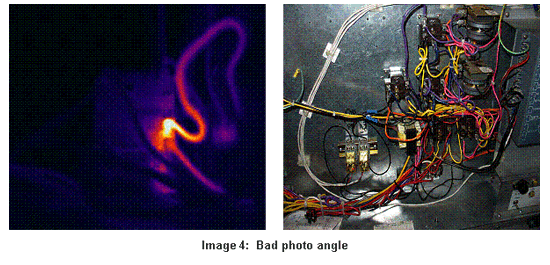
When taking thermal images, make sure there is enough view of the surrounding area to help find what component is being identified for attention. Also, always take the thermal image and visual image from the same angle and distance. This will help the customer return to the same place when repairs are done.
Outside Scanning: Weather
Weather affects all forms of infrared thermography. Whether it is roof scanning, electrical utility surveys, building energy loss or mechanical scans. A big issue in electrical scanning is the temperature effect on the components. If it is windy out and a fuse disconnect is opened, there is not too much time before the connection cools off, and accurate data of the actual temperature becomes elusive. Be sure to be ready in front of the component, camera running, in focus and settings set before opening the box to be sure you will gather the most accurate temperatures.
Utility scanning in the rain or snow is really just a washout. Unless the utility company wants to push on with the survey (which does happen), it is best to just wait for better conditions. Here in the Pacific Northwest, a common motto is “just wait 5 minutes, or 5 miles …. the weather will change”. This is so true, and here we may just wait awhile or travel to another substation.
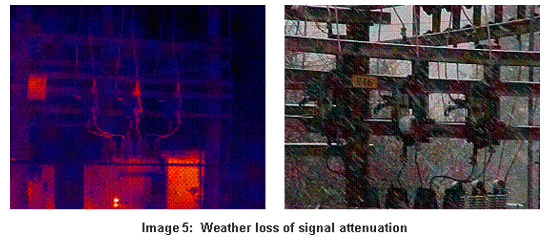
A couple of key points to utility scanning:
1. Always go into substations with an experienced assistant who works for the utility. Going in alone is just asking for trouble
2. Don’t wander around the yard. Stand where the experienced guy is standing
3. Do not point up at components. That makes you a good path to ground
4. Ask for a description of each component that is found to have exceptional temperature signatures. Every utility calls things by different names or different switch nomenclature
5. Wear appropriate safety gear
Roofs: Tips and Tricks
Equipment
- Use a short wave camera if at all possible
- Bring an assistant….always. His/her job is to make marks on the roof outlining areas of suspect moisture intrusion and, most importantly, watch out for the thermographer so no injuries or damage to the roof occur.
- Walk-on roof scanning needs a 10 foot ladder. This allows a better angle when looking for the wet spots. Some customers will request that a flat board be used under each foot of the ladder to reduce damage from the ladder. If they want this, say yes, then charge more for the service.
- Bring fluorescent red, orange or yellow marking paint. Plenty of it. Use a “dashed line” method for outlining areas. This minimizes paint use and roof impact.
- Bring flashlights. The head-mounted kind work well. A laser pointer is also a useful tool to have. Many cameras have laser pointers built in which are a useful tool. Be aware though, that the pointer doesn’t always get the assistant to the exact spot of interest that you see in the camera. It is usually best to “track” the assistant’s foot to the first corner of the area that shows wetness, then proceed to outline the area.
- Mark each area with a distinctive numbering system using spray paint. Spray the number just before taking the thermogram, and usually the image saved will contain the number thermally, because the aerosol in the can comes out cold. It’s all about temperature differential.
- Make sure all batteries are charged
Roof Scanning Data Errors
Solar Loading
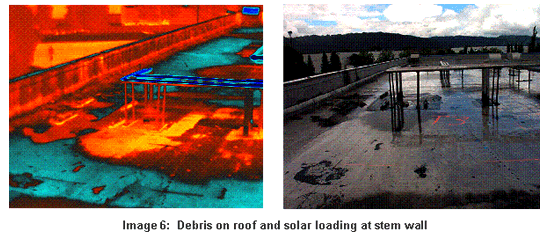
- As the sun goes down in the west, the flashing and stem wall on the east side of the building will retain its heat longer, and therefore show an elevated thermal signature. This is important, because some of the roof will be ready to scan for moisture while the east stem wall is still cooling off. Don’t mistake this for a problem area of roofing.
Debris on Roof
- Excess pine needles, leaves, and other debris usually accumulate in corners and around roof drains as the wind blows them around the roof. As the sun sets, this debris will retain heat longer than the rest of the roof and is a data error.
Interior Environment
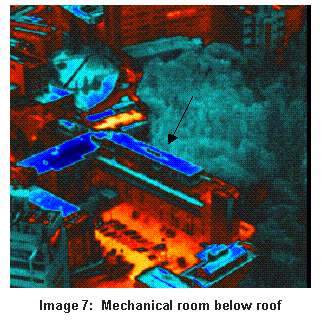
- Make sure you know what the environment under the roof decking is. There may be a boiler room or mechanical room that is producing heat and will show up as a heat signature.
Uneven Gravel on Roof
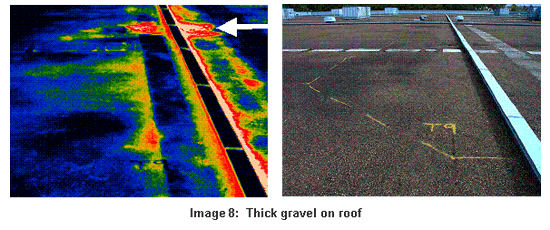
- Some roofs are ballasted with gravel. As time goes on after the initial installation, the gravel gets kicked around or pushed into piles to facilitate repairs. This material will retain its solar load well into the night, resulting in a heat signature. Once again, this is a data error.
Mechanical Equipment on Roof
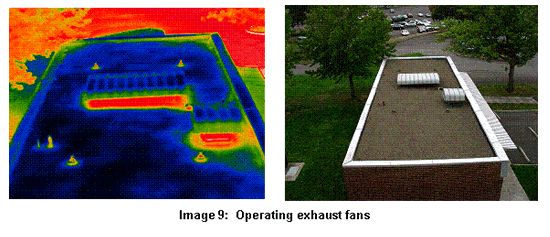
- Often, there is mechanical equipment on the roof you are examining. If it is of a type that pushes air from the interior of the building, like an exhaust fan or a rooftop HVAC unit, the air that is exhausted will usually be warmer than the outside environment, thus creating a heat signature on the roof. This is a data error.
Conclusion
It’s been said at many infrared thermography training classes that it is important to eliminate all of the bad data that is gathered when taking an infrared image to get to what good information is available. Infrared thermography is a great tool for finding hidden problems in electrical equipment and roof structures. You just have to know what to look for and what to ignore. Hopefully, this presentation will illustrate some of the pitfalls of getting to the “Right Stuff”.
Advertisement


