James Brady
Level III Certified Infrared Thermographer
Brady Infrared Inspections Inc.
935 Pine Castle CourtStuart, FL 34996Ph: 772-288-9884www.bradyinfrared.com
Abstract
Locating the source of water leaks in buildings constructed with non-absorbent materials, such as glass, pre-cast concrete panels, and stone facades can be expensive with little to no progress to show for the investment. Intruding water travels quickly through these types of buildings and leaves behind a trail of damage without clues of its entry point. Conventional infrared surveys that look for entrained moisture in the exterior layer of a building envelope often yield inconclusive results, leaving the building owner to contemplate the next step.
This presentation highlights a recent infrared inspection of a building that was experiencing the exact symptoms of water intrusion mentioned above. By utilizing the building’s HVAC system combined with an interior and exterior infrared survey of the building envelope, the origin of water intrusion was accurately located on the exterior of the building. The inspection also provided insight to the materials used for construction and the overall performance of the building.
Introduction
Water intrusion is one of the most common and destructive problems that affect buildings. Older buildings suffer from architectural designs that sought beauty over function, while newer buildings often fall prey to inferior flashing details focused on sealing out water and air infiltration.
History has shown that infrared technology works extremely well to locate trapped water in absorbent exterior building materials such as stucco, Exterior Finish Insulated System (EIFS), brick, and concrete mason units (CMU). Under the right conditions, trapped moisture can be detected within these materials. However, infrared as a moisture detection tool is limited on construction products like glass, metal, pre-cast concrete panels, and polished stone because of their non-absorbent properties. Most often, water passes quickly these materials and enters the building. The interior damage observed can be several feet from where the water has entered, but complex wall construction often prohibits tracking down the source of the leak. A visual inspection to look for water staining on the interior side of the building often times provides only a “best guess” to where water is entering.
This study will show that by manipulating building pressures using the HVAC system combined with an infrared survey of the building envelop can accurately located leak sites on the exterior surface of non-absorbent materials.
General Comments on Building Pressures
The mass balance of air volume that is entering a building versus the amount of air volume leaving the building will dictate a building’s pressure. If more air is entering a building than leaving, the building will have a positive outward “pushing” pressure. If more air volume is leaving a building then entering, the building will have a negative inward “pulling” pressure. If entering air volume equals exiting air volume, the building will have no preference either positive or negative, a condition referred to as neutral.
The mechanism for bringing outside air into a building is facilitated by the make-up air supply of the HVAC. This is a prescribed amount of fresh air that is introduced and mixed with re-circulating air of the HVAC system to properly maintain conditioned air space.
The means by which air leaves a building is through roof top fans that exhaust restrooms, kitchens and other places needing large exchanges of air. Other places include elevator shafts and chase-ways that run the entire length of a building. The latter duct systems are usually located on the roof and are controlled by dampers.
It should be stated that a building under a neutral pressure will naturally have a slight negative pressure on lower floors and progress to a slight positive pressure on higher floors. The intensity of this stacking phenomenon is affected by height and temperature. At some mid-floor level in the building there will be a zone of neutral pressure. By adjusting a building’s HVAC system, the natural affects of stacking can be overcome, placing the entire building into a state of negative or positive pressure.
I am by no means an expert in HVAC systems; however, I did seek out someone who is to assist me on this project. I would suggest the same for anyone aspiring to conduct an inspection like this, but lacking a strong background in commercial HVAC systems and mass air balancing of buildings.
Project Background
Recently, I conducted an infrared survey on an office building constructed in the mid 1980’s that was experiencing numerous water leaks; most noticed around window frames. Water usually entered the building on the facing side of rain storms. For example, a north to south traveling rain storm would produce leaks on the north facing side of the building and nowhere else. The building has leaks throughout; it just depends upon the tracking of any given storm that dictates which leaks flare up. Over the years attempts were made to locate and repair suspected flashing details to stop water intrusion. Limited success was had, and leaks continued to plague the building despite the best efforts invested.
Building Construction and General Observations
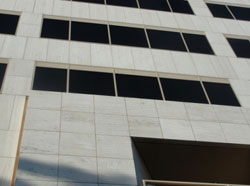
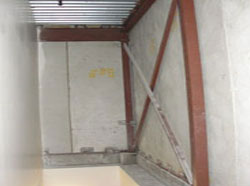
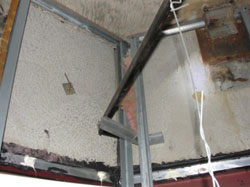
The building is multi-story with alternating levels of glass windows and solid walls (Figure 1). The windows begin approximately two feet above the floor and end just below the drop ceiling per floor. The solid sections of walls are pre-cast concrete panels tack-welded to the building frame and to each other with foam backer rods at panel seams (Figure 2). The exterior side of the concrete panels has limestone tiles attached. As built diagrams of the wall construction detail show no water plane between the concrete panels and tile, just a direct attachment. The interior sides of the concrete panels have foil-back insulation and acoustic ceiling tiles pressed against them for insulating value. The interface between the concrete panels and metal window frames is sealed with black adhesive caulk (Figure 3).
 |
 |
 |
|
Figure 1(left): Photo of exterior walls showing alternating windows and pre-cast panels with attached limestone tiles. Figure 2 (middle): Interior view of pre-cast concrete panel showing welded attachments plates and vertical seams filled with foam backer rods. Figure 3 (right): Interior side of pre-cast concrete panel viewed from the plenum space of the fifth floor. Black adhesive caulk was used to seal the connection at the window frame. Also shown are metal tabs used to weld the panel to the concrete ceiling and metal framework of the building. From this photo, it is apparent that water could enter and travel along various pathways, making it very difficult to track down the exact entry point. |
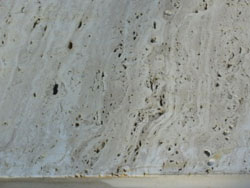
The limestone tiles are polished in some places and very rough and porous in others. Deep cavities are present that appear to propagate through the entire thickness of the tile (Figure 4). The caulk between wall tiles and window frames is very narrow in places, and as such does not provide a strong adhesion to either surface (Figure 5). Open gaps are present in several places.
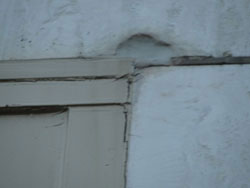
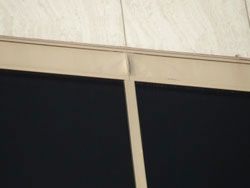
The building’s window frames show some surface rust and slight bulging at panel seams (Figure 6).
 |
 |
 |
|
Figure 4 (left): Close-up view of an exterior building tile showing alternating layers of smooth and rough limestone. Some of the dark cavities are deep and may penetrate the entire thickness of the tile. Figure 5 (middle): Window frame showing rust and deterioration from water intrusion. Figure 6 (right): Caulk around window frame showing signs of shrinkage and cracking.
|
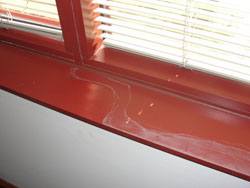
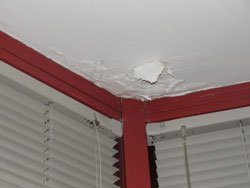
The building’s interior is typical office space construction; metal studs filled with fiberglass batt insulation and covered by drywall. Evidence of water intrusion is evident in several places; water stained window sills, and damaged dry wall and ceilings on mid-story office space (Figures 7 and 8).
 |
 |
|
Figure 7 (left): Water stains on window sill. Figure 8 (right): Damaged ceiling on a mid-level floor of the building.
|
Conducting the Inspection
HVAC System
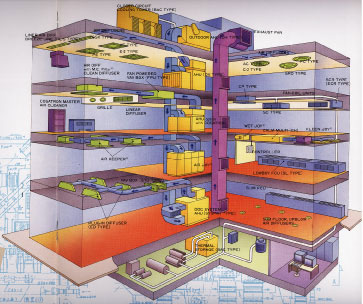
The building has a central outside air system that provides fresh make up air to all floors via a trunk line from the penthouse mechanical room to a mechanical room on each floor. The HVAC is a pressure dependent duct system with one air handler per floor and fan powered VAV (variable air volume) with reheat throughout the building, similar to the image below in Figure 9.
 |
|
Figure 9: Schematic of central outside air system HVAC system, (image courtesy of John Cannamela, Level-III CIT, www.infraredsurvey.com).
|
Enviromental Conditions
The scan was conducted during evening hours. The exterior walls were dry. The last rain event occurred more than a week prior to the inspection. No indications of moisture were observed on the exterior panels or in the interior space of the building.
The building’s operational pressure prior to pressurization was slight negative to neutral (0 to – .01 inches of water) on the windward side of the building, and neutral to slight positive (0 to + .01 inches of water) on the leeward side.
The outside temperature at the start of the scan was 58 degrees F. At the conclusion, the outside temperature had dropped to 55 degrees F. Interior building temperatures were maintained between 71 and 74 degrees F for all floors during the inspection.
Building Preparation
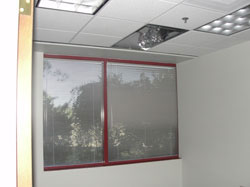
Ceiling tiles and ceiling tile / fiberglass insulation assembly were pulled away from the interior side of pre-cast panels in each office space on each floor to assure proper air flow to the back side of the pre-cast concrete panels (Figure 10).
The fresh air make-up was turned off as the HVAC system was operated in heat mode to warm the interior space of the building. During this time the building was under a slight negative pressure and thermal images were taken from the interior of the building.
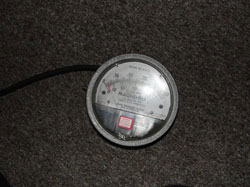
Once interior temperatures climbed above 70-degrees F, the exhaust system was placed off line while the fresh air make-up system was operating to provide positive pressure to atmosphere. The building’s HVAC system was operated in heat mode. A slight positive above neutral pressure (+.02 inches of water) was maintained during the inspection (Figure 11). It should be noted that this was the strongest positive pressure attainable for this building given the HAVAC adjustments available.
 |
 |
|
Figure 10 (right): Typical office space showing two ceiling tiles removed to promote proper air flow throughout building. Figure 11 (left): A magnehelic was used to monitor building pressures during the inspection. Shown here, the building is just slightly on the positive side of neutral at +.02 inches of water. |
Camera/Lenses
A long-wave, FLIR SC 65 thermal imaging camera mounted on a portable tripod was used to scan the interior and exterior walls of the building. The camera was set to an emissivity of 1.00. Trees and other landscaping made it necessary to either get very close or far away from the building to capture certain wall sections. Wide-angle and telephoto lenses were used to overcome these challenges.
The exterior of the building was systematically imaged starting at one side and making a complete circle around the entire building. Every wall section had baseline images captured and saved. Post-processing of images made it possible to stitch together and form panoramic thermograms.
Inspection Findings
Interior Inspection
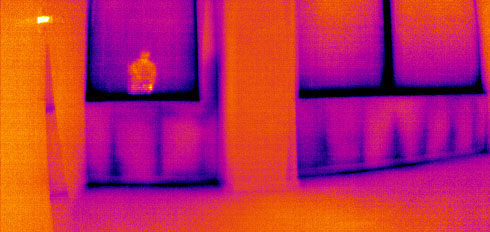
During the warming period of the interior space, the building was under a slight negative pressure. This provided an excellent opportunity to scan various interior walls. Several exterior walls showed cold anomalies, indicative of air leakage into the building.
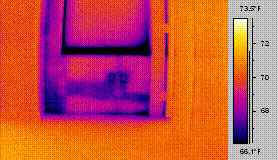
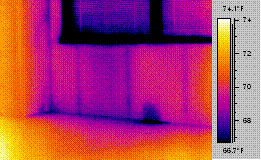
Cold anomalies occurred around window frames, main building columns, baseboards and other structural attachment features in the wall construction. Also observed was thermal bridging of steel wall studs in contact with the pre-cast concrete panels. Figures 12, 13, and 14 show a few examples of what was observed.
In general, this exercise showed that the building had numerous air-barrier breaches.
 |
 |
|
Figure 12: Thermogram of an interior office space showing cold air leaking around main column and baseboard. Also note thermal bridging on steel wall studs.
|
 |
 |
|
Figure 13 (left): Cold air leaking around metal panel fasteners on 4th floor. Figure 14 (right): Cold air leaking into building along baseboard and below window.
|
Exterior Inspection
Several warm anomalies were detected at various sections of the exterior walls. Three general types of anomalies were found and include:
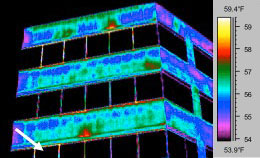
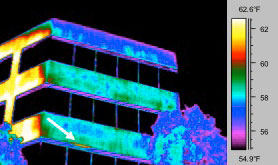
-Vertical anomalies that parallel window frame and limestone tile caulk seams (Figure 15)
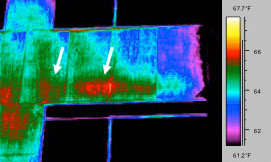
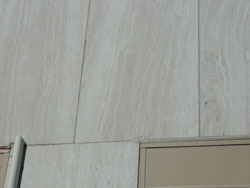
– Horizontal anomalies that parallel window frame (Figure 16)
-Wide, diffused anomalies that correlate to rough and porous bedding layers on limestone tiles (Figure 17).
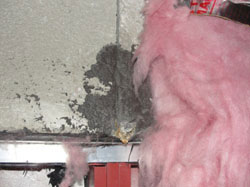
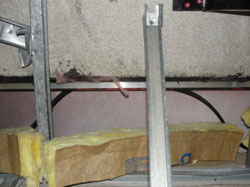
Following the thermal inspection, several areas where anomalies were detected were investigated from the interior side of the building to confirm and verify their significance. These findings are presented as paired photographs with the thermograms below.
 |
 |
|
Figure15: Thermal image, at left, showing air leakage around a vertical caulk seam; Photo right shows old repair and evidence of water leakage along pre-cast concrete panel on inside of building |
 |
 |
|
Figure 16: Thermal image at left, showing air leakage around window frames; and photo at right, showing a displaced window seal gasket. |
 |
 |
|
Figure17: A close-up thermal image showing a warm thermal pattern of escaping warm air that mimics the bedding layers in the limestone. These areas on the tile may be contributing to water infiltration.
|
The anomalies observed on the faces of the limestone tiles, as shown in Figure 17, may be a function of:
– The porous nature of the tiles in that area allowing air to escape (and conversely allowing some water to enter)
– The attachment between the limestone tile and pre-cast concrete panels may not be uniform, and as such allows warm air to travel between the two materials where voids are present.
Discussion of Findings
The infrared inspection on both the interior and exterior of the building shows that the building has numerous locations of air leakage: caulk seams, window frame seals, and possibly the natural layering characteristic of the limestone itself. It has been confirmed that these areas coincide closely with locations of water intrusion into the building.
There has been much study and emphasis on building air-barriers over the past decade. Research by the author has found that both rain barriers and air barriers are needed on buildings to control air and moisture intrusion. In some designs, these are discrete structures separated by a drainage plane. If the rain barrier is not totally impervious to moisture, the drainage barrier allows the infiltrating moisture to purge through the wall system via weep holes. In other designs the water barrier and air barrier can be one and the same.
Although not clearly defined in the wall construction under investigation, it is proposed that the wall system as a whole serves both as the rain barrier and air-barrier. The absence of weep holes or other drainage features in the exterior wall suggests that a drainage plane is absent, therefore, any water entering the wall system has no choice but to enter the building.
As noted, the building’s pressures were slight negative on the facing side of the gentle evening breeze and neutral to slight positive on the leeward side. Also noted was the fact that leaks mostly occur on the side of the building facing approaching rains and nowhere else. Wind washing during rain events may play a significant role to transport water into the buildings on walls experiencing localized negative pressures on the facing side of storms.
Conclusion
Tracing down water entry points on buildings with non-absorbent building materials limits the effectiveness of infrared technology to see trapped latent moisture. Flashing details between building materials and construction designs present a complex pathway of water migration, especially on multi-layer wall construction. The location of where water makes its presence known inside a building may be several feet away from where it is entering.
Using a building’s HVAC system to create a positive pressure combined with infrared technology is an excellent way to identify water entry points on buildings constructed of non-absorbent materials. This study has shown that infrared can be used very effectively to see escaping air from a building with water intrusion problems and correlate these areas to locations of interior water damage. Using inside air with a sufficient temperature difference from the outside air, defects in the exterior wall system are easily identified. In this case, defects in caulk joints as well and possible naturally occurring features in the building material used for the rain barrier are contributing to water penetrating the building’s exterior layer. Also discovered was an air-barrier that has several points of air leakage. This combined with an inferior rain barrier is allowing wind driven rains to enter the building.
References and Technical Assistance
Cannamela, John, www.infraredsurvey.com: Mr. Cannamela assisted Brady Infrared on fieldwork and provided oversight and guidance related to pressurizing the building.
Ganuli, U., 2001, Wind and Air Pressure on the Building Envelope: National Research Council Canada; published as part of the technical documentation produced for Building Science Insight ’86, “An Air Barrier for the Building Envelope,” a series of seminars presented in major cities across Canada in 1986.
Lstiburek, J. 2006, Understanding Air Barriers, Building Science Digest 104,
www.buildingscience.com
Straube, J., 2006, Rain Control in Buildings, Building Science Digest 103,
www.buildingscience.com


