Article Archive
Diagnosis and Repair of Failing In-floor Electric Radiant Heating Lines
Lee Durston
BS, CBST, Forensic Building Scientist
BCRA
2106 Pacific Avenue, Suite 300
Tacoma, WA 98402
Ph: 253-627-4367
Abstract
With radiant in-floor heating becoming more popular, both in private residential and multi-family residential, the number of failures experienced in these systems is increasing proportionally. Infrared is now being used to locate failure points and assist in the QA/QC process on many construction sites. By utilizing infrared, one can save both time and money and play an integral part in claim subrogation as a failure of this type is mitigated. This presentation will introduce tips and tricks used in diagnosis and repair of electric radiant in-floor heating systems through multiple case studies in which infrared proved to be a valuable resource.
Introduction
In-floor radiant heating has become a very popular means of heating a structure, including the residential, multi-family, and commercial markets of construction. This recent surge can be contributed to the claims that radiant heating is more energy efficient. While this claim can be true in some instances, many times there will be no realized cost savings and in some cases energy usage can soar. In new construction, proper design factors must be taken into account with a radiant floor system, including floor insulation, construction type, boiler efficiency (hydronic), etc. Proper assessment of a potential retrofit floor system should also be performed by a third party who is not selling a product. It pays to have a thorough assessment performed on a case by case basis to see if radiant in-floor heating is energy efficient and thus cost effective.
In addition to compatibility factors, there is the rare chance of installation issues that render an in-floor system useless when construction is complete. Many times, situations like this result in a complete dismantling of the floor to expose the system in question. Luckily, failure rates involving in-floor heating systems are very low, but when a failure does occur, it can interrupt construction schedules, create a claim and related litigation, and at best, be frustrating and quite costly.
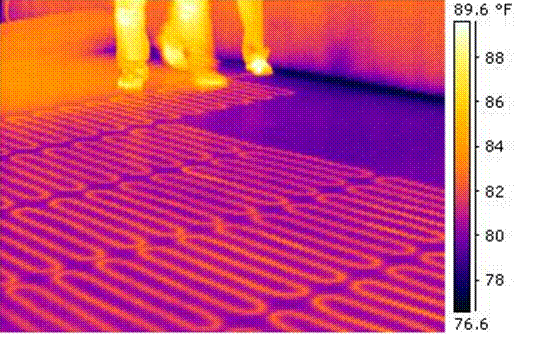
Over the past decade, infrared building science has grown dramatically. It is more and more common to see a hand held infrared camera being walked around a facility, inspecting electrical panels or searching for water intrusion. It was only a matter of time before a thermographer turned a camera towards a radiant floor heating system and saw the brilliance of a floor system working properly. With such a vivid image, it is very easy to see the intricate design of the system and it is just as easy to see where the system may not be working properly. While both hydronic and electrical in-floor heating systems can benefit from infrared inspections, this paper will focus specifically on electric in-floor radiant heating systems. As electrical inspections can be dangerous, BCRA recommends a licensed electrician be present on any work of this type.
Discussion
Anatomy of Heating Lines
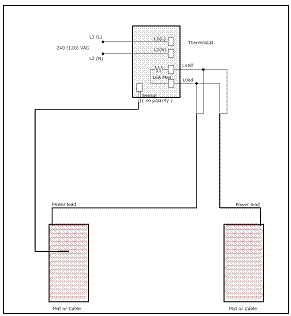
The anatomy of an electrical in-floor heating system is very simple. Starting with the power source, electricity is run through a control panel or thermostat to a radiant heating cable which houses conductor line(s), a ground line, insulation, and a heat shield. Both single conductor lines and twin conductor lines exist. These heating lines come in basic lines that you space yourself or in pre-spaced mats. As resistance is built in the conductor wire it produces heat through conduction into the surrounding materials. As these flooring materials (concrete, tile, wood, etc.) heat up, the living space above is warmed through radiation. The system can be controlled at an on-wall thermal sensor, in-floor thermal sensor, or both.
|
Wiring Diagram |
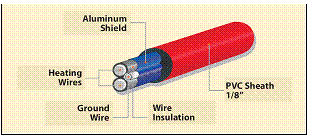 Illustration of typical heating line components |
As with all elements of construction there are possibilities for failure. Failures can be caused from factory-built deficiencies to mistreatment of the product in the field. As we have found, the nature of the conductor wire, being small enough to create a resistance load, also makes it susceptible to breaks and cuts that can interrupt the circuit path. Once this circuit path is broken, partial heating or no heating will occur. To further complicate the issue, thermostats now carry a safety package, a Ground Fault Circuit Interrupter (GFCI), that will break the circuit if a fluctuation of greater than three milli-amps is experienced. Because of the fragile nature of these systems the manufacturers now recommend verifying continuity of the lines at multiple points during installation.
When Failures Occur
Inevitably, for one reason or another, the floor and interior finishes are completed and the floor will not pass the continuity test, or will trip the GFCI, rendering the mat useless. To avoid excavating the complete floor surface and creating major construction interruptions, the use of infrared thermography has been incorporated into failure investigations. Infrared allows for a quick, precise, and easy to understand pictorial report that documents the precise area of failure points along the heating wire. The trick is to get the area of failure, or fault, to heat up and display itself.
The first step to any investigation is to perform an adequate review of the historical data. Design documents, manufacturers product information, occupant testimony, etc., should all be taken into account. Also, have your electrician perform a brief inspection to verify the electrical work leading to the thermostat and mat is installed properly. The next step is to observe the operation of the mat in failure mode. In some instances, the mat will heat to a point and then trip the GFCI and leave a heat signature on the floor detailing the fault point.
In most instances it is not this easy. The next step would then be to turn the power source off at the breaker panel, then remove the thermostat from the wall and the conducting wires from the thermostat. Continuity should be evaluated between conducting wires and between each conducting wire and the ground wire individually. Some manufacturers build wires with an aluminum shield wrap and in some instances continuity may appear between phase and shield. Results from this continuity check will give a good representation of what type of failure has occurred. For example, if there is no continuity between conductor wires, but there is continuity between the conductor wire and the ground wire, then most likely you have a severed phase wire. If continuity exists between the phase wires, then perhaps there is a problem with the thermostat and not the heating wire at all.
Assuming you have established continuity between any two legs, single out those two legs and connect your power source leads directly to them. With the floor free of obstacles and debris, turn the power on at the breaker panel and observe with both digital and IR video. In most instances the fault area will appear as a small area of intense heat as an arc is being created at a damaged portion of wire. Other results may include a functional heating wire reaching a point of failure with the remainder of the wire appearing to function at half strength. Again, the portion of damaged wire is easy to identify.
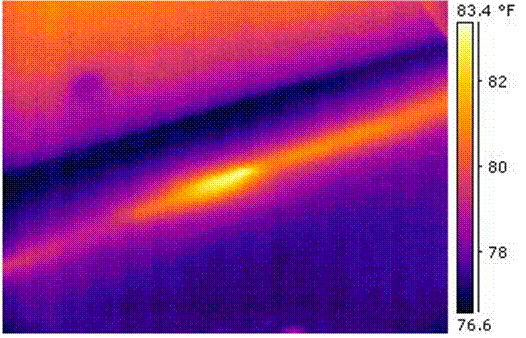
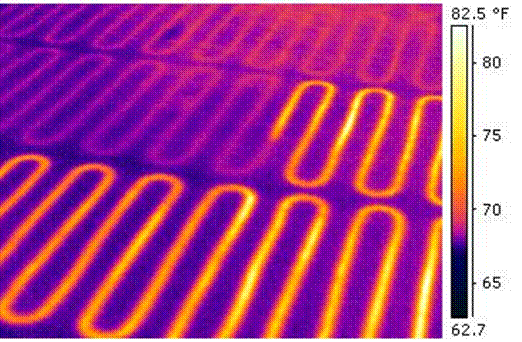
There may be some instances where continuity is not detected in any combination of wires and or shield. This would be representative of a larger amount of damage where the radiant heating wires are completely severed. If this is the case, you must work to create a large enough arc to bridge the gap. A qualified electrician will be able to provide a transformer that can create an arc potential of this type. For many of the examples listed in this paper, a 20,000 volt transformer was harvested from an oil furnace and used to create the arc potential. With the addition of this as the power source, the wires can arc and even re-weld themselves. The fault will again display itself along with the possibility of a small arc “pop” if the radiant heating line has been penetrated by a fastener in the floor.
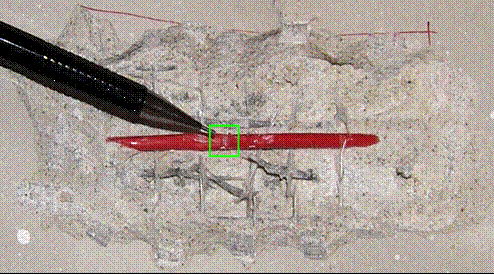
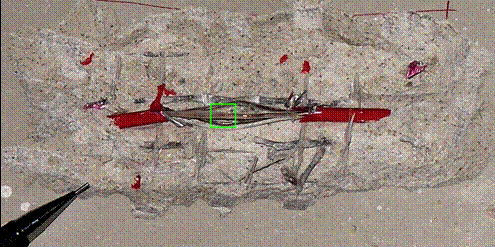
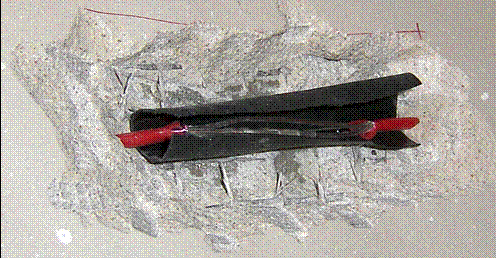
Once you have identified the fault, carefully mark the area on the floor and turn the power off at the breaker panel. Let the floor cool and repeat the exercise confirming the location of the fault. Upon confirmation, excavate the subfloor material for visual inspection of the wire. You will be looking for a level of damage that corresponds with the prior testing results. Be careful not to damage the wire further with excavation tactics. Once the wire is uncovered there may be only a small cut in the insulation or there may be a large burned area. Further exploration into the internal wire components will reveal the exact mode of failure. Once this area is clearly defined, have the electrician clean up the wires involved and provide in-line splices where needed. Once this is complete, all wires can be closed up with wiring shrink wrap. Many manufactures provide all the materials needed in a “splice kit”, usually sold for joining mats or extension wires.
|
Excavation and investigation of wire |
|
Diagnosis of problematic wire |
|
Repaired wire ready for shrink wrap |
The radiant lines should be retested once the repair is complete. This retest should happen without the thermostat in place and then with it in place. Once verification of the fully operational system is completed, the subfloor should be repaired.
Case Studies
Case #1
Condo Unit #104
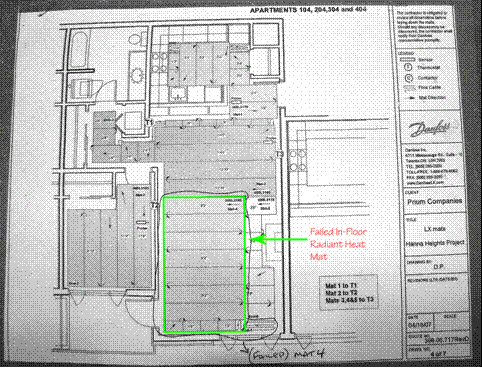
BCRA conducted its investigation during one site visit. All efforts were made not to disrupt the construction progress. BCRA was given access to the facilities by the site superintendent. All finished flooring material above the Ardex subfloor, in which the radiant heating is encased, was removed or pulled back prior to our arrival. Visual inspection showed the in-floor radiant heating system to be seemingly properly installed, though the coils were placed shallow enough in several places to be visible at the surface of the concrete. Additionally, the location of the lead wire to the failing mat was clearly visible at the concrete surface along the east living room wall.
|
Floor heating design layout |
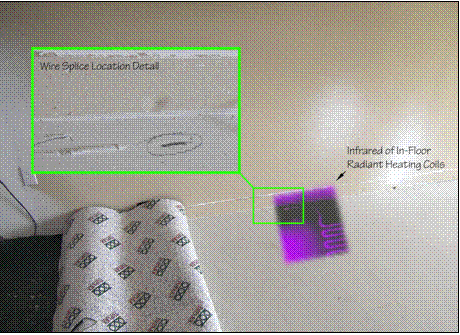
Infrared inspection revealed no aberration in heat radiance along the mat except where it could be attributed to a difference in coil depth. When hard wired (disabling automatic shut-off) to the breaker, the mat stayed on and infrared showed it to be functioning correctly.
|
Identified thermal anomaly |
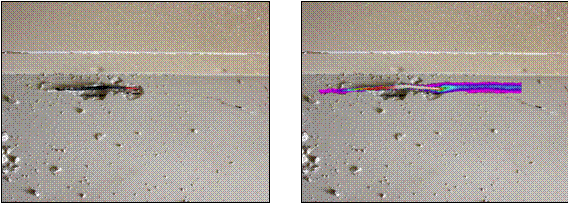
Although the mat as a whole seemed to be performing properly, infrared analysis revealed the factory splice joining the lead to the mat radiated greater amounts of heat than the subsequent coils. At the request of the site superintendent, the wire splice was chipped out of the concrete for visual inspection and clearer infrared analysis. The uncovered section of wire showed deformation in the same location as the highest heat radiation, thus demonstrating that the splice was the location of the thermal anomaly.
|
|
|
| Excavated wire | With infrared overlay |
Infrared analysis indicated that mat #4 was installed properly and the coils were functioning as intended, but that the factory-made wire splice to the power lead, which occurs just before the radiant coils, radiated an unusual amount of heat. In electrical applications, unusually high radiance is a sign of fault or shorting and should be inspected for proper insulation and connection. It is BCRA’s opinion that the apparent fault of mat #4 is in the wire splice, rather than the radiant heat coils.
Case #2
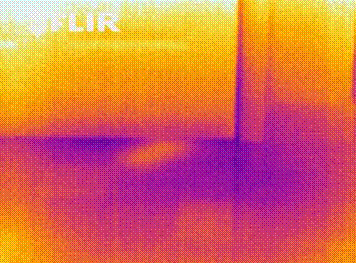
BCRA conducted its investigation during three site visits. All efforts were made to avoid disrupting the normal operation of the residence. BCRA was given access to the facilities by the residence owner and contractor. The heat line was first connected directly to the power source to by-pass the thermostat GFCI. After doing so, no heating was visible. Next, continuity was tested on each of the lines and from each heating leg to ground. This revealed no continuity. A transformer was added to the power source to produce an arc and reveal a failure point. A small area by the main door did exhibit a thermal anomaly and proved to be a likely area in which a failure point could have occurred. If excavation of the radiant heat line occurs, BCRA recommends examination for failure starting at this point near the entry door. If a failure point is located, a repair splice can be made. Once this repair is made, the system should be re-tested for any other failures. Included in this brief report are photographs and thermograms which will help to locate this thermal anomaly.
|
Thermal anomaly in area of bathroom entry door |
|
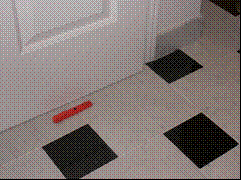
Visible light photograph |
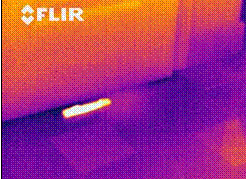
Infrared thermogram |
Excavation and repair of this line was completed without BCRA present and the floor is now functioning properly.
Case #3
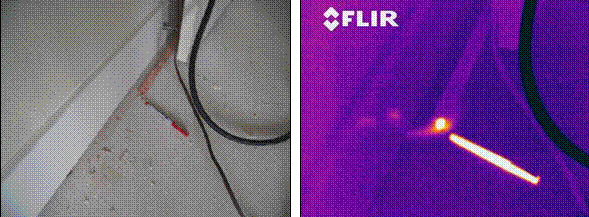
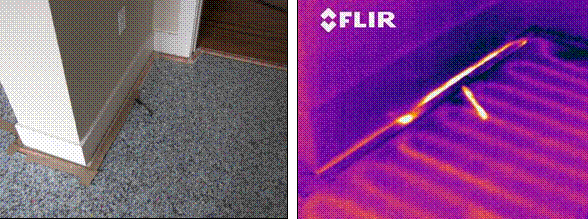
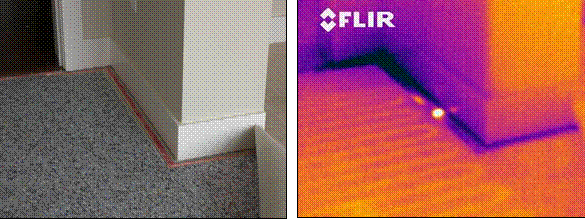
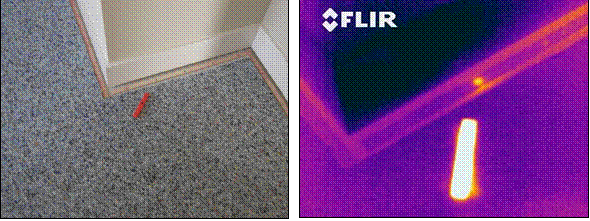
BCRA conducted its investigation during three site visits. All efforts were made not to disrupt the construction progress. BCRA was given access to the facilities by the site superintendent. Visual inspection revealed that in 16 units, at least one heating mat was not functioning. It was also quickly noted that the mats had been working prior to carpet installation. A quick tear away of the carpet and pad revealed that the carpet strips had been secured to the floor using nail fasteners. It was obvious the nails used to secure the carpet strips had been driven into the subfloor in the same location of the in-floor heating system. To demonstrate which fasteners had damaged the heating wire, BCRA directed the electrician on how to manipulate the circuit in order to provide for an adequate thermal signature at the point of failure(s). In many cases, the heating wires had been penetrated multiple times, and after each repair the next failure would present itself. Included below are a few of the noted failures.
|
Unit 305: Arc failure in bedroom |
|
Unit 101: Arc failure in bedroom |
|
Unit 105: Arc failure in bedroom |
|
Unit 106: Arc failure in bedroom |
Summary
While each case encountered will present its own unique set of problems and abnormalities, this paper can be used as a base to begin assessing failures involving electric in-floor radiant heat systems. With infrared assessment, this process can be quick, definitive, and cost effective. Additionally, the use of infrared produces an easy to understand pictorial report so all parties involved can see the problem at hand.
Acknowledgements
The author wishes to thank Ed Otto, Product Representative for Danfoss Radiant Heating Products, for the expertise shared on this subject matter.
About the Author
Mr. Durston is educated as a microbiologist and a civil engineer and is currently director of the Building Science Group at BCRA, a multi-discipline design firm based in Tacoma, WA. Investigations include expertise in the areas of building structure, building envelope, interior finishes, architectural design, and life safety. His investigation skills include invasive and non-invasive inspection techniques highlighted by a certification in building science thermography. Mr. Durston has had involvement in multiple construction defect litigation cases. His special approach utilizes his skills in science and engineering to define, analyze, and remediate problems or failures in the built environment.
Advertisement


