IRINFO Banner Image  


2009
January 5, 2009

Sponsored by:


Make a New Year’s Resolution for Safety

Tip written by: Infraspection Institute


With the New Year upon us, many of us will follow the tradition of resolving to change or better ourselves. With this Tip, we offer suggestions for making job safety a priority.

The New Year is symbolic for many reasons. For some, the New Year represents a fresh start or new beginning. For others, it provides an opportunity to rededicate one’s self to a set of goals or principles. The New Year provides a perfect opportunity for thermographers to take stock of workplace safety practices and procedures. In doing so, be sure to keep the following in mind:

• Review safety procedures to ensure that they are complete and current

• Ensure that safety training is up-to-date for all personnel including First Aid and CPR

• Physically inspect all Personal Protective Equipment to ensure it is in good condition

• Check calibration and/or replacement dates for all monitoring or test equipment

Lastly, resolve to make safety your number one priority each and every day. Safety is not a poster, a slogan, or a set of actions to be followed only when it is convenient. Rather, safety is way of life that affects not only you but those around you.

Thermographer safety is one of the many topics covered in the Level I Infraspection Institute Certified Infrared Thermographer® training course. For information on thermographer training including course locations and dates, visit us online at www.infraspection.com or call us at 609-239-4788.


Visit Infraspection Institute Web Site


January 12, 2009

Sponsored by:

II Logo


Frostbite & Hypothermia


“Jack Frost nipping at your nose.” These lyrics from a popular Christmas carol evoke romantic visions of winter; however, frostbite and hypothermia are dangerous medical conditions that can present serious safety hazards.

For many, the dead of winter is upon us. Thermographers working outdoors in cold climates can face serious safety challenges due to frostbite and hypothermia. Knowing the symptoms of these conditions and proper treatment is imperative for worker safety.

Frostbite is a severe reaction to cold exposure that can permanently damage its victims. A loss of feeling and a white or pale appearance in fingers, toes, or nose and ear lobes are symptoms of frostbite.

Hypothermia is a condition brought on when the body temperature drops to less than 90 degrees Fahrenheit. Symptoms of hypothermia include uncontrollable shivering, slow speech, memory lapses, frequent stumbling, drowsiness, and exhaustion.

If frostbite or hypothermia is suspected, begin warming the person slowly and seek immediate medical assistance. Warm the person's trunk first. Use your own body heat to help. Arms and legs should be warmed last because stimulation of the limbs can drive cold blood toward the heart and lead to heart failure. If the person is wet, put them in dry clothing and wrap their entire body in a blanket.

Never give a frostbite or hypothermia victim beverages containing caffeine or alcohol. Caffeine, a stimulant, can cause the heart to beat faster and hasten the effects the cold has on the body. Alcohol, a depressant, can slow the heart and also hasten the ill effects of cold body temperatures.


Visit Infraspection Institute Web Site

Top of Page

 
January 19, 2009

Sponsored by:

Logo


Cold Weather Clothing


Last week’s tip discussed the dangers of Frostbite and Hypothermia while working in cold temperatures. This week’s tip covers cold weather clothing.

Cold weather clothing is a matter of functionality not fashion. Clothing needs to be worn in layers in order to trap air which is warmed by the body. When selecting clothing, start with the innermost layer and work outward. The use of multiple layers will trap warm air while providing greater ease of movement. As you add layers, be sure to adjust the next layer’s size accordingly.

The first layer should be made of a synthetic material that will wick perspiration away from the body and maintain its insulating properties when damp. The second layer is your main insulator and should be a breathable material that maintains its insulating properties when wet. Synthetic fleeces or natural wool are good choices. The outermost layer should be breathable and both wind and water resistant.

Head and neck protection is a must since nearly 40% of body heat is lost here. Perspiration is the main enemy of feet. The best footwear will have sturdy outers, good treads and a removable felt liner. Buy extra liners and replace them every few hours. Liners can take a full day to fully dry out so buy enough to get through a typical workday.

Mittens are the warmest but present problems in grasping tools etc. I have found that a heavy duty welder’s glove with cotton or wool gloves lining them provide good warmth and mobility. Buy enough liners to get you through the day. One final note, the body needs fuel to produce heat. Your calorie needs increase in cold weather and require regular replenishment with good wholesome foods.

Visit Infraspection Institute Web Site

Logo

 
January 26, 2009

Sponsored by:


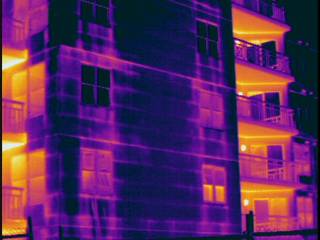
Detecting Delamination of Stucco


With aging infrastructure becoming an increasing concern in many communities, more attention is being focused on the maintenance of building facades. Under the right conditions, thermal imaging can detect evidence of delaminated stucco or concrete finishes on the exterior of masonry buildings.

Over time, buildings that utilize concrete stucco for exterior finishes are subject to failure. One of these failures involves the stucco delaminating from its substrate. Delaminated stucco is a serious safety concern as it can cause serious injury to pedestrians should it fall from any significant height.

When concrete stucco delaminates from its substrate, an air pocket is formed between the stucco finish and the substrate. Because this air pocket acts as an insulator, it will change the thermal capacity and/or thermal conductivity in the area of the delamination. Under the correct weather conditions, thermal imaging can detect evidence of delaminated areas.

In order to detect evidence of delaminated areas using thermal imaging, a temperature differential must be present. Typically, infrared inspections of concrete stucco are performed during evening hours following a sunny day. As an alternative, infrared inspections may also be performed during midday under solar loading conditions. Thermal patterns associated with delaminated stucco will generally be amorphous in shape and will typically appear as cold spots during post-sunset inspections or as hot spots during midday inspections.

When performing infrared inspections of concrete stucco finishes, keep the following in mind:

  • Subject surfaces should be clean and dry
  • Wall surfaces must be heated uniformly. Areas in shadow or shade may not produce accurate data
  • IR inspections are qualitative in nature. Compare similar areas to each other noting any inexplicable temperature differences

Once the infrared inspection has been completed, all thermal anomalies should be investigated for cause and appropriate corrective measures taken.

Visit Infraspection Institute Web Site


February 3, 2009

Sponsored by:


Winter Driving Tips

Tip written by: Infraspection Institute


Despite unseasonably warm weather this winter, severe weather and its attendant challenges are likely to occur before this season ends. With this Tip, we offer some advice for driving in winter conditions.

Prepare Your Vehicle

  • Make sure brakes, windshield wipers, defroster, heater and exhaust system are in top condition
  • Check radiator for coolant level and adequate antifreeze protection. Fill windshield washer reservoir with freeze-resistant fluid
  • Check tires for proper inflation and tread condition
  • Carry an ice scraper, brush, and a shovel
  • Maintain a full gas tank in case of traffic delays or should you need to turn back due to conditions
  • Keep snow chains handy and in good condition

Driving Tips

  • Allow enough time. Trips take longer during stormy/icy conditions
  • Keep windshield and windows clear
  • Maintain a safe distance from other vehicles; snow and ice make stopping distances much longer
  • Remember to avoid sudden stops and quick direction changes
  • Watch for slippery spots. Bridge decks and shady spots can be icy when other areas are not
  • Be more observant. Visibility is often limited in winter by weather conditions. Slow down and watch out for stopped vehicles and emergency equipment

Lastly, be certain to wear your seat belt. Consult your local weather forecast before you set out and consider postponing your trip if extreme weather is predicted.


Visit Infraspection Institute Web Site


February 10, 2009

Sponsored by:


Easier Than A, B, C

Tip written by: Infraspection Institute


When performing infrared inspections of electrical distribution systems, many people identify the individual phases of polyphase circuits as A, B, and C; others frequently use 1, 2, and 3.

Confusion can arise with alphabetical or numerical labels particularly when switchgear enclosures are inspected from different perspectives e.g. front versus rear. Further confusion can occur when phase rotation has been modified or changed or, in some cases, mislabelled.

Reference errors can be avoided by using terms that cannot be confused such as Left, Middle, Right OR Upper, Middle, Lower. When using such terms, one should always reference where the image was taken from. For outside power lines references such as Street, Center, and Field may be used to identify phases without confusion.

Using the above simple terms can make your reports easier to understand and help to eliminate confusion when repairs are performed.

Infrared inspection of electrical distribution systems is one of the many applications covered in the Infraspection Institute Level I Certified Infrared Thermographer® training course. For course schedules or to obtain a copy of the Standard for Infrared Inspection of Electrical Systems and Rotating Equipment, visit Infraspection Institute online at www.infraspection.com or call us at 609-239-4788.


Visit Infraspection Institute Web Site


February 16, 2009

Sponsored by:


Spare Parts to the Rescue

Tip written by: Infraspection Institute


Seasoned professionals know the value of spare parts when it comes to facility maintenance. The principle of always being prepared can be successfully applied to an infrared inspection program as well.

Like any electrical or mechanical device, thermal imaging systems are subject to wear and tear. Having user-replaceable spare parts on hand can help prevent unscheduled downtime for your infrared inspection program. Building a spare parts inventory is easy if you follow a few simple steps:

1. Examine your equipment for parts that are subject to physical wear such as eyepieces, switch covers or hand/neck straps.

2. Identify which parts are fragile and are most likely to break such as viewfinders or external monitors.

3. Determine which items are critical to operation such as power/video cables, batteries, fuses, screws and external hardware.

4. Inventory items which are easily misplaced such as lens caps and flash cards.

5. Purchase necessary items as soon as possible to ensure availability of specialty or custom parts. For critical items, be sure to purchase extras.

6. Replace spare parts when utilized to maintain inventory.

After building your spare parts inventory, keep mission-critical components in a safe place or with your imager so that you will have them when needed.

Infrared imager operation and maintenance are two of the many applications covered in the Infraspection Institute Level I Certified Infrared Thermographer® training course. For more information or to register for a course visit us online at www.infraspection.com or call us at 609-239-4788.


Visit Infraspection Institute Web Site


February 23, 2009

Sponsored by:


Frequency of IR Roof Inspections

Tip written by: Infraspection Institute


The benefits of thermography for condition assessment of insulated roofs are well documented. Performed on a regular basis, infrared thermography can help to extend the overall life of a roofing system when utilized as part of a preventive maintenance program.

As a building component, roofing systems tend to be out-of-sight and out-of-mind. Despite the critical role they play in keeping a facility dry, many roofs garner little attention until they begin to leak. In order to minimize damage, it is imperative that roof leaks be detected and repaired at an early stage.

Many roofs can gain significant quantities of moisture in a very short period of time. In the case of retrofitted roof systems, whole roof sections can become saturated in a matter of weeks while leaking little or no water into the occupied spaces. By the time a roof leak is noticed within the building, replacement may be the only option available.

For best results, insulated roofs should be thermographically inspected at least twice per year (e.g. Spring and Autumn) in accordance with published standards and guidelines. Semi-annual infrared inspections can help to identify new areas of moisture damage and help to ensure that recent repairs are performing in a watertight manner. Infrared findings should be correlated with a thorough visual inspection and other pertinent data to formulate an effective roof maintenance strategy.

For information on infrared training or certification or to obtain a copy of the Guideline for Performing Infrared Inspections of Building Envelopes and Insulated Roofs, contact Infraspection Institute at 609-239-4788.


Visit Infraspection Institute Web Site


March 3, 2009

Sponsored by:


Selecting an IR Training Firm

Tip written by: Infraspection Institute


As thermography has gained in popularity, the demand for training services has also increased. Since operator training can have a profound effect on the success of an infrared program, obtaining quality training is of paramount importance.

At present, there are several firms that offer infrared training and certification. While nearly all infrared training firms refer to their training courses by level (1, 2, or 3), there are no standards which dictate the content of any offered course. As a result, training courses can vary widely between firms.

When choosing an infrared training firm, be certain to:

  • Examine course curriculum to ensure that it meets one’s needs
  • Ensure that course will be germane to all infrared imagers, regardless of age
  • Ascertain if Certification is included with course, its expiration date, and renewal fees
  • Determine number of years training firm has been in business - not the cumulative total of staff years
  • Insist that instructors be practicing thermographers with documentable field experience in their area of instruction

Lastly, beware of claims that training is “vendor neutral”. It is impossible for training firms to sell infrared equipment or train for equipment manufacturers without being biased. Firms who train for manufacturers work for manufacturers and cannot provide the unbiased information students deserve. Simply put, no man can serve two masters.

Infraspection Institute has been providing infrared training and certification for infrared thermographers since 1980. Our Level I, II, and III Certified Infrared Thermographer® training courses meet the training requirements for NDT personnel in accordance with the ASNT document, SNT-TC-1A. All courses are taught by practicing, expert Level III thermographers whose field experience is unsurpassed anywhere in the world. We teach effective, real-world solutions using the latest standards, software and technology. For more information call 609-239-4788 or visit us online at www.infraspection.com.


Visit Infraspection Institute Web Site


March 9, 2009

Sponsored by:


Imager Resolution & The Great Pixel Debate

Tip written by: Infraspection Institute


Resolution is one of the most important objective specifications for any thermal imaging system. Pixel count is frequently offered as a measure of image quality; however, pixel count is only one of many factors that affect imager resolution.

The Focal Plane Array (FPA) detector assemblies used in modern infrared imagers are made up of several tiny, discrete picture elements or pixels. Each pixel is a discrete infrared detector that collects thermal data. Individual pixels are arranged to form an array that ultimately allows the imager to produce a thermal image.

FPA detectors are commonly specified according to pixel count and ratio. Typical detector sizes for industrial imagers range from 160W by 120H to 320W by 240H; some detectors may have more or less pixels. To determine the total pixel count for a detector; the horizontal and vertical values are multiplied.

Imager manufacturers often cite pixel count as a measure of imager resolution. Imager sales are won and lost as entire ad campaigns focus heavily on this single objective specification. Actually determining resolution is not that simple.

Although resolution generally increases with the number of pixels, there are several other factors that influence image clarity or resolution. These include, but are not limited to, pixel viewing angle, imager optics, signal-to-noise ratio and the imager’s display screen.

When evaluating an imager for resolution, physically try the imager under actual working conditions. Imagers that produce clear images should be sufficient to the task regardless of pixel count.

To better understand imager resolution, read the article, Selecting, Specifying and Purchasing Thermal Imagers available from Infraspection Institute. To obtain a copy of the article, call 609-239-4788 or visit us online at www.infraspection.com.


Visit Infraspection Institute Web Site


March 16, 2009

Sponsored by:

Brady Infrared Inspections, Inc.

935 Pine Castle Court
Stuart, FL 34996


The Power of Inductive Heating


The magnitude and intensity of inductive heating should not be underestimated when performing infrared inspections of electrical switchgear. Inductive heating is derived from the proximal interaction of non-current carrying devices with the magnetic field around energized conductors that are under load.

Inductive heating affects ferrous metals and causes inexplicable heating of non-current carrying components. The intensity of heating is a function of the amount of current passing through the conductor and rather than the voltage class. In some cases, the affected components can reach temperatures in excess of several hundred degrees.

During a recent inspection at a power generation plant, two examples of inductive heating where observed near the plant’s step-up transformers.  Images captured showed intense heating on a non-current carrying support pole and bus transition box, both of which were close to iso-phase bus entering a13kV to 230kV step-up transformer.  Temperatures documented on these devices were in excess of 400°F.  Being the starting point of transmission service, a heavy current load would be expected on energized equipment.


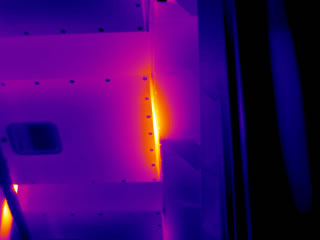
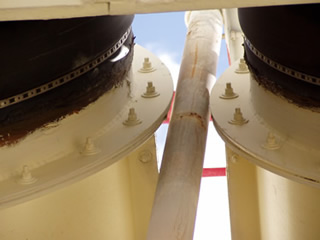
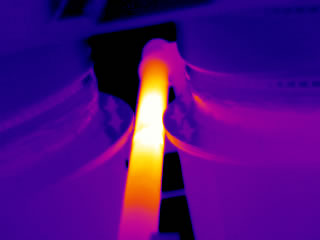
Often, engineering designs on switchgear enclosures and other electrical equipment do not take into consideration the interaction of non-current carrying ferrous devices within electro-magnetic fields.  In some cases, these situations can pose safety hazards when the affected component is in contact with combustible materials or heats structures that are accessible to human contact.  When faced with perplexing heat patterns on components that should not be hot, inductive heating may be to blame.


Visit Infraspection Institute Web Site


March 23, 2009

Sponsored by:


Preventing Workplace Falls


“Watch Your Step”. Sage advice that we’ve heard a million times; however, falls continue to be one of the most common workplace accidents. Following a few simple steps can help thermographers to prevent most falls.

Each year falls in the workplace account for over one million injuries and several hundred fatalities. Even a simple slip can cause serious injuries. Many falls can be prevented by following some basic rules:

  • Identify all potential tripping and fall hazards before work starts
  • Look for fall hazards such as unprotected floor openings/edges, shafts, skylights, stairwells, and roof openings/edges
  • Use appropriate fall protection equipment; inspect equipment for defects prior to each use
  • Never use boxes or chairs in place of an appropriate ladder or stepstool
  • Secure and stabilize ladders before climbing them; never stand on top rung or step of a ladder
  • Use handrails when going up/down stairs
  • Practice good housekeeping - Keep floors dry and free of clutter such as cords, hoses , and cables
  • Keep walkways free of snow and ice

Lastly, be sure to use sturdy footwear appropriate to the task. Work boots and shoes should be laced and tied to prevent tripping and to afford proper support. When it comes to fall protection, an ounce of prevention is worth a pound of cure. For more information on workplace safety standards and fall protection, visit www.osha.gov.


Visit Infraspection Institute Web Site


March 30, 2009

Sponsored by:


Choosing and Maintaining Your Domain Name

Tip written by: Infraspection Institute


“What's in a name? That which we call a rose by any other word would smell as sweet.” This Shakespeare quote implies that names are not that important; however, Sir William never had a website. In this Tip we discuss the importance of website domain names.

When setting up a website, choosing a domain name is one of the most important considerations. A domain name not only represents your online identity, it can seriously influence the success of marketing a company and its products and services. Prior to selecting a domain name, it is important to understand the short and long-term implications of domain name choice.

A general rule of thumb for domain names is www.yourcompanyname.com. This convention works well if your company name is recognized and/or unique. This can get tricky if your company name is long or contains characters such as hyphens. Domain names can only use letters, numbers, or dashes; spaces and symbols are not allowed.

When selecting a domain name, keep the following in mind:

  • Keep it short. Although domain names can be up to 63 characters in length, shorter names are easier to remember
  • Avoid trademarked names. Cybersquatting is illegal and not well tolerated by trademark owners
  • Register selected domain name(s) immediately. Include all appropriate extensions: .com, .net., .org, .biz

Lastly, be certain to renew domain name registrations on time to avoid loosing your ownership. Expired domain names that are not trademarked can be purchased by a third party and used to point traffic to websites of their choice.

Designing and maintaining an effective website is one of the many topics covered in the Infraspection Institute Level III Best Practices training course. For more information on thermographer training and certification or to register for a course, visit us online at www.infraspection.com or call us at 609-239-4788.


Visit Infraspection Institute Web Site


April 6, 2009

Sponsored by:


NFPA 70E & Infrared Thermography

Tip written by: Infraspection Institute


On September 5, 2008, the eighth edition of NFPA 70E Standard for Electrical Safety in the Workplace became available superceding all previous editions.  This latest edition of NFPA 70E contains several important changes and specifically addresses thermographic inspections of energized electrical systems.

Since 1979, the National Fire Protection Association has published the document, NFPA 70E.  Since its initial publication, this safety standard has been renamed, expanded, and extensively revised.  NFPA 70E is applicable to any workplace and is intended for use by employers, employees, and OSHA, among others.

The 2009 edition of NFPA 70E contains several changes over the 2004 edition.  Among these changes are:

  • Several key definitions have been revised
  • Article 350 R&D Laboratories has been added to Chapter 3
  • Chapter 4 has been deleted from the 2009 edition
  • The 2009 edition contains an Introduction, 3 Chapters, and 15 Annexes

Perhaps the most significant change to NFPA 70E is that thermography is specifically addressed as a task.  Table 130.7(C)(9) Hazard Risk Category Classifications provides Hazard/Risk categories ranging from 0 to 3 depending upon the type of equipment being inspected. 

While Table 130.7(C)(9) may be used for certain tasks, it does not cover all inspection scenarios.  For tasks not listed in Table 130.7(C)(9) or for power systems with greater than the assumed maximum short circuit current capacity or with longer than the assumed maximum fault clearing times, an arc flash hazard analysis is required.

The application and use of NFPA 70E are specifically covered within Infraspection Institute’s online short course, NFPA 70E – Are You in Compliance?  Available 24 hours per day, this 45 minute course focuses on the history and application of 70E, changes included in the current edition, and how it applies to thermographers.  For more information or to register, please visit:  http://www.successiries.com/SuccessIRies_105.html.


Visit Infraspection Institute Web Site


April 13, 2009

Sponsored by:


Checking IR Equipment Calibration

Tip written by: Infraspection Institute


Equipment calibration can have a significant impact on the accuracy of infrared temperature measurement. In this Tip we discuss a simple technique for checking the accuracy of imaging and non-imaging radiometers.

Infrared radiometers must be within calibration in order to accurately measure temperatures. Traditionally, thermographers periodically send their equipment to the manufacturer for calibration. For some, this process can take several weeks and can be rather expensive. As an alternative, savvy thermographers can check the calibration of their instrument quickly and easily using some commonly available items.

In order to check infrared radiometer calibration, you will need at least two targets each with a known temperature and emittance. A simple solution is to use a container of ice water and a container of boiling water with a coupon of Scotch PVC electrical tape affixed to the container’s exterior surface. The size of both targets must exceed the spot measurement size of the instrument being calibrated. Container temperatures may be ascertained with a thermometer, thermocouple or contact radiometer.

Once targets have been prepared, use the following procedure:

  • Turn radiometer on and allow it to stabilize to room temperature.
  • Set radiometer perpendicular to target surface
  • If possible, set radiometer inputs for distance, humidity & air temperature
  • Aim, focus and calculate Reflected Temperature
  • Set radiometer emittance control
    • Scotch 191 tape = 0.97 LW or SW
    • Ice = 0.98 LW; 0.93 SW
  • Using subject radiometer, measure temperature of target. For ice water, measure temperature of ice cubes. For hot water container, measure tape coupon.
  • Compare radiometer’s value with contact temperature reading for each target to ensure that radiometer is within spec

A heated blackbody simulator can be used to check instrument calibration at higher temperatures. Because radiometer calibration is not user-adjustable, it will be necessary to return it to the manufacturer should you find your instrument is out of spec.

Verifying infrared equipment calibration is specifically covered within Infraspection Institute’s online short course, How to Check Infrared Equipment Calibration.  Available 24 hours per day, this 27 minute course focuses on the simple, yet effective techniques for calibrating infrared equipment. The techniques demonstrated are complaint with accepted industry practice and ISO standards.  For more information or to register, please visit:  http://www.successiries.com/SuccessIRies_108.html.


Visit Infraspection Institute Web Site


April 20, 2009

Sponsored by:


Infrared Imaging and Spray Testing of Walls

Tip written by: Infraspection Institute


Infrared imaging can be useful for detecting leaks within building sidewalls; however, timing an inspection can be tricky. Controlled wetting of walls can be used to simulate storm conditions during an inspection.

Water spray racks are mechanical devices that permit controlled wetting of a building surface. Spray racks typically consist of lightweight tubing and engineered spray heads spaced at regular intervals. When connected to a water supply and placed in front of a building wall, a spray rack can be used to deliver a deluge of water to an area of interest. The amount of water delivered can be controlled by using different size spray heads and/or varying supplied water pressure.


Spray rack used for controlled wetting of exterior walls

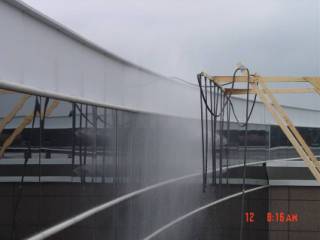
Spray racks are commonly used for testing the water tightness of curtain walls. During an infrared inspection from the interior of a building, spray racks can provide continuous wetting of walls to aid in leak detection. Spray racks can also be used to uniformly saturate a wall when infrared inspections are to be performed at a later time to detect evidence of latent moisture.


Water damaged EIFS appears warm
after sunset; building imaged from exterior

Because spray rack operation requires special tools and presents unique challenges, it is often best done by a qualified professional. Thermographers performing imaging during or after spray testing should keep the following in mind:

  • Spray testing can be time consuming due to set up and/or repositioning of spray equipment
  • Spray testing can cause significant building leakage requiring an interruption of testing
  • Spray testing can be messy; avoid getting your imager wet
  • When imaging from the exterior of a building, allow sufficient time for surface to dry and a Delta T to develop

Thermal imaging during spray testing is one of several applications covered in the Infrared Inspections for Home & Building Inspectors training course. For more information call 609-239-4788 or visit us online at: www.infraspection.com


Visit Infraspection Institute Web Site


April 27, 2009

Sponsored by:


Is Distance Learning Right For You?


Recent advancements in technology are reshaping traditional approaches to education. Students are now able to study a wide variety of subjects, including thermography, from virtually anywhere in the world.

Distance learning may be defined as any situation where the student and the instructor are in physically separate locations. Distance instruction may be live or pre-recorded and can be delivered via video presentations, remote teleconferencing, and web-based presentations.

Distance learning provides several advantages over the traditional classroom setting. Chief among these are the elimination of travel costs, 24 hour availability, and increased convenience in scheduling. The availability of Distance Learning courses for thermography is particularly beneficial to thermographers with hectic schedules.

When selecting Distance Learning courses for thermography, be sure to determine the following:

  • How and when is course delivered
  • Length of course and curriculum
  • What standards does course curriculum conform to
  • Are experienced instructors available to answer questions
  • Does course qualify toward thermographer certification
  • Experience of training firm in providing thermographic instruction

Infraspection Institute offers a wide variety of Distance Learning courses for thermography. Courses include: Certification Prep, Applications and Industry-Specific Courses. All courses are ASNT compliant and are taught by Level III Infraspection Institute Certified Infrared Thermographers® each having over 20 years experience. For more information or to register for a course call us at
609-239-4788 or visit us online at Distance Learning offered by Infraspection Institute.:


May 4, 2009

Sponsored by:


How to Survive a Shrinking Maintenance Budget


Maintenance departments face many challenges.  One of the toughest challenges is securing adequate funding when money is tight.  In this Tip, we discuss several ways to make sure you get the biggest bang for your maintenance buck.

Companies are always on the lookout for ways to improve the bottom line.  Reducing costs during an economic downturn has a long history; however, one must be careful which costs are reduced.  Those who do not appreciate the value of a maintenance program often seek to reduce expenditures by indiscriminately slashing the company’s maintenance budget.

A directive to reduce maintenance costs need not spell disaster.  In fact, it can provide an opportunity to improve program performance by reviewing how maintenance dollars are spent and the value provided by various activities.  When times are lean, the following areas can provide opportunities for improvement.

  • Review maintenance procedures for effectiveness and eliminate outdated practices
  • Utilize predictive and condition based monitoring tools to work smarter, not harder
  • Focus on training to ensure that employees have knowledge and skills to work efficiently
  • Make certain that maintenance expenditures are charged to appropriate business units

Lastly, be certain to communicate the function and importance of maintenance and to all parties involved.  Bad times are always followed by better times and it is important to ensure that companies emerge with a strong infrastructure, a solid workforce, and a reputation for delivering quality products or services intact.

Designing and maintaining an effective infrared inspection program is one of several best practices covered in the Infraspection Institute Level III Certified Infrared Thermographer® training course.  For more information, including course locations and dates, please call 609-239-4788 or visit www.infraspection.com.

Additional articles on this subject are available from Maintenance Technology Magazine.


May 11, 2009

Sponsored by:


Temperature Limits for Drive Belts


Temperature is frequently used to gauge the condition of motors and power transmission equipment.  In this Tip, we discuss the effect of heat on flexible drive belts and temperature limits for them.

Drive belts are an integral component on many types of machines.  Despite the critical role they play in machine operation, V type drive belts tend to out-of-sight and out-of-mind until they fail.  In most installations, belt temperature largely influences the life installed V belts. 

As a rule of thumb, properly applied and maintained belts should not exceed 140º F (60º C), assuming an ambient temperature of less than 110º F (43º C).  It should be noted that belt life can be greatly reduced by higher operating temperature.  In fact, for every 18 F (10 C) increase in belt temperature, belt life is cut in half.
Thermogram shows overheating V belt.  Note castoff in control photo.
  Images courtesy Skip Handlin.

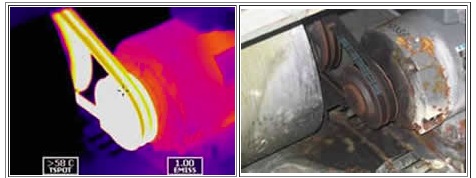
There are many factors that contribute to high belt operating temperature including, but not limited to:  ambient air temperature, machine design, installation, alignment, and belt tension.  Overheating belts can be readily detected with an infrared imager.  Once detected, overheating belts should be investigated for cause and proper corrective measures undertaken as soon as possible.  Doing so can help prevent unscheduled downtime and may prolong belt life.

Temperature limits for mechanical equipment is one of the many topics covered in the Infraspection Institute Level II Certified Infrared Thermographer® training course.  Classes are held regularly throughout the year and are also available through our web-based Distance Learning Program.  For more information, please call 609-239-4788 or visit www.infraspection.com.


May 18, 2009

Sponsored by:


Understanding Emissivity


Emissivity refers to an object’s ability to radiate infrared energy. Because infrared instruments measure radiant energy, it is imperative for a thermographer to understand emissivity and how it can vary.

All objects above 0 Kelvin radiate infrared energy. The amount of energy radiated is dependent upon an object’s temperature and emittance. Increases in temperature and/or emittance will increase the amount of infrared energy radiated.

Although many equate emissivity to values published in emittance tables, emissivity is a dynamic characteristic and is influenced by several factors. Among these are:

Wavelength - For most objects, emissivity varies with wavelength.

Object Temperature – Changes in object temperature cause changes in Emissivity
For clean metals, E increases with temperature rise
For dielectrics, E decreases with temperature rise

Viewing Angle – Imaging at angles other than perpendicular causes changes in Emissivity

Target Geometry – Target shape affects Emissivity. Compared to a flat surface,
Concave shape increases E
Convex shape decreases E

Surface Condition – Surface roughness, texture, or condition (dirt, oxidation or paint) can significantly affect Emissivity

Although thermographers frequently obtain emittance values from published tables, this practice can introduce significant temperature measurement errors since emittance tables cannot account for several of the above factors. Because of this, calculating emittance with one’s thermal imager will help to ensure measurement accuracy.

A simple procedure for calculating emittance may be found in the Standard for Measuring and Compensating for Emittance Using Infrared Imaging Radiometers available from Infraspection Institute. For more information or to place an order, call 609-239-4788 or visit us online at www.infraspection.com.


May 26, 2009

Sponsored by:


How to Deal With Emittance


The perpetual question among those using radiometric equipment is, “What emittance value should I use?” In this Tip, we address several options for providing emittance values.

Emittance is a numerical value between 0 and 1.0 indicating an object’s relative ability to radiate infrared energy. Most radiometers allow the user to input emittance values into the radiometer’s computer. Utilizing correct emittance values is imperative for accurate non-contact temperature measurements.

When determining emittance values for a target, there are five accepted ways to obtain an emittance value. These methods are listed below in order of increasing complexity and accuracy.

  • Use General Default Values
    • Organics are generally > 0.80
      Metals can vary widely from < 0.1 to > 0.90
  • Use Emittance Tables
    • Be certain to use tables that match your radiometers spectral response and your target’s temperature.
  • Estimate Emittance
    • Choose representative sample and test for emittance value. Use these values whenever similar object is encountered in the future.
  • Modify Surface to a Known Emittance Value
    • Use tape, paint, or powder with known E. Prior to modifying any surface, be certain it is safe to do so.
  • Measure Emittance Value
    • Use subject radiometer to measure target E value. This practice is preferred as it provides the most accurate emittance values.

The procedure for measuring emittance values is described in detail in the Standard for Measuring and Compensating for Emittance Using Infrared Imaging Radiometers available from Infraspection Institute. For more information or to order a copy, call 609-239-4788 or visit us online at www.infraspection.com.


Jun1 1, 2009

Sponsored by:


How to Calculate Emittance


Utilizing correct emittance values is imperative for accurate non-contact temperature measurements. Knowing how to accurately calculate emittance values can help to ensure the accuracy of infrared temperature measurements.

Although thermographers frequently obtain emittance values from published tables, this practice can introduce significant errors. Following the procedure listed below, it is possible to accurately calculate the E value of an object.

Equipment Required:

1. Calibrated imaging radiometer with a computer that allows thermographer to input Reflected Temperature and Emittance values

2. Natural or induced means of heating/cooling target to a stable temperature at least 10ºC above/below ambient temperature

3. Calibrated contact thermometer

Method:

1. Place imaging radiometer at desired distance from heated/cooled target. Be certain that target is larger than imager’s spot measurement area. Aim and focus imager on target

2. Measure and compensate for Reflected Temperature

3. Place imager crosshairs on target

4. Use contact thermometer to measure target temperature at location of imager crosshairs. Remove contact thermometer

5. Without moving imager, adjust E control until observed temperature matches value obtained in Step 4 above. The displayed E value is the Emittance value for this target with this imaging radiometer. For greatest accuracy, repeat above three times and average the results.

Note: This procedure requires contact with the object being measured. Be certain to observe all necessary safety precautions prior to making contact with target.

The above procedure is described in detail in the Standard for Measuring and Compensating for Emittance Using Infrared Imaging Radiometers available from Infraspection Institute. For more information or to order a copy, call 609-239-4788 or visit us online at www.infraspection.com.


Jun1 8, 2009

Sponsored by:


Ensuring Payment for Your Services


Tip provided by:

Robert J. Incollingo
416 Black Horse Pike
Glendora, NJ  08029
856-234-3800
www.rjilaw.com

Thermographers (like lawyers) are subject to the "call girl principle," which states that the perceived value of a service drops like a stone once the service has been performed. To boost your prospects of getting paid, above all you need to get your bills out promptly, and aggressively follow up on any delay in payment. Here are five other steps you can take to increase your chances of getting paid:

1. Acquire and use a graduated set of collection letters for your delinquent accounts. Sample collection letters are readily and freely available on the internet, starting with a gentle reminder and increasing in impatience until the matter must be referred out to an attorney. Copy your lawyer with your final collection letter. Many times, a cc: line on the bottom of the letter is all it takes to convince your debtor that he’s had his last warning. Don’t forget to actually send the copy.

2. Early on, a telephone call should be made to catch any mistakes in the system, such as wrong addresses or accounting, and to find out if there is an acceptable reason for the delay in payment. Most people pay their debts unless something prevents them. You may be willing to accommodate their problem for a defined period.

3. Don’t forget to provide in your contract or purchase order for the recovery of attorneys’ fees in the event you have to sue. Most times, the thought of picking up the other side’s legal bills is enough to prevent delinquency all by itself. Remember, however, that unless the customer signs the contract, the attorneys’ fees clause will probably be worthless.

4. Keep copies of the checks you receive. In the event you need to sue to collect on a debt, the information found on a check will help you quickly locate and levy on the account. A bank levy is the easiest way to get real dollars to satisfy your judgment.

5. Discount your expectations. Collection agencies and attorneys don’t work for free, so compromise may be your best course. Figure on backing down to a sum which approximates your likeliest recovery less the expected costs to get there. When you’ve settled on a number you won’t walk away from, remember that terms of payment on time are still negotiable.  That's why they call them lump sums - installments are just easier to swallow.

Bob Incollingo is an attorney in private practice in New Jersey and a regular speaker at Infraspection Institute’s annual IR/INFO Conference.


Jun 15, 2009

Sponsored by:


Heat Stress & the Human Body


For many, the peak of Summer brings high temperatures to the workplace. For others, high temperatures in the workplace are an everyday occurrence. Understanding heat stress and its attendant safety challenges is crucial for those working in hot environments.

What is heat stress?

Heat stress is a physical hazard. It is caused by environmental conditions and results in the breakdown of the human thermal regulating system.

What are the symptoms of heat stress?

There are various degrees of heat stress. Each has its own unique symptoms. The most common form of heat stress is heat exhaustion. Symptoms of heat exhaustion include dizziness, confusion, headaches, upset stomach, weakness, decreased urine output, dark-colored urine, fainting, and pale clammy skin.

What do I do If I think I am experiencing some form of heat stress?

Act immediately –

  • Advise a co-worker that you do not feel well
  • Move to an area away from the hot environment
  • Seek shade and cooler temperatures
  • Drink water (1 – 8 oz. cup every 15 minutes) unless sick to the stomach
  • Have someone stay with you until you feel better

What should I think about before working in a hot environment?

Before working in a hot environment, consider the type of work to be performed, duration of time to be spent in hot areas, level of physical activity, and other nearby hazards. Always use appropriate PPE and work together as a team.


Jun 22, 2009

Sponsored by:


Heat Stress & Hydration


An ounce of prevention is worth a pound of cure. In last week’s Tip, we covered the topic of heat stress, its symptoms, and treatment. This Tip focuses on the importance of hydration as a preventive measure.

What is heat stress?

Heat stress is a physical hazard. It is caused by environmental conditions and results in the breakdown of the human thermal regulating system. If you work or play in hot environments, your body needs a lot more water than you might think.

What is hydration?

Hydration is the process of adding water. Our bodies need water to do many things. In hot environments we need large quantities of water to help keep our bodies cooled to a temperature that allows them to function properly. Heat stress becomes a health and safety concern when the volume of water we need to function drops below the level necessary to maintain homeostasis. We call this low water condition dehydration or under-hydration. The average person is 7% under-hydrated.

How can I avoid being under-hydrated?

Developing the habit of drinking water at routine intervals. One 8 oz. cup every hour on hot days will assure proper hydration.

How will I know if I am properly hydrated?

Check the color of your urine. You are properly hydrated if your urine is clear, copious in volume, and light yellow in color.

What are the benefits of proper hydration?

Staying properly hydrated will help to avoid heat stress and may increase your energy level. For every 1% under-hydration, you lose 5% of your energy potential.


Jun 29, 2009

Sponsored by:


A Thermographer’s Magic Marker

Tip suggested by:
Randall D. Cain, American Water Company


An age-old challenge for thermographers is the ability to annotate or mark objects to make them easier to identify in recorded imagery. One possible solution is to mark targets with an ink pen with low emittance ink.

Many thermographers have long sought ways to mark targets in such a fashion that numbers or text can clearly be seen with a thermal imager. Over time, some thermographers have used paints with emittances that contrast sharply with the objects being marked. In these cases, text and/or numbers painted on the target are clearly visible within resulting thermal imagery and recorded thermograms.

Recently some thermographers have reported good results in utilizing a Sharpie permanent felt-tip marker in silver color. The low emittance of the metallic ink contrasts markedly with high emittance targets allowing annotations to clearly appear within thermal images. In many cases, the silver ink can also be clearly seen in daylight images as well. An example can be seen below.


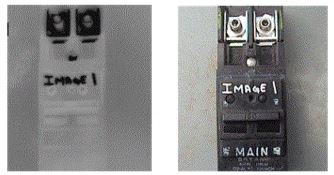
One should be aware that Sharpie markers are permanent unless the ink is applied to a removable material such as tape or labels affixed to the target. Prior to marking any target, be certain it is safe to do so and that marking will not permanently damage the target.

For more information on thermographer training and certification or to obtain a copy of the Guideline for Infrared Inspections of Electrical and Mechanical Systems, call Infraspection Institute at 609-239-4788 or visit us online at wwww.infraspection.com.


Visit Infraspection Institute Web Site


July 7, 2009

Sponsored by:


Infrared Inspections of PLC Cabinets

Tip provided by Brady Infrared Inspections, Inc.


Maximizing the effectiveness of an infrared inspection of electrical systems requires that all energized equipment be inspected.  In this week’s Tip, we discuss how thermal imaging can be applied to programmable logic controls.

Programmable Logic Controls (PLC’s) are commonly used in manufacturing and industrial facilities to automate processes.  A typical PLC cabinet (Figure 1) contains circuit breakers, power supplies, card readers/output modules, fused circuit boards, and numerous terminal connections.


Figure 1

The intricate design of PLC cabinets can be intimidating to an inexperienced thermographer; however, most PLCs are similar with respect to their major components.  A proper understanding of these components and their functions is imperative for accurate thermographic diagnoses.

Within a PLC, circuit breakers provide protection from overloads and/or ground fault.  Power supplies provide the appropriate voltage and type of current needed.  Output modules are either 120V AC or 24V DC depending upon the automated application.  Output modules also provide access for computer programming.  The fused circuit boards serve as the communication link from the output modules to the automated stations. 

Heating on connections and components in PLC components can cause automated equipment to drop offline disrupting production.  The most common problems detected with a thermal imager include loose connections and defective internal contacts on molded case circuit breakers.  More subtle problems include defective cable connections to circuit boards (Figure 2) and failures of laminated circuit board ribbons (Figure 3). 

Figure 2
Figure 3

Problems with output modules can also be detected.  Normally, these components exhibit a thermal gradient that transitions from warm to cool when viewed from top to bottom.  Thermal patterns showing heat propagating through the entire module signifies trouble (Figure 4).


Figure 4

Using infrared thermography to identify PLC problems can assist E&I technicians in their troubleshooting efforts and provides another step towards increasing uptime and reliability. 

Tip provided by Brady Infrared Inspections, Inc.


Visit Infraspection Institute Web Site


July 13, 2009

Sponsored by:


Gauging Solar Loading


Did you know that an automobile can be used to gauge solar loading? Under the correct conditions, a parked car can serve as a cheap, but effective, pyranometer.

Many types of infrared inspections rely on solar loading to heat the target so that infrared imaging may be performed successfully. Applications include, but are not limited to, low slope roof inspections, concrete bridge decks, storage vessel levels and latent moisture within building sidewalls. Ensuring that enough solar loading has occurred is imperative to collecting good data.

Good solar loading conditions are easy to recognize – long days with bright sunny skies, low humidity and no wind. More tricky is being able to determine if less than optimal conditions are allowing for appreciable solar gain.

A time tested method for gauging solar loading is to check the interior of a parked automobile. With the engine stopped and the windows and doors closed, allow the vehicle to sit in the sun for up to an hour. Immediately upon opening the door, check to see if the vehicle interior has exceeded outdoor ambient temperature. If a noticeable difference is not detected, feel the dashboard to see if it has warmed. If not, it is likely that appreciable solar loading has not occurred and it may be best to reschedule your solar driven inspection for another day.

Visit Infraspection Institute Web Site


July 20, 2009

Sponsored by:


Accuracy and Sensitivity - Part 1

~ Tip provided by Wayne Swirnow
Infrared Imaging Services, LLC


Objective specifications are frequently used to describe the performance of thermal imaging systems.  In this two-part Tip, we explore the significance of two commonly used, but frequently misunderstood terms:  Accuracy and Sensitivity.

Infrared cameras along with most other electronic measurement systems have to manage their own sources of measurement error. These error sources include detector electronics, signal-to-noise ratios along the signal path, non-linearity, thermal drifting of components, gain/offset adjustments, and a host of other internal electronic workings in the measurement chain of the camera.  Each component adds its contribution to the overall error of the camera as a measurement system.

Because many electronic measurement systems are similar in function, that is to detect and convert real world analog information into digital numbers, they all tend to use the same two specifications called “Sensitivity” and “Accuracy”. These two specifications combined describe the unit’s ability to state how close the converted value will be to the actual value of the input.

The Sensitivity specification for an infrared imager states the smallest amount of detectable change in the level of radiant power the camera can sense and convert into a digital number.  Any change in radiant power smaller than this amount will not be recognized by the system.  It is usually a very small number, (near LSB level in digital terms) and for infrared cameras it’s commonly stated as a fraction of one degree C. Typical  specifications for Sensitivity are in the range of  .2°C , .1°C or .06°C at a given temperature such as 30°C.

Because Sensitivity values are calculated using a blackbody simulator under laboratory conditions, they represent a best case scenario.  An imager’s sensitivity can be significantly affected when imaging real world targets.  Factors which influence sensitivity include, but are not limited to:  target temperature, target emittance, and imager measurement range.

In part 2 of this Tip we will discuss the topic of Accuracy.


Visit Infraspection Institute Web Site


July 27, 2009

Sponsored by:


Accuracy and Sensitivity - Part 2

~ Tip provided by Wayne Swirnow
Infrared Imaging Services, LLC


Objective specifications are frequently used to describe the performance of thermal imaging systems.  In part two of this Tip, we explore the significance of our second frequently misunderstood term, Accuracy.

For an infrared camera, the Accuracy specification states how close the camera’s measurement of radiant power will be to the actual radiant power emitted from a target.  Things would be less confusing if this spec was called “Inaccuracy” or “Allowable Error” because it is really stating how inaccurate the camera is allowed to be.

Taking a closer look at the specification for Accuracy, it is made up of two separate components which are combined to give a complete statement of Accuracy:

The “Minimum” part of the spec is expressed as a window of temperature where what is measured is guaranteed to be no further away from the actual input than this spec.  A typical specification is “± 2ºC”. This part of the spec covers the camera’s error or inaccuracy when dealing with lower levels of radiant power or lower temperature targets.

The “Maximum” part of the spec is expressed as a percentage of the measured value where what is measured is guaranteed to be no further away from the actual input than this spec.  A typical specification is “± 2%” of reading”.  This part of the spec covers the camera’s error or inaccuracy when dealing with higher levels of radiant power or higher temperature targets.

As the measured value gets larger, the relative contribution from error remains the same as a percent of the total measured value, but its absolute value goes up. For example, 2% of 100 is “2”, but the same 2% of 1000 is “20”. As the measured temperature value increases to say 500ºC, then the ±2ºC spec is inadequate to express the camera’s accuracy because 2ºC out of 500ºC would be less than .05% error and that is not what the camera can do.

This is why the percentage of reading ( ± 2% of reading) component of the spec is needed and why for larger measurement values IT now becomes the dominant factor in the Accuracy spec.  And just to make sure the entire range of accuracy in the camera is covered regardless of the measurement value, manufacturers add the statement, ”whichever is greater”.

Now that we understand the separate components of an Accuracy specification, here is the total statement of how well you can expect a typical infrared camera to measure the radiant power of an object:

“Accuracy = ± 2ºC or ± 2% of reading, whichever is greater

If this is unclear, try this:

Imagine a marksman shooting at a target and we want to describe his ability to hit the bull’s eye mark every time, or more appropriately, define how far away from the bull’s eye he is allowed to deviate. Let’s also define how tightly his shots will be grouped.  But here is the problem:  hitting the bull’s eye and making tight groups are two separate talents our marksman possesses.   Although they are related, they do operate independently in this shooter and therefore need to be discussed and defined individually.

For our marksman, we’ll assign some infrared camera specifications to his shooting so we can set expectations as to his anticipated performance.

Sensitivity - ability to group shots together

Specification:  0.1 inch
Expectation - Our marksman can place shots within one tenth of an inch of each other

Accuracy - ability to hit the bull’s eye dead center

Specification:   ± 2 inches or ± 2% of the distance from the target whichever is greater
Expectation - Our marksman is allowed to miss the bull’s eye by up to 2 inches; greater inaccuracy is allowed as distance to the target increases.

As you can see in this example, his grouping talents do not help him in hitting the bull’s eye.  By specification he is allowed to miss the bull’s eye by up to 2 inches.  Regardless of a camera’s fantastic “Sensitivity” spec, it is allowed to miss an accurate temperature measurement by its “Accuracy” spec!

~ Tip provided by Wayne Swirnow
Infrared Imaging Services, LLC


Visit Infraspection Institute Web Site


August 2, 2009

Sponsored by:


Thermography and ASNT Certification

Tip written by:
Infraspection Institute


In his commentary, ‘The 35 Undeniable Truths’, Rush Limbaugh states, “Words mean things.” This is especially true in thermography when it comes to one’s certification.

Certification has long been recognized as an indicator of a thermographer’s formal education and/or qualifications. Certification can have significant financial implications since buyers of inspection services often base purchasing decisions on a thermographer’s level of certification. Unfortunately, misstatements regarding certification, in particular ASNT certification, are quite common.

First of all, ASNT Certification – certification issued by the American Society of Nondestructive Testing - is only available from ASNT Headquarters in Columbus, Ohio. This certification program is designed to provide uniform testing and certification of NDT personnel that is ‘transportable’ when an NDT technician leaves the employ of a company.

The use of the title, ‘ASNT Certified Thermographer’ is incorrect since ASNT does not use or recognize the term ‘thermographer’ in any of its professional designations. The correct term is NDT person or NDT technician.

Although ASNT does offer Level II certification in some NDT disciplines, they presently do not certify anyone below Level III in the Thermal Infrared (TIR) Method. Therefore, titles such as “ASNT Level 2 Certified Thermographer” or “ASNT Level 1 Certified Thermographer” do not exist except on the websites or advertising materials of companies who believe they have earned such titles. There are many examples of such citations ranging from infrared consultants to top executives at infrared equipment manufacturers.

Perhaps the biggest reason that considerable confusion surrounds ASNT certification is that some infrared trainers provide misleading information on this topic. Further compounding this problem is that many thermographers are imprecise when they represent their credentials. Few thermographers who do misrepresent themselves are rarely called to task by their peers or their clients.

Ethics within any profession demand that practitioners always represent their qualifications and credentials accurately. Because words do mean things, thermographers must be careful when representing their qualifications and avoid using titles that do not exist. Accurately describing your certification reflects not only on you but on the credibility of our industry as well.

The topics of ASNT certification and how to establish ASNT-compliant certification programs are two of the many topics covered in depth within the Infraspection Institute Level III Certified Infrared Thermographer® training course. For more information on course dates or to register for a course, call 609-239-4788 or visit Infraspection Institute online.


Visit Infraspection Institute Web Site


August 10, 2009

Sponsored by:

The Law Offices
of

Robert J. Incollingo


Careful Testimony at Your Fingertips

Tip provided by:

Robert J. Incollingo
416 Black Horse Pike
Glendora, NJ  08029
856-234-3800
www.rjilaw.com


When called on to answer a question under oath, put your left hand on your lap, fingertips to your pant leg and think about the tip of your thumb. Your thumb reminds you that you have a predicate question of your own to answer for yourself, before you can even begin to reply to the other person. Counting on your thumb reminds you to ask yourself first, "Did I hear the whole question?" There are lots of reasons why you might not hear a question; your mind wanders, someone in the room speaks or coughs on top of the question, you don’t hear so well, outside traffic noise spikes, a distractingly pretty girl wanders past, or the inquirer mumbles in a heavy accent while covering his mouth with his hand. Maybe you were thinking of your thumb. If you didn’t hear the whole question, you cannot answer but to reply, "I didn’t hear the question. Could you please repeat it?"

Robert J. Incollingo

If you did hear the question, your index finger should twitch. Your index finger is trying to remind you to ask yourself, "Did I understand the question?" There are lots of reasons why you might not understand a question; you don’t know a word, a word you know is being used in an unknown context, the question assumes a fact which is not true or not in evidence (of the "when did you stop beating your wife" variety), or the question is a leading question that incorporates a statement which it asks you to admit or deny, and as phrased you can do neither (such as, "You were wearing pants this morning when you hit my client, weren’t you?"). Sometimes, the question isn’t even a question, but a form of copspeak, a statement coupled with a pregnant pause. (Here your lawyer should jump in and state loudly for your benefit, "Objection as to form. No question pending.") We must also admit the possibility that you are a dullard, the question is beyond you, and this whole business of questions reminds you unpleasantly of school.

If you didn’t truly understand the whole question, you must sensibly ask the questioner, "I didn’t understand the question. Could you please rephrase it?" Be prepared to get another question in return, "What part didn’t you understand?" Look blank for a meaningful second, and reply, "I’m not sure. If you rephrase it maybe I can answer."

If you heard and understood the question, your middle fingertip will press against your leg, insistent that you ask yourself, "Do I know the answer? If not, is it because I don’t know the answer, or because I forget the answer?" This distinction makes much more of a difference on the stand than in regular life. If you knew something but forgot it, your recollection can be refreshed and introduced into evidence. If you never knew it, your testimony is not competent on this point, and is thus worthless forever. Sorry.

Should you reply, "I don’t know," expect the follow-up question, "Well, who would know?" Look blank, and start on your thumb again. If you know who would know, say so and stop talking. Otherwise, feel free to say you don’t know who would know. They can’t mess with you this way.
Should you reply, "I don’t remember," expect the follow up question, "Can you think of any documents which would tend to refresh your recollection?" Look blank, and start on your thumb again. And so on.

If you know the answer, your ring finger will tap and twitch to tell you that you are in the greatest danger of all. The pressure of your ring fingertip against your leg reminds you that you must answer the question truthfully in a manner that is only apparently helpful, and then stop talking. Answer only the question asked, which you are now presumed to have heard and understood, and coming to the very first period at the end of the very first sentence of your answer, stop talking. Stop talking. STOP TALKING. Do not answer the question you believe should have been asked; do not tell the questioner what you think she needs to know; do not answer a question with a question; do not object, or protest to your lawyer or the judge, "Do I have to answer that?"; do not preface your answer with an aside such as, "Can we go off the record for a minute here?" Instead, respond only to the question asked, as briefly and as generally as you can get away with, without obstructing justice. Do not blather, do not be helpful to the questioner, do not be funny, do not let your temper run away with you, do not lie. Answer in as few words as possible and then, you guessed it, stop talking.

And your little finger? Well, your little finger goes, “wee, wee, wee” all the way home. We thought you knew that.

Robert J. Incollingo
416 Black Horse Pike
Glendora, NJ  08029
856-234-3800
www.rjilaw.com

Bob Incollingo is an attorney in private practice in New Jersey and a regular speaker at Infraspection Institute’s annual IR/INFO Conference.


Visit Infraspection Institute Web Site


August 17, 2009

Sponsored by:


The Problem with Solar Loading


Everyone who has performed infrared inspections outdoors on sunny days is familiar with the problem of solar reflections. Compensating for solar reflections is usually accomplished by repositioning the thermal imager to change the viewing angle to eliminate the reflection. For objects exposed to strong sunlight, a more insidious problem can occur in the form of solar loading.

The concept of solar loading is familiar to everyone: objects exposed to the Sun will heat up. In general, dark colored objects absorb the most solar energy and heat faster than light colored objects. If an object absorbs enough heat from the Sun, significant thermal anomalies may be hidden and go undetected.

As there is no way to compensate or correct for solar loading, the most prudent course of action is avoidance. Solar loading can be avoided by imaging on cloudy days, at night, or early in the morning. Solar loading can also be overcome by shading an exposed target and waiting for the object’s temperature to return to normal.

Identifying and overcoming environmental error sources such as solar loading is one of the many topics covered in depth within the Infraspection Institute Level I Certified Infrared Thermographer® training course. For more information on course dates or to register for a course, call 609-239-4788 or visit Infraspection Institute online.

Visit Infraspection Institute Web Site


August 24, 2009

Sponsored by:


Lightning Safety


Lightning is one of the most spectacular natural phenomena. For thermographers who work outdoors, it can present a serious safety hazard. This week’s Tip discusses how you can protect yourself from this serious safety hazard.

Each year, lightning kills an average of 67 people in the United States; hundreds more are injured. Few people really understand the dangers of lightning. Many fail to act promptly to protect their lives and property don't understand the dangers associated with thunderstorms and lightning.

Thunderstorms are most likely to develop on warm summer days and go through various stages of growth, development and dissipation. On a sunny day, as the sun heats the air, pockets of warmer air start to rise in the atmosphere. When this air reaches a certain level in the atmosphere, cumulus clouds start to form. Continued heating can cause these clouds to grow vertically upward in the atmosphere into "towering cumulus" clouds. These towering cumulus may be one of the first indications of a developing thunderstorm.

During a thunderstorm, each flash of cloud-to-ground lightning is a potential killer. The determining factor on whether a particular flash could be deadly depends on whether a person is in the path of the lightning discharge. In addition to the visible flash that travels through the air, the current associated with the lightning discharge travels along the ground. Although some victims are struck directly by the main lightning stroke, many victims are struck as the current moves in and along the ground.

Lightning can strike as far as 10 miles away from the rain area in a thunderstorm. That's about the distance you can hear thunder. When a storm is 10 miles away, it may even be difficult to tell a storm is coming.

IF YOU CAN HEAR THUNDER, YOU ARE WITHIN STRIKING DISTANCE. SEEK SAFE SHELTER IMMEDIATELY!

The first stroke of lightning is just as deadly as the last. If the sky looks threatening, take shelter before hearing thunder. Once indoors, stay away from windows and doors and avoid contact with anything that conducts electricity. Wait at least 30 minutes after the last clap of thunder before leaving shelter.

For more info on lightning safety, visit: www.lightningsafety.noaa.gov/overview.htm

Visit Infraspection Institute Web Site


August 31, 2009

Sponsored by:


A Reminder to Cut the Roof


Stuart L. Raney
Level III Certified Infrared Thermographer

It is a typical roof inspection using an infrared imager to locate hidden moisture.  The roof is in pretty good shape and no exceptions have been located on the first two sections. Walking across the third roof section, the first exception is spotted.  It is a small one, roughly 2’ x 2’, and appears to be half of a 2’ x 4’ Perlite board. 

Stepping in the middle of the exception reveals the softness created when board type insulation becomes wet.  With a small exception like this, it is tempting to mark it and move on to the next, but first let’s check it with our capacitance meter. Sure enough, the meter pegs the needle, but to make sure we whip out the pin-type moisture meter. Inserted into the center of the area, it also pegs the needle.  So now we have a footstep and three advanced pieces of technology that all agree the roof is wet, or do they? 

The footstep only tells us the roof was slightly softer in that area.  The infrared imager only reports that the radiated energy was slightly higher.  The capacitance meter only reports that the electrical impedance of the area is different from the area around it.  The pin-type meter only reports that it encountered a different electrical resistance.

In order to confirm the presence of moisture we take a core sample of the roof. What we found was a piece of sheet metal laid below the membrane, apparently to cover the opening left by an old vent pipe that had been removed.  The metal changed the radiated energy seen by the imager, the impedance seen by the capacitance meter, the resistance seen by the pin-type meter and small hole in the deck changed the firmness felt by the footstep.  All these were good reasons to suspect a wet area but none good enough to verify one, even when all four agreed.

This is an old tip, but one worth revisiting. This exception was actually encountered on a recent inspection and could have been misinterpreted had the roof not been cored to confirm or deny the other results. 

Perhaps a good way to understand the importance of core cuts is to realize that the visible evidence of a core is the only method of investigation that determines if a roof is wet or dry. Infrared imagers, nuclear gauges, capacitance meters and even pin-type resistance moisture meters can only be used to narrow down areas of the roof and limit the number of cores that must be taken. So if you are in the business of roof moisture surveys, your primary tool is a core cutter.  You just use the fancy equipment to tell you where to do the real work.


Visit Infraspection Institute Web Site


September 7, 2009

Sponsored by:


Insurance for Thermographers


As thermography gains wider acceptance, the number of firms offering infrared inspections continues to grow. A common challenge among thermographers is obtaining appropriate insurance coverage for their inspection activities.

Insurance is a necessary expense in the modern business world. Depending upon a where a business is located, certain types of insurance (unemployment, automobile, workers compensation) and the amount of coverage may be mandated by law. General liability insurance which is designed to protect against an insured against a legal claim often evokes the greatest number of questions.

For professional thermographers, the challenge in obtaining the correct type of insurance and the amount of coverage will depend upon several factors. These include, but are not limited to, the location where work is to be performed, the types of inspections to be conducted, thermographer training and experience, and the content of any reports to be issued.

In order to best determine insurance needs, a thermographer should consult with their insurance broker or agent who can provide the best guidance on insurance options. In the absence of a current insurance professional, consider asking for a referral from another local business. When seeking insurance, consulting with more than one insurance professional will likely provide both policy and pricing options.

Infraspection has been training and certifying thermographers for over 25 years. Since 1983, our Certified Infrared Thermographer® program has been setting the standard for excellence among professional thermographers worldwide. For information on training courses and certification, contact Infraspection Institute at 609-239-4788 or visit www.infraspection.com.


Visit Infraspection Institute Web Site


September 14, 2009

Sponsored by:


Netiquette and Your Online Image

Tip written by:
Infraspection Institute


First impressions not only count but they can last a long time. Bad impressions can last forever especially if their source is constantly in public view on an internet message board.

Humans leave their mark everywhere they go. They leave fingerprints on the things they touch, footprints in the sand where they walk, and personal impressions on those they meet. A less considered type of impression is an ‘internet footprint’ which is created whenever a person posts to public message boards or blogs.

Web posts often make permanent impressions on those who read them. Web posts that are timely, accurate, and professional can serve to help others and create a positive image for their authors. Bad or inappropriate posts can cause permanent damage and even harm one’s business. When posting on the net, following a few simple rules or netiquette can help to avoid creating a bad impression in cyberspace.

  • Do not post anything you would not (or should not) say in public
  • Always refrain from using foul, profane, or vulgar language
  • Do not badger others or attack their personal beliefs
  • Avoid over exposure. Chronic posting or posting ‘round the clock gives the impression that you have nothing better to do.
  • Keep in mind that posts can be viewed worldwide across different languages and cultures. Humor and witticism rarely translate well; sarcasm is often magnified.

Lastly, remember to think before you hit the ‘send’ button. Web posts often have an unintended permanence and are available for the world to see. Webmasters are rarely under any obligation to remove or edit posts regardless of how unflattering they may be.

Visit Infraspection Institute Web Site


September 21, 2009

Sponsored by:


How Much Certification Do You Need


Certification and levels thereof are one of the most frequently discussed issues in thermography. With few standards addressing certification, purchasers of infrared inspection services and thermographers often ask, “How much certification is necessary?”

Due to a variety of definitions, certification can have different meanings. As it is used in thermography, certification generally means, “to declare something to be true and/or to attest by issuing a certificate to.”

The American Society for Nondestructive Testing document, SNT-TC-1A provides suggested curricula and experience for under the Thermal/Infrared test method. Recommended curricula and the classroom hours are listed below; these should be modified to meet an employer’s needs.

Certification Level
Training Hours
Months Experience
1
32
3
2
66
18
3
66
66

In short, it is up to an employer to determine his/her client’s needs for and to set certification requirements accordingly.

Taken at face value, certification generally indicates one’s level of formal training. This training, combined with experience and knowledge of the system or structure being inspected determine a thermographer’s qualifications.

In a larger sense, certification is a measure of a thermographer’s professional qualifications. It is therefore incumbent on the professional thermographer to achieve the highest level of certification possible. The rewards for doing so are both personal and professional and can provide significant financial and competitive advantages.

Infraspection Institute has been training and certifying professional infrared thermographers since 1980. Our Level I, II, and III Certified Infrared Thermographer® training courses are fully compliant with ASNT and industry standards. Students may choose from open-enrollment and convenient web-based Distance Learning Courses. For more information or to register for a class, call 609-239-4788 or visit us online at www.infraspection.com.


September 28, 2009

Sponsored by:


Autumn IR Inspections to Assess Roof Condition

Tip written by:
Infraspection Institute


With much of the US experiencing record setting heat, it is hard to think about winter. For many, autumn provides a perfect opportunity to conduct infrared inspections of flat roofs to help ensure that they are ready for the upcoming colder months.

Summer can be especially tough on roofing systems. High temperatures, building movement, and UV radiation often cause cracks and splits in the waterproofing system. Left undetected, these cracks and splits can lead to roof leaks and premature roof failure. Performing an infrared roof inspection prior to the onset of colder weather can detect evidence of problems and help to direct repair efforts.

Performed under the proper conditions with the right equipment, an infrared inspection can detect evidence of latent moisture within the roofing system often before leaks become evident in the building. For many locations, autumn provides perfect conditions for conducting an infrared inspection and performing any necessary roof repairs.

The best candidates for infrared inspection are flat or low slope roofs where the insulation is located between the roof deck and the membrane and is in direct contact with the underside of the membrane. Applicable constructions are roofs with either smooth or gravel-surfaced, built-up or single-ply membranes. If gravel is present, it should be less than ½” in diameter and less than 1” thick.

For smooth-surfaced roofs, a short wave (2-5.6 µ) imager will provide more accurate results especially if the roof is painted with a reflective coating. All infrared data should be verified by a qualified roofing professional via core sampling or invasive moisture meter readings.

Infrared inspection of flat roofs and proper equipment selection are two of the many topics covered in the Infraspection Institute Level I Certified Infrared Thermographer® training course. For more information or to register for a course, visit Infraspection Institute or call us at 609-239-4788.

Visit Infraspection Institute Web Site


October 5, 2009

Sponsored by:


Temperature Differentials for
Infrared Building Inspections - Part 1

Tip written by:
Infraspection Institute


A common question among thermographers is, “How much temperature differential is needed to obtain good data?”  In this two-part Tip, we discuss required temperature differentials for infrared inspections of buildings.

Proper conduct of any infrared inspection requires that a detectable temperature differential or Delta T is associated with the sought-after defect at the time of inspection.  For infrared inspections of buildings and their subsystems, the appropriate time for an infrared inspection will depend upon, but not be limited to:  the type of condition or defect, time of day, local atmospheric conditions, and imaging vantage point.

For building energy loss inspections, published standards require an inside/outside temperature differential of 10 C or 18 F degrees for at least 3 hours prior to the inspection.  Such a differential will help to ensure that there is adequate heat flow through structural components necessary for an accurate inspection.  While it is possible to conduct energy loss inspections with a lesser inside/outside temperature differential, the likelihood of missing defects increases with a decrease in Delta T. 

IR inspections to detect building energy loss may be conducted from either the interior or exterior of a building; however, imaging from the interior is often more comprehensive and useful than macro shots taken exclusively from the exterior.  Regardless of vantage point, one must make certain to account for the effects of solar loading, especially when imaging during daytime hours.  Thermal patterns associated with missing or damaged insulation may appear warm or cool depending upon vantage point and site conditions.

In addition to the above, detecting latent moisture within or evaporating from building materials assumes a relatively high target emittance.  Low emittance surfaces associated with metal building facades or roofs coated with aluminum paint may not lend themselves to an accurate infrared inspection.

Lastly, all infrared data should be verified by independent means, as appropriate.  This testing may include visual and/or invasive moisture meter readings.

Infrared inspection of buildings is of the many topics covered in the Infraspection Institute Level I Certified Infrared Thermographer® training course.  For more information or to register for a course, visit Infraspection Institute or call us at 609-239-4788.


Visit Infraspection Institute Web Site


October 12, 2009

Sponsored by:


Temperature Differentials for
Infrared Building Inspections - Part 2

Tip written by:
Infraspection Institute


A common question among thermographers is, “How much temperature differential is needed to obtain good data?”  In this two-part Tip, we discuss required temperature differentials for infrared inspections of buildings.

Proper conduct of any infrared inspection requires that a detectable temperature differential or Delta T is associated with the sought-after defect at the time of inspection.  For infrared inspections of buildings and their subsystems, the appropriate time for an infrared inspection will depend upon, but not be limited to:  the type of condition or defect, time of day, local atmospheric conditions, and imaging vantage point.
 
For detecting latent moisture within EIFS structures or insulated roofs, an inside/outside temperature differential is not necessary.  For these applications, the IR inspection is traditionally conducted from outdoors during evening hours following a sunny day.  Areas of latent moisture will typically show as warm areas since water will store and retain more solar energy than areas containing dry insulation.

For damage investigations, directly imaging wet building materials will usually result in well-defined amorphously shaped patterns.  This application does not require an inside/outside temperature differential or solar loading.  Rather, thermal patterns associated with moisture can be readily detected provided that water is evaporating at the time of inspection.  For drywall, water may evaporate into the living space or into cavities behind the affected drywall.  In most cases, water evaporating from a material will cause wet areas to appear cool.

In addition to the above, detecting latent moisture within or evaporating from building materials assumes a relatively high target emittance.  Low emittance surfaces associated with metal building facades or roofs coated with aluminum paint may not lend themselves to an accurate infrared inspection.

Lastly, all infrared data should be verified by independent means, as appropriate.  This testing may include visual and/or invasive moisture meter readings.
Infrared inspection of buildings is of the many topics covered in the Infraspection Institute Level I Certified Infrared Thermographer® training course.  For more information or to register for a course, visit Infraspection Institute or call us at 609-239-4788.


Visit Infraspection Institute Web Site


October 19, 2009

Sponsored by:


2009 H1N1 Flu & You

Tip written by:
Infraspection Institute


2009 H1N1, sometimes called “swine flu”, is a new influenza virus that is spreading worldwide among people.  Because this virus is very different from current seasonal influenza viruses, many people will not have protective immunity against it and and the seasonal flu vaccine will not protect against it either.

Influenze is unpredictable, but this flu season could be worse than recent years because of the 2009 H1N1 virus.  The Centers for Disease Control and Prevention are preparing for an early flu season and expects both 2009 H1N1 virus and seasonal flu to cause illness, hospital stays, and deaths this season.

How does 2009 H1N1 flu spread?

Both 2009 H1N1 flu and seasonal flu are thought to spread mostly from person to person through the coughs and sneezes of people who are sick with influenza. People may also get sick by touching something with flu viruses on it and then touching their mouth or nose.

How long can a sick person spread 2009 H1N1 flu to others?

People infected with 2009 H1N1 flu shed virus and may be able to infect others from 1 day before getting sick to about 7 days after getting sick. This can be longer in some people, especially children and people with weakened immune systems.

How severe is illness associated with this 2009 H1N1 flu virus?

2009 H1N1 flu illness has ranged from mild to severe. Most healthy people who have been sick with 2009 H1N1 have recovered without needing medical treatment; however, hospitalizations and deaths from 2009 H1N1 have occurred.

Who is at greatest risk of infection with this new virus?

So far, younger people have been more likely to be infected with 2009 H1N1 flu than older people.  Most cases of 2009 H1N1 have occurred in people younger than 25 years of age.  At this time, there are relatively few cases of 2009 H1N1 in people 65 or older, which is unusual compared with seasonal flu.

What can I do to protect myself from getting sick
from 2009 H1N1 flu?

CDC recommends a three-step approach to fighting the flu:  vaccination, everyday preventive actions including frequent hand washing and staying home when sick, and the correct use of antiviral drugs if your doctor recommends them.
Everyday actions can help prevent the spread of germs that cause respiratory illnesses like influenza.

    • Cover your nose and mouth with a tissue when you cough or sneeze. Throw the tissue in the trash after you use it.
    • Wash your hands often with soap and water. If soap and water are not available, use an alcohol-based hand rub.
    • Avoid touching your eyes, nose or mouth. Germs spread this way.
    • Try to avoid close contact with sick people.
    • Stay home if you are sick.  CDC recommends that you stay home from work or school and limit contact with others to keep from infecting them.
    • Follow public health advice regarding school closures, avoiding crowds and other social distancing measures.
    • Be prepared in case you get sick and need to stay home for several days; a supply of over-the-counter medicines, alcohol-based hand rubs, tissues, facemsks, and other related items might be useful and help avoid the need to make trips out in public while you are sick and contagious.

What should I do if I get sick?

If you become ill with influenza-like symptoms this flu season you should stay home and avoid contact with other people except to seek medical care.  Most people have been able to recover at home from 2009 H1N1 without needing medical care and the same is true of seasonal flu.
For more information on 2009 H1N1, visit www.cdc.gov/h1n1flu or call 800 CDC-INFO.


Visit Infraspection Institute Web Site


October 26, 2009

Sponsored by:


2009 H1N1 and Seasonal Flu –
What To Do If You Get Sick

Tip written by:
Infraspection Institute


If you get sick with flu-like symptoms this flu season, you should stay home and avoid contact with other people except to get medical care. Most people with 2009 H1N1 have had mild illness and have not needed medical care or antiviral drugs and the same is true of seasonal flu.
However, some people are more likely to get flu complications and they should talk to a health care provider about whether they need to be examined if they get flu symptoms this season. They are:

  • Children younger than 5, but especially children younger than 2 years old
  • People 65 and older
  • Pregnant women
  • People who have:
    • Cancer
    • Chronic lung disease [including asthma or chronic obstructive pulmonary disease (COPD)]
    • Diabetes
    • Heart disease
    • Blood, kidney, liver, neurological, and neuromuscular disorders
    • Weakened immune systems

Also, it’s possible for healthy people to develop severe illness from the flu so anyone concerned about their illness should consult a health care provider.

There are emergency warning signs. Anyone who has them should get medical care right away.

How do I know if I have the flu?

You may have the flu if you have some or all of these symptoms:

  • fever *
  • cough
  • sore throat
  • runny or stuffy nose
  • body aches
  • headache
  • chills
  • fatigue
  • sometimes diarrhea and vomiting

*It’s important to note that not everyone with flu will have a fever.

What are the emergency warning signs?

In children

  • Fast breathing or trouble breathing
  • Bluish skin color
  • Not drinking enough fluids
  • Not waking up or not interacting
  • Being so irritable that the child does not want to be held
  • Flu-like symptoms improve but then return with fever and worse cough
  • Fever with a rash

In adults

  • Difficulty breathing or shortness of breath
  • Pain or pressure in the chest or abdomen
  • Sudden dizziness
  • Confusion
  • Severe or persistent vomiting

Do I need to go the emergency room if I am only a little sick?

 No. The emergency room should be used for people who are very sick. You should not go to the emergency room if you are only mildly ill. If you have the emergency warning signs of flu sickness, you should go to the emergency room. If you get sick with flu symptoms and are at high risk of flu complications or you are concerned about your illness, call your health care provider for advice. If you go to the emergency room and you are not sick with the flu, you may catch it from people who do have it.

Are there medicines to treat 2009 H1N1?

Yes. There are drugs your doctor may prescribe for treating both seasonal and 2009 H1N1 called “antiviral drugs.” These drugs can make you better faster and may also prevent serious complications. This flu season, antiviral drugs are being used mainly to treat people who are very sick, such as people who need to be hospitalized, and to treat sick people who are more likely to get serious flu complications. Your health care provider will decide whether antiviral drugs are needed to treat your illness. Remember, most people with 2009 H1N1 have had mild illness and have not needed medical care or antiviral drugs and the same is true of seasonal flu.

How long should I stay home if I’m sick?

CDC recommends that you stay home for at least 24 hours after your fever is gone except to get medical care or for other things you have to do and no one else can do for you. (Your fever should be gone without the use of a fever-reducing medicine, such as Tylenol®.) You should stay home from work, school, travel, shopping, social events, and public gatherings.

What should I do while I’m sick?

Stay away from others as much as possible to keep from making them sick. If you must leave home, for example to get medical care, wear a facemask if you have one, or cover coughs and sneezes with a tissue. And wash your hands often to keep from spreading flu to others.

CDC has information on “Taking Care of a Sick Person in Your Home” on its website at http://www.cdc.gov/h1n1flu/guidance_homecare.htm


Visit Infraspection Institute Web Site


November 2, 2009

Sponsored by:


Imager Settings for MCC Inspections

Tip written by:
Infraspection Institute


Infrared inspections of electrical distribution systems frequently include motor controllers.  Proper imager settings and inspection technique are imperative In order to accurately inspect these critical electrical devices.

Industrial motors of all sizes are frequently controlled by remote devices known as motor controllers.  Motor controllers are small to large metal-clad devices containing one or more large solenoids that provide manual or automatic control of motor functions including:  starting/stopping, motor speed, torque, and rotation direction.  Motor controllers may be installed as individual units or grouped with others in motor control centers.   

Motor controllers often contain a number of electrical devices operating at widely differing temperatures.  These devices include control circuits, transformers, fuses, circuit breakers, contactors, thermal overloads, and circuit conductors.  The temperature of these devices can range over hundreds of degrees. 

When performing an infrared inspection, setting a thermal imager’s controls to encompass the whole motor control in a single view is not recommended as significant problems can be overlooked.  For best results, we recommend the following:

  • Ensure that subject motor controller is under load
  • Image from a distance that permits viewing only of the subject controller components.
  • Perform inspection in direction of line to load side of motor control circuit
  • View subject components individually
  • Adjust level/gain settings to optimize image for each component inspected
  • Compare features of similar components to each other, noting inexplicable differences

For controllers with multiple contactors, it will be necessary to inspect each contactor individually while under load.  Be sure to allow sufficient time for subject contactor to achieve running temperature.  Lastly, be certain to observe all necessary safety practices when working on or near energized electrical equipment. 

Infrared inspection of power distribution systems is one of the many topics covered in the Level I Infraspection Institute Certified Infrared Thermographer® training course.  For information on thermographer training or to obtain a copy of the Standard for Infrared Inspection of Electrical Systems & Rotating Equipment, visit us online at www.infraspection.com or call us at 609-239-4788.


Visit Infraspection Institute Web Site


November 10, 2009

Sponsored by:


Training – A Wise Use of Year End Budget Money


When it comes to spending year end budget monies, the phrase “Use it or Lose it” often applies. Training can be a wise choice for those looking to reduce a budget surplus.

Staying within budget is a constant challenge for maintenance managers. For many, it seems that there is never enough money in the budget. On occasion, however, it is possible to experience a surplus in one’s budget when nearing year end.

When faced with a budget surplus, it is imperative to fully utilize allocated financial resources. Failure to do so can cause a reduction in future budgeting if management perceives that your department is over funded. When searching for wise choices for year-end spending, training is always a good option.

Thermographic training is a sound investment for initiating a PdM program or expanding an existing one. Whenever considering infrared training be certain to:

  • Examine course curriculum to ensure that it meets your needs
  • Ensure that course will be germane to all infrared imagers
  • Determine course locations or availability of Distance Learning courses
  • Ascertain if certification is included with course, its expiration date, and renewal fees
  • Insist that instructors be practicing thermographers with documented field experience in their area of instruction

Infraspection Institute has been providing infrared training and certification for infrared thermographers since 1980. Our Level I, II, and III Certified Infrared Thermographer® training courses meet the training requirements for NDT personnel in accordance with the ASNT document, SNT-TC-1A. Certification and applications courses are offered as open enrollment or on-site classes or through our Distance Learning program. All courses are taught by expert Level III thermographers whose field experience is unsurpassed anywhere in the world. For more information call 609-239-4788 or visit us online at www.infraspection.com.

Visit Infraspection Institute Web Site


November 16, 2009

Sponsored by:


The Importance of Fully Charged Batteries


“Energy nearly gone . . . Must finish . . .” When incorporated into a movie script, such a quote can provide high drama; spoken by a thermographer, it could foretell of temperature measurement errors.

Experienced thermographers know what it feels like to be near the end of an inspection only to have a low battery indicator appear on their instrument’s display screen. When fresh batteries are unavailable or far away, thermographers are often tempted to try to finish their inspection without switching batteries.

Although many portable thermal imagers and radiometers are designed to be used with batteries, few thermographers appreciate the impact of supply voltage on temperature measurement. Using infrared equipment with low batteries or incorrect voltage can cause significant errors in temperature measurement. Because of this, it is imperative to ensure that equipment batteries are always fully charged.

To help avoid measurement errors caused by low voltage, keep the following in mind:

  • Only use batteries that are appropriate for your equipment
  • Ensure that batteries are fully charged before each use
  • When working in remote locations, carry spare batteries with you
  • Change batteries immediately whenever a low power warning appears

Lastly, when working away from your office, it is a good practice to keep your battery charger(s) handy. Doing so will enable you to recharge dead batteries while you continue to work, helping to ensure that fresh ones are available when you need them.

Infraspection Institute Certified Infrared Thermographer® training courses teach the proper use of thermal imagers and radiometers along with proven techniques to help ensure accurate temperature measurement. For more information or to register for a course, call 609-239-4788 or visit us online at: www.infraspection.com.


Visit Infraspection Institute Web Site


November 23, 2009

Sponsored by:


Thanksgiving Safety Tip

Tip written by:
Infraspection Institute


When it comes to heat transfer and safety, thermographers traditionally think of the workplace. With the Thanksgiving holiday upon us, neither of these topics should be overlooked when it comes to preparing the holiday feast.

According to estimates from the Centers for Disease Control, approximately 76 million Americans become ill each year as a result of foodborne pathogens. Of these, approximately 5,000 die. Proper hygiene practices before, during, and after food preparation can reduce the risk of food poisoning.

As part of their nationwide Be Food Safe public education campaign, the US Department of Agriculture offers four simple tips for safe food preparation:

Clean Wash hands, surfaces and utensils often to avoid spreading bacteria when preparing food.
Separate – Use different cutting boards for raw meat, poultry, seafood and vegetables. Keep raw turkey away from vegetables and side dishes that won’t be cooked.
Cook You can’t tell it’s done by how it looks! Use a food thermometer. Every part of the turkey should reach a minimum internal temperature of 165ºF.
Chill – Keep the refrigerator at 40ºF or below to keep bacteria from growing. Pumpkin pie should always be refrigerated and all food should be refrigerated within two hours.

If deep fried turkey is your preference, be sure to observe all safety precautions and never leave your fryer unattended. For more information on food safety, visit the US Department of Agriculture website.

From all of us at Infraspection Institute, Happy Thanksgiving to all of our readers and friends! May you enjoy a safe and happy holiday in the company of those you love.


~ Jim and Christopher Seffrin ~


Visit Infraspection Institute Web Site


November 30, 2009

Sponsored by:


Thermal Imagery to Detect Roof Fasteners

Tip written by: Infraspection Institute


Thermal imaging is a proven technique for detecting latent moisture within low-slope roofing systems. Under the right conditions, thermal imaging may also indicate the number and location of roof fasteners.

Mechanical fasteners are a critical component in flat roofs. Essentially large sheet metal screws that are installed through large steel or plastic plates, mechanical fasteners secure sheets of insulation to the roof deck. In order to help ensure roof system performance, it is critical that each insulation board is installed with a sufficient number of fasteners.

An insufficient number of roof fasteners may be the result of improper design or a contractor attempting to cut corners on material. When fastener quantity is in doubt, a thermal imager may be used to indicate the number and location of fasteners. Typically, fasteners and plates will show as relatively warm components against a cooler background when imaged post-sunset after a sunny day. In the image below, subsurface fasteners and steel plates show as regularly-spaced warm circles.

When attempting to detect thermal patterns associated with mechanical fasteners, keep the following in mind:

  • Thermal imaging should begin at or shortly after sunset
  • Imagery associated with fasteners may only appear for a short time
  • Fasteners may not be detectable on low emittance or gravel-surfaced roofs

Infrared inspections of flat roofs are one of the many applications covered in the Infraspection Institute Level I Certified Infrared Thermographer® training course. For course schedules or to obtain a copy of the Standard for Infrared Inspections of Insulated Roofs, visit Infraspection Institute online or call us at 609-239-4788.

Visit Infraspection Institute Web Site


December 7, 2009

Sponsored by:

Sponsored by:

Visit IRISS


Thermography as a Business Opportunity
Tip written by: Infraspection Institute


Savvy business owners are always on the lookout for new business opportunities. Thermography can be a particularly good fit for building and home inspectors seeking to expand their services and generate new revenue.

The past few years have seen tremendous growth in the use of thermography for building inspections. Greater public awareness and lower equipment costs have induced many home and building inspectors, damage restoration specialists and pest management professionals to add thermography to their services.

The income potential for thermographers is significant. Depending upon services offered and rate structure, a single thermographer is capable of generating $250,000 per year in revenue. This potential can be influenced by a number of factors including one’s choice of infrared imaging equipment. Prior to purchasing equipment, one should keep the following in mind:

• Determine your firm’s capabilities with respect to expertise and manpower.

• Conduct a marketing study to determine what services you will offer. In particular, look for services that will repeat annually and/or provide the greatest revenue with the least amount of sales effort.

• Entry level equipment can limit one’s capabilities and revenue potential. Try to anticipate your equipment needs for at least three years and purchase accordingly.

Despite claims to the contrary, thermography is not a ‘point and shoot’ technology. In addition to thorough knowledge of the systems or structures being inspected, thermographers should be trained in infrared theory, heat transfer concepts, equipment operation and selection, current industry standards, and report generation. For those lacking experience, training should be completed prior to purchasing equipment.

Infrared inspection of buildings and their subsystems is one of the many topics covered in the Level I Infraspection Institute Certified Infrared Thermographer® training course. For information on thermographer training including course locations and dates, visit us online at www.infraspection.com or call us at 609-239-4788.


Visit Infraspection Institute Web Site


December 14, 2009

Sponsored by:

Sponsored by:


Using Switchgear Windows and Ports


As the popularity of switchgear windows and ports grows, thermographers are faced with challenges unique to these devices. In this Tip we examine some of these challenges and provide advice and cautions when imaging through windows and ports.

In an effort to reduce the risk of injuries associated with arc flash, many facilities have installed IR transmissive windows or ports that permit infrared inspections without having to open panel covers. Although windows and ports can provide a measure of safety and help to reduce labor associated with infrared inspections, they pose unique challenges not associated with direct line-of-sight imaging.

Switchgear windows are typically constructed of a metal frame with a fixed IR transparent material that enables an imager to view through them. Switchgear ports consist of a metal frame with small openings through which an imager may be sighted. Depending upon type, some ports have a single hole; others have metal screens containing multiple holes.

Windows and ports will always attenuate infrared energy received by the imager. This attenuation will affect both qualitative and quantitative data; however, the greatest challenge posed by windows and ports involves temperature measurement. Due to their small opening it is not possible to accurately measure temperature through screened ports. Accurate temperature through windows and single opening ports is possible only if the following conditions are met:

Window opening must be larger than IR lens objective
Target must be at or beyond imager’s minimum focus distance
Both window transmittance and target emittance values must be known and properly entered into imager’s computer
Imager lens must be kept perpendicular to, and in contact with window

When it is not possible to meet all of the above conditions, imagery should be evaluated only for its qualitative value. As always, any inexplicable hot or cold exceptions should be investigated for cause and appropriate corrective action taken.

The Infraspection Institute Standard for Measuring and Compensating for Transmittance of an Attenuating Medium Using Infrared Imaging Radiometers provides procedures for calculating window transmittance which is critical to accurate temperature measurement. To obtain a current copy of the Standard, call 609-239-4788 or visit our the standards area of our online store.


Visit Infraspection Institute Web Site


December 21, 2009

Sponsored by:

Sponsored by:


Holiday Wishes

Tip written by: Infraspection Institute


It is hard to believe that another year has passed and the holiday season is once again upon us. With this Tip, we invite our readers to share a favorite memory as we celebrate the season.

Recently, we noticed a television schedule announcing the airing of one of our all-time favorite programs, ‘A Charlie Brown Christmas’. As children growing up in the 1960’s, the annual airing of this program was proof that Christmas was just around the corner.

With no reruns on broadcast television, we, like many of our childhood friends, would plan our entire week around watching this special program each year. With a cool soundtrack, the program brought our favorite Peanuts characters to life as Charlie Brown strove to discover the meaning of Christmas. To this day, Linus VanPelt’s simple monologue is one of our favorite holiday memories.

With the holidays and busy year-end schedules upon us once again, we invite you to take the time to make special memories with family and friends and to keep them in your heart where you may easily find them in the future.

As we enjoy this holiday season, we extend a heartfelt Thank You to all of our readers, friends, and associates throughout the world for everything that you do for us all year long.

May your holidays be filled with peace and joy and your New Year with good health and happiness.

~ Jim & Chris Seffrin


Linus’ Monologue

Charlie Brown: Isn't there anyone who knows what Christmas is all about?

Linus: Sure, Charlie Brown. I can tell you what Christmas is all about. Lights, please.

And there were in the same country, shepherds, abiding in the fields, keeping watch over their flock by night and lo, the angel of the Lord came upon them. And the glory of the Lord shone ‘round about them and they were so afraid. And the angel said unto them, “Fear not. For behold, I bring you tidings of great joy which shall be to all people. For unto you is born this day in the city of David, a savior, which is Christ the Lord. And this shall be a sign unto you, ye shall find the babe wrapped in swaddling clothes lying in a manger.”

And suddenly there was with the angel, a multitude of the heavenly hosts praising God and saying, “Glory to God in the highest and on Earth, Peace and Goodwill toward men.”

That’s what Christmas is all about Charlie Brown.

Excerpted from ‘A Charlie Brown Christmas’ by Charles Schulz


Visit Infraspection Institute Web Site


Legal Disclaimer Site Map