2007
January 03, 2007
Sponsored by:
![]()
IR Inspections of Furnace Tubes
Tip written by: Infraspection Institute
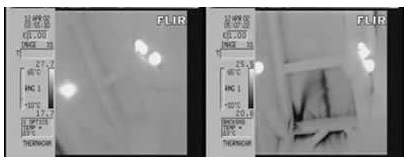
Process furnaces or heaters are a critical component found in many petrochemical refineries. Performed properly, infrared inspections of furnace tubes can provide valuable data regarding tube condition and operating temperature.
Process heaters are large, refractory-lined structures used to heat hydrocarbon product during refining. Process heaters are similar to steam boilers in their construction except that hydrocarbon is passed through the firebox tubes instead of water. Safe operation of process heaters requires that tubes operate below their maximum operating temperature. Overheating of tubes can reduce operational life or lead to catastrophic failure.
Measuring tube temperatures is difficult for many reasons. Tubes are often remotely located from inspection ports and are frequently obscured by visually opaque flames. High temperature environments make contact measurements difficult or impossible. Under the right circumstances, infrared thermography can be used to provide qualitative and quantitative data for in-service heater tubes. The following images were taken through viewports on operating heaters.

Image taken through opaque flame.
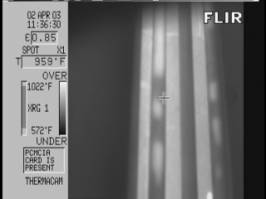
Image taken through opaque flame.
Infrared inspection of process furnaces or heaters is one of the most difficult tasks for thermal imaging and infrared radiometry. Accuracy in temperature measurement is of paramount importance since many companies utilize infrared data to determine safe operating limits for in-service heaters.
Far from being a “point and shoot” application, a thermographer needs to understand heater operation and heat transfer as well as issues pertinent to thermography. These include, but are not limited to: infrared camera selection including proper spectral response and spot measurement size; imager calibration; use of filters, windows and heat shields; calculating emittance and reflected temperature; equipment precision and accuracy; and how to obtain reliable reference temperatures to verify proper imager settings.
To help ensure accuracy, thermographers should be trained to at least Level II and, when possible, work with an experienced mentor until they have gained sufficient field experience.
Infrared inspection of process heater tubes is one of the applications covered in the Infraspection Institute Level II Certified Infrared Thermographer® training courses. For more information or course schedules, visit us online at www.infraspection.com or call us at 609-239-4788.
More information on this subject is available a free download from this website by visiting: Applications of Infrared Thermography for Petrochemical Process Heaters.
Visit Infraspection Institute Web Site
January 08, 2007
Sponsored by:
![]()
IR Inspections of Insulated Windows
Tip written by: Infraspection Institute
Infrared inspections of building envelopes can provide evidence of excess energy loss through walls, doors and roofs. Under the right conditions, thermal imagery can also provide evidence of excess energy loss through insulated window assemblies.
Insulated windows are a common feature found on modern commercial and residential structures. Unlike single pane windows, insulated windows are manufactured with an Insulating Glass Unit (IGU). An IGU typically consists of two or more layers (lites) of glazing separated by a spacer along the edge and sealed to create a hermetically sealed air space between the layers. IGUs are then encased within a sash or fixed frame in order to facilitate installation.
In order to increase the insulating performance of an IGU, the air space between the lites may be filled with air or inert gases like argon or krypton. Typically the spacer is filled with desiccant to prevent condensation. For some IGUs, most of the air is removed to further reduce convection and conduction through the finished IGU.
Over time, IGUs seals can fail causing inert gas to be lost and/or allowing humid air to enter the assembly. Unless condensation occurs between the lites, failed IGUs are difficult to detect; however, they may be readily detected using a thermal imager under the proper conditions.
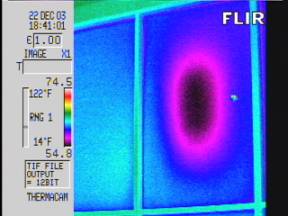
center of insulated window. Pattern typical of failed IGU seal.
Infrared inspection of insulated windows and building envelopes is one of many topics to be covered during Infraspection Institute’s annual technical conference, IR/INFO 2007 being held January 14 – 17, 2007 in Orlando, FL. For more information or to register, visit us online at www.infraspection.com or call us at 609-239-4788.
Visit Infraspection Institute Web Site
January 15, 2007
Sponsored by:
![]()
Winter Driving Tips
Tip written by: Infraspection Institute
Despite unseasonably warm weather this winter, severe weather and its attendant challenges are likely to occur before this season ends. With this Tip, we offer some advice for driving in winter conditions.
Prepare Your Vehicle
- Make sure brakes, windshield wipers, defroster, heater and exhaust system are in top condition
- Check radiator for coolant level and adequate antifreeze protection. Fill windshield washer reservoir with freeze-resistant fluid
- Check tires for proper inflation and tread condition
- Carry an ice scraper, brush, and a shovel
- Maintain a full gas tank in case of traffic delays or should you need to turn back due to conditions
- Keep snow chains handy and in good condition
Driving Tips
- Allow enough time. Trips take longer during stormy/icy conditions
- Keep windshield and windows clear
- Maintain a safe distance from other vehicles; snow and ice make stopping distances much longer
- Remember to avoid sudden stops and quick direction changes
- Watch for slippery spots. Bridge decks and shady spots can be icy when other areas are not
- Be more observant. Visibility is often limited in winter by weather conditions. Slow down and watch out for stopped vehicles and emergency equipment
Lastly, be certain to wear your seat belt. Consult your local weather forecast before you set out and consider postponing your trip if extreme weather is predicted.
Visit Infraspection Institute Web Site
January 23, 2007
Sponsored by:
![]()
Power Inverters to the Rescue
Tip written by: Infraspection Institute
For thermographers who must travel between job locations, finding an AC power source for recharging batteries or powering small devices can be a challenge. In some cases, a portable power inverter can provide a solution.
Power inverters are electrical devices that convert DC power from a battery into conventional AC power. Designed to work in most automobiles, portable power inverters can provide AC power for charging portable batteries or operating small AC devices.
Recent advances in technology have resulted in power inverters that are both small and dependable. With prices starting at less than $50, portable power inverters have become surprisingly affordable. Price is largely dependent upon two key specifications: wattage rating and sine wave output.
When choosing an inverter, keep the following in mind:
- Prior to selecting an inverter, make sure your AC device(s) can be used safely with an inverter
- Choose an inverter with a continuous output rating greater than the connected load. Ideally, inverter rating should be 20% greater than maximum continuous load
- Motorized appliances may draw up to seven times their continuous current rating during startup. For such devices, choose an inverter with adequate peak output rating
- Small inverters (<400 watts) can be powered from a cigarette lighter socket. Larger models will require direct wiring to the automobile battery with properly sized conductors
- Most inverters provide a modified sine wave output which may be incompatible with certain electronic devices such as laptop computers. For these devices, choose an inverter with a pure sine wave output
Inverters can produce enough heat to start a fire. Never overload an inverter or leave it unattended. Lastly, inverters are capable of producing dangerous or lethal voltages. Never use an inverter in a wet location as electrocution may result.
Visit Infraspection Institute Web Site
January 30, 2007
Sponsored by:
![]()
Choosing and Maintaining Your Domain Name
Tip written by: Infraspection Institute
“What’s in a name? That which we call a rose by any other word would smell as sweet.” This Shakespeare quote implies that names are not that important; however, Sir William never had a website. In this Tip we discuss the importance of website domain names.
When setting up a website, choosing a domain name is one of the most important considerations. A domain name not only represents your online identity, it can seriously influence the success of marketing a company and its products and services. Prior to selecting a domain name, it is important to understand the short and long-term implications of domain name choice.
A general rule of thumb for domain names is www.yourcompanyname.com. This convention works well if your company name is recognized and/or unique. This can get tricky if your company name is long or contains characters such as hyphens. Domain names can only use letters, numbers, or dashes; spaces and symbols are not allowed.
When selecting a domain name, keep the following in mind:
- Keep it short. Although domain names can be up to 63 characters in length, shorter names are easier to remember
- Avoid trademarked names. Cybersquatting is illegal and not well tolerated by trademark owners
- Register selected domain name(s) immediately. Include all appropriate extensions: .com, .net., .org, .biz
Lastly, be certain to renew domain name registrations on time to avoid loosing your ownership. Expired domain names that are not trademarked can be purchased by a third party and used to point traffic to websites of their choice.
Designing and maintaining an effective website is one of the many topics covered in the Infraspection Institute Level III Best Practices training course. For more information on thermographer training and certification or to register for a course, visit us online at www.infraspection.com or call us at 609-239-4788.
Visit Infraspection Institute Web Site
February 06, 2007
Sponsored by:
![]()
Infrared Imaging and Spray Testing of Walls
Tip written by: Infraspection Institute
Infrared imaging can be useful for detecting leaks within building sidewalls; however, timing an inspection can be tricky. Controlled wetting of walls can be used to simulate storm conditions during an inspection.
Water spray racks are mechanical devices that permit controlled wetting of a building surface. Spray racks typically consist of lightweight tubing and engineered spray heads spaced at regular intervals. When connected to a water supply and placed in front of a building wall, a spray rack can be used to deliver a deluge of water to an area of interest. The amount of water delivered can be controlled by using different size spray heads and/or varying supplied water pressure.
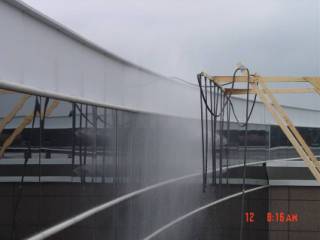
after sunset; building imaged from exterior
Because spray rack operation requires special tools and presents unique challenges, it is often best done by a qualified professional. Thermographers performing imaging during or after spray testing should keep the following in mind:
- Spray testing can be time consuming due to set up and/or repositioning of spray equipment
- Spray testing can cause significant building leakage requiring an interruption of testing
- Spray testing can be messy; avoid getting your imager wet
- When imaging from the exterior of a building, allow sufficient time for surface to dry and a Delta T to develop
Thermal imaging during spray testing is one of several applications covered in the Infrared Inspections for Home & Building Inspectors training course. For more information call 609-239-4788 or visit us online at: www.infraspection.com
Visit Infraspection Institute Web Site
February 13, 2007
Sponsored by:
![]()
Using Apple Computers for Infrared Inspection Reports – Part I
Tip written by: Infraspection Institute
Apple Macintosh computers have long been noted for their superior graphics capabilities. Although the Mac platform has been largely ignored by infrared camera manufacturers, Apple computers can provide thermographers with some powerful tools for documenting their findings.
Since post processing software first appeared for thermal imagers, manufacturers have relied exclusively on PC based software for their applications. For some thermal imagers, qualitative imagery can be viewed using a Mac. However, at present, no imaging radiometer stores temperature data in a format that is readable by a Mac. Although this situation is unlikely to change in the near future, Mac computers do offer some distinct advantages for documenting an infrared inspection.
For infrared cameras equipped with a standard video output, infrared imagery can be digitally recorded using a video recorder. Apple’s iLife suite can then be used to import and edit infrared and/or daylight video to produce professional quality videos or DVDs of an inspection.
When documenting infrared data to video, keep the following in mind:
- Video is particularly useful when documenting large structures and/or dynamic processes
- Clear voice narrations can vastly improve viewer comprehension
- Using a fluid head tripod will provide imagery that is smooth and steady
- Video recordings are WYSIWYG; be certain that captured imagery contains exactly what you want a viewer to see – color palettes, temperature tools, etc.
Generating standards-compliant reports and video recordings are two of the many topics covered in the Infraspection Institute Certified Infrared Thermographer® Level I training course. For more information on Infraspection training courses or class schedules, call 609-239-4788 or visit us online at: www.infraspection.com.
Visit Infraspection Institute Web Site
February 19, 2007
Sponsored by:
![]()
Measuring Motor Temperatures
Tip written by: Infraspection Institute
Temperature can be an indicator of the condition of installed electric motors; however, the best location for measuring temperature is often debated. In this Tip we discuss the best location for measuring motor temperatures.
Measuring motor temperature is often a challenge since electric motors differ widely in their design and construction. While many have suggested measuring the motor casing along the stator, this method does not work well for motors that are fan cooled or exposed to external air currents. For uncooled motors, this approach can produce varying temperature values depending upon the location of the subject temperature readings.
In 1997, a research project led by Infraspection Institute utilized instrumented motors in a controlled environment to determine the effect of excess force on installed motors. One of the primary goals of this research was to identify a location for collecting reliable temperature data.
From our research it was found that measuring the exterior of the motor bellhousing within 1” of the output driveshaft consistently produced temperatures that were within 1 to 2 C of the motor windings and the output side bearing assembly. Temperatures taken at the bellhousing were especially useful for fan cooled motors since this area was unaffected by convective cooling from the fan.
When measuring motor temperatures, keep the following in mind:
- Make certain that all thermometers are within calibration and used properly
- Motor temperature will vary with load and ambient temperature. Be certain to record both with along motor temperature
- Elevated temperatures can be caused by electrical or mechanical defects within the motor and/or defective installations
- Motors with elevated temperature should be further investigated for cause and repaired or replaced accordingly
Temperature limits and trending of two of the many topics covered in the Level II Infraspection Institute Certified Infrared Thermographer® training course. For more information on upcoming classes or to obtain a copy of our Cross Technologies Study, call 609-239-4788 or visit us online at www.infraspection.com.
Visit Infraspection Institute Web Site
February 26, 2007
Sponsored by:
![]()
Images and Reports – Who Owns Them?
Tip written by: Infraspection Institute
It is said that, “Possession is nine tenths of the law. When it comes to infrared data, ownership is often not that simple. In this Tip we explore the frequently misunderstood topic of infrared data ownership.
Thermograms and hardcopy reports are commonly produced for infrared inspections. Like proud parents sharing photographs of children, thermographers frequently share images, data, and reports with others. During these demonstrations, it is not uncommon to hear thermographers refer to this work product as “my images” and “my reports”. For the purposes of casual conversation, referring to work product in the possessive sense is acceptable; however, the actual owner of such data is often someone else.
Under a principle known as ‘Shop Rule’, data produced by thermographers as part of their duties as an employee belongs to their employer. In general, Shop Rule will always apply unless there is a written agreement to the contrary. For thermographers who work as consultants, a principle known as ‘Works for Hire’ may apply. Under this principle, any work product generated belongs to the client and not the thermographer.
Thermographers who work as consultants should be mindful that contracts and written agreements often have ‘Works for Hire’ clauses. These clauses may appear in the body of a contract or purchase order or be incorporated by reference. Thermographers who wish to retain ownership should address this issue prior to the commencement of any work.
Prior to using infrared data for any purpose other than its original intent, always obtain permission to do so. Employers and clients are frequently willing to grant permission to use imagery provided it does not divulge a trade secret or jeopardize confidential information.
Capturing imagery and preparing reports are two of the many topics covered in the Level I Infraspection Institute Certified Infrared Thermographer® training course. For more information on upcoming classes, call 609-239-4788 or visit us online at www.infraspection.com.
Visit Infraspection Institute Web Site
![]()
Checking IR Equipment Calibration
Tip written by: Infraspection Institute
Equipment calibration can have a significant impact on the accuracy of infrared temperature measurement. In this Tip we discuss a simple technique for checking the accuracy of imaging and non-imaging radiometers.
Infrared radiometers must be within calibration in order to accurately measure temperatures. Traditionally, thermographers periodically send their equipment to the manufacturer for calibration. For some, this process can take several weeks and can be rather expensive. As an alternative, savvy thermographers can check the calibration of their instrument quickly and easily using some commonly available items.
In order to check infrared radiometer calibration, you will need at least two targets each with a known temperature and emittance. A simple solution is to use a container of ice water and a container of boiling water with a coupon of Scotch PVC electrical tape affixed to the container’s exterior surface. The size of both targets must exceed the spot measurement size of the instrument being calibrated. Container temperatures may be ascertained with a thermometer, thermocouple or contact radiometer.
Once targets have been prepared, use the following procedure:
- Turn radiometer on and allow it to stabilize to room temperature.
- Set radiometer perpendicular to target surface
- If possible, set radiometer inputs for distance, humidity & air temperature
- Aim, focus and calculate Reflected Temperature
- Set radiometer emittance control
- Scotch 191 tape = 0.97 LW or SW
- Ice = 0.98 LW; 0.93 SW
- Using subject radiometer, measure temperature of target. For ice water, measure temperature of ice cubes. For hot water container, measure tape coupon.
- Compare radiometer’s value with contact temperature reading for each target to ensure that radiometer is within spec
A heated blackbody simulator can be used to check instrument calibration at higher temperatures. Because radiometer calibration is not user-adjustable, it will be necessary to return it to the manufacturer should you find your instrument is out of spec.
Verifying infrared equipment calibration is one of the many topics covered in Infraspection Institute Level II Certified Infrared Thermographer training course. For more on information on thermographer training and certification or to register for a course, visit us online at www.infraspection.com or call us at 609-239-4788.
Visit Infraspection Institute Web Site
![]()
Purchasing an Imager – Which Brand is Best?
Tip written by: Infraspection Institute
When purchasing a thermal imager, buyers frequently ask, “Which brand of imager is best?” While this seems like a straightforward question, the answer is not so simple. In this Tip we offer advice for making the correct choice.
As infrared thermography gains wider acceptance, its usage is increasing. Meanwhile, the task of selecting an imager is becoming more difficult. Presently, there is a wide selection of equipment available from a record number of manufacturers. With some manufacturers offering several variants of camera models, there are more choices than ever before.
Procuring an imager is a challenge for many reasons: initial purchase price can easily run into the tens of thousands of dollars, no imager is capable of performing all imaging applications, imager performance varies widely, performance specs are not always available or comparable, and making an incorrect purchase can be costly.
Purchasing an imager should be done by assessing your company’s present and future needs, obtaining and comparing manufacturer specifications, and taking time to thoroughly evaluate the imager in the workplace where it will be used. Prior to purchase, the imager and its manufacturer should be carefully evaluated in the following areas:
- Evaluate imagers objective and performance specifications
- Obtain service and warranty information
- Evaluate imager for subjective characteristics
- Consider equipment value
Lastly, when considering pre-owned equipment, it is often a good idea to have a title search conducted prior to purchase to ensure that the equipment is free of liens.
Equipment purchase is of the many topics covered in the Level I Infraspection Institute Certified Infrared Thermographer® training course. For more information on upcoming classes or to obtain a copy of our article, Selecting, Specifying and Purchasing Thermal Imagers, call 609-239-4788 or visit us online at www.infraspection.com.
Visit Infraspection Institute Web Site
![]()
Why Building Corners Appear Cool
Tip written by: Infraspection Institute
When performing infrared inspections of framed buildings from the interior, thermographers often note that corners appear at a different temperature. With this Tip we explore the reasons for this condition and how to differentiate potential problems from normal conditions.
Corners are a common construction detail found within building walls that utilize frame construction. Corners are typically constructed with vertical framing members that both support the framed wall and provide a nailing surface for interior paneling or drywall. Although details can vary, a typical corner has three vertical studs in close proximity to each other.
More energy loss occurs at corners for two reasons: Studs are more conductive than insulation; and there is little or no space for insulation to be installed wherever corner framing studs are present. Because of this, it is normal to see greater energy loss at corners when compared to a properly insulated wall cavity.
When performing an infrared inspection of framed walls from the interior of a building with cold outdoor temperatures, corners will typically appear cooler than insulated wall cavities. Observed thermal patterns will reverse should the same inspection scenario exist with warm outdoor temperatures.
When thermographically inspecting corner details, it is normal to observe a straight vertical line from floor to ceiling. This vertical line should be confined to the corner itself and not extend onto the flat wall surfaces adjacent to the corner. Amorphous or geometric thermal patterns appearing within or adjacent to corners should be investigated for cause.
Infrared inspection of building envelopes is one of the many applications covered in the Infraspection Institute Level I Certified Infrared Thermographer® training course. For course schedules or to obtain a copy of the Guideline for Performing Infrared Inspections of Building Envelopes and Insulated Roofs, visit Infraspection Institute online at www.infraspection.com or call us at 609-239-4788.
Visit Infraspection Institute Web Site
![]()
Using Voltage Drop Measurements
Tip written by: Infraspection Institute
Accurate confirmation of thermal data is a critical step when performing infrared inspections of energized electrical systems. In this Tip we discuss an advanced verification technique known as a voltage drop measurement.
Loose and deteriorated connections are among the most common defects detected during thermographic inspections of electrical systems. Thermal patterns associated with these defects are characterized by heating at, or adjacent to, mechanical connections within the circuit. Loose connections are frequently found at terminals, lugs, fuse clips and splices.
In most cases, thermographers discovering suspected loose connections will document such hotspots and recommend that the observed exception be investigated and appropriate corrective action be performed. Typically, such investigation is performed at a later time with the circuit de-energized utilizing manual inspection or contact resistance testing.
Another method for confirming loose/deteriorated connections is known as a voltage drop measurement. To perform this test, a digital voltmeter is used to measure voltage across the subject connection with the circuit energized and under load. Loose/deteriorated connections will exhibit an increased voltage drop across the connection due to higher resistance. Observed voltage drop values may then be compared to other similar connections under similar load.
Because voltage drop measurements require contact with energized circuits, this testing should only be performed by qualified persons while observing all necessary safety precautions. Lastly, one should be aware that neither temperature nor voltage drop measurements can predict time of failure for any electrical component. Therefore, suspected loose connections should always be investigated for cause and appropriate corrective action undertaken as soon as possible.
Infrared inspection of electrical distribution systems is one of the many applications covered in the Infraspection Institute Level I Certified Infrared Thermographer® training course. For course schedules or to obtain a copy of the Guideline for Performing Infrared Inspections of Electrical and Mechanical Systems, visit Infraspection Institute online at www.infraspection.com or call us at 609-239-4788.
Visit Infraspection Institute Web Site
![]()
Infrared Inspections of Roofs Containing Foam Insulation
Tip written by: Infraspection Institute
You can’t believe everything you hear. This can be especially true when it comes to performing infrared inspections on flat roofs that contain closed cell foam insulation.
Closed cell foam generically describes several insulation materials commonly found in low slope or flat roofs. Typical materials include urethane foam, isocyanurate foam and, in some cases, cellular glass. Closed cell foam insulations typically offer good R value, are dimensionally stable, and can be used with a wide variety of roofing materials.
Another characteristic of closed cell foam insulations is that they are water resistant. This characteristic, however, only applies to short term exposure to water. When installed in a roofing system and exposed to water for extended periods of time, the cells tend to break down permitting the insulation to become quite absorbent. When this occurs, foam insulation can absorb large quantities of moisture and will exhibit the type of thermal patterns typically associated with absorbent insulations.
Over the years, many have claimed that infrared inspections of closed cell foam roofs are ineffective due to foam’s low absorbency. The thermal image below clearly shows the extent of water damage in a roof constructed with foam insulation.
Note the solid thermal pattern typical of absorbent insulation.
Thermogram provided by Jersey Infrared Consultants
Initially, thermal patterns associated with latent moisture in roofs containing foam insulation will exhibit ‘picture frame’ signatures. These thermal patterns are due to water collecting at the perimeter of individual boards. As time progresses and the foam loses its water resistance, insulation boards will begin to exhibit the same type of thermal signatures exhibited by wet, absorbent insulations such as wood or glass fiber.
Infrared inspections of flat roofs is one of the many applications covered in the Infraspection Institute Level I Certified Infrared Thermographer® training course. For course schedules or to obtain a copy of the Guideline for Performing Infrared Inspections of Building Envelopes and Insulated Roofs, visit Infraspection Institute online or call us at 609-239-4788.
Visit Infraspection Institute Web Site
![]()
Thermography and ASNT Certification
Tip written by: Infraspection Institute
In his commentary, ‘The 35 Undeniable Truths’, Rush Limbaugh states, “Words mean things.” This is especially true in thermography when it comes to one’s certification.
Certification has long been recognized as an indicator of a thermographer’s formal education and/or qualifications. Certification can have significant financial implications since buyers of inspection services often base purchasing decisions on a thermographer’s level of certification. Unfortunately, misstatements regarding certification, in particular ASNT certification, are quite common.
First of all, ASNT Certification – certification issued by the American Society of Nondestructive Testing – is only available from ASNT Headquarters in Columbus, Ohio. This certification program is designed to provide uniform testing and certification of NDT personnel that is ‘transportable’ when an NDT technician leaves the employ of a company.
The use of the title, ‘ASNT Certified Thermographer’ is incorrect since ASNT does not use or recognize the term ‘thermographer’ in any of its professional designations. The correct term is NDT person or NDT technician.
Although ASNT does offer Level II certification in some NDT disciplines, they presently do not certify anyone below Level III in the Thermal Infrared (TIR) Method. Therefore, titles such as “ASNT Level 2 Certified Thermographer” or “ASNT Level 1 Certified Thermographer” do not exist except on the websites or advertising materials of companies who believe they have earned such titles. There are many examples of such citations ranging from infrared consultants to top executives at infrared equipment manufacturers.
Perhaps the biggest reason that considerable confusion surrounds ASNT certification is that some infrared trainers provide misleading information on this topic. Further compounding this problem is that many thermographers are imprecise when they represent their credentials. Few thermographers who do misrepresent themselves are rarely called to task by their peers or their clients.
Ethics within any profession demand that practitioners always represent their qualifications and credentials accurately. Because words do mean things, thermographers must be careful when representing their qualifications and avoid using titles that do not exist. Accurately describing your certification reflects not only on you but on the credibility of our industry as well.
The topics of ASNT certification and how to establish ASNT-compliant certification programs are two of the many topics covered in depth within the Infraspection Institute Level III Certified Infrared Thermographer® training course. For more information on course dates or to register for a course, call 609-239-4788 or visit Infraspection Institute online.
Visit Infraspection Institute Web Site
![]()
What Do Thermometers Measure?
Tip written by: Infraspection Institute
When asked what a thermometer measures, most people will tell you that thermometers measure whatever they contact. The correct answer is a little more complex and is fundamental to understanding and accurately applying contact thermometry.
Contact thermometry is a common technique used in temperature measurement. Thermocouples, resistance temperature devices, thermistors, and bulb thermometers are used to gauge the temperature of a wide variety of objects, materials, and systems. Although each works on a different principle, all contact temperature devices have one thing in common: contact thermometers report their own temperature.
Because contact thermometry is often used by thermographers to confirm radiometric measurements and to calibrate infrared equipment, accuracy is extremely important. To help ensure accuracy when using a contact thermometer, keep the following in mind:
- Select thermometer appropriate for task. Be sure to consider sensor size, thermometer sensitivity, operating range, and response time
- Prior to use, confirm that chosen thermometer is calibrated and operating properly
- Make certain that selected thermometer is in good contact with object
- Allow sufficient time for thermometer to achieve thermal equilibrium with object
Prior to using a contact thermometer, make certain that the surface to be measured is safe to touch. Never use a contact thermometer on energized electrical equipment or on any machinery where contact could result in personal injury.
Advanced heat transfer and temperature measurement are some of the many topics covered in the Infraspection Institute Level II Certified Infrared Thermographer® training course. For course schedules or to register for a course, visit Infraspection Institute online or call us at 609-239-4788.
Visit Infraspection Institute Web Site
![]()
Roof Inspections – Solar Reflectance versus IR Reflectance
Tip written by: Infraspection Institute
Energy and environmental concerns have caused many facility owners to look to their roofing systems for ways to conserve energy. Modern roofing systems known as ‘cool roofs’ can provide savings; however, they can present challenges for thermographers who inspect them.
Over 90% of roofs in the United States are dark colored. On sunny days, temperatures of these roofs can reach 150º to 190º F causing decreased indoor comfort, increased cooling costs, and premature aging of roofing materials. Advances in roofing technology have led to the development of ‘cool roof’ systems that help to solve these challenges.
Cool roof materials have a high solar reflectance or albedo. Compared to conventional roof materials, cool roofs operate at lower temperatures since they absorb less energy from the Sun. Cool roofs also have a high thermal emittance enabling them to radiate well and shed heat quickly after sunset.
Cool roof membranes are usually made of single-ply rubber or plastic materials such as EPDM, PVC, and TPO. These materials are usually white in color and have a smooth surface. Cool roof coatings or paints are an alternative for existing low-slope roofs.
Although cool roof materials are rated to have a high emittance, thermographers should remember that this value is an average emittance value calculated in a laboratory under ideal conditions and at a perpendicular viewing angle. During an infrared inspection, smooth-surfaced roofs appear quite reflective to a thermal imager due to the low viewing angle that is usually associated with inspections performed on foot from the roof surface. This condition is most severe on cloudless nights when atmospheric humidity levels are low.
Due to the low emittance associated with smooth roof surfaces, thermographers can easily miss the small temperature differentials associated with latent moisture. In order to mitigate errors associated with low emittance, thermographers should choose a short wave (2 to 5.6 microns) thermal imager whenever inspecting a smooth-surfaced roof regardless of membrane color or material.
Infrared inspection of flat roofs and proper equipment selection are two of the many topics covered in the Infraspection Institute Level I Certified Infrared Thermographer® training course. For more information or to register for a course, visit Infraspection Institute online or call us at 609-239-4788.
Visit Infraspection Institute Web Site
![]()
IR Inspections of Roofs with Insulating Decks
Tip written by: Infraspection Institute
Thermography is a proven technique for inspecting insulated, low-slope roofing systems. Under the proper conditions, thermography may also be used to inspect uninsulated roofs that are constructed with an insulating deck.
Flat or low slope roofs, also known as insulated roofs, are a common feature found in commercial construction. Applicable construction includes smooth, gravel, or granule-surfaced membranes having a layer of insulation located between the deck and the membrane and in continuous contact with the underside of the membrane.
As an alternative, some roof membranes may be installed without insulation directly over insulating roof decks. Common insulating deck materials include gypsum and lightweight concrete. Typically, these materials are mixed to produce a liquid slurry which is poured and formed in place during construction. After solidifying and drying sufficiently, the roof membrane is laid directly over the insulating deck.
Because wet-applied decks can retain significant quantities of construction water, thermographically inspecting these roofs can be a challenge. In some cases, it may take several months for construction water to dry out making it difficult or impossible to detect thermal patterns associated with water ingress. In other cases, water entering these systems due to a leak may diffuse or dry out quickly.
Selecting optimal site and weather conditions is of paramount importance when performing infrared inspections of uninsulated roofs with gypsum or lightweight concrete decks. Among these are:
- Rainfall within previous 48 hours
- Completely dry roof surface at sunrise
- Daytime high temperatures above 40ºF and little or no wind
- Mostly sunny day followed by clear evening with no wind and temperatures above 32ºF
Infrared inspections should be conducted by walking over the subject roof(s) after sunset. The inspection should be methodically conducted and no inexplicable anomaly should be overlooked. All thermal data should be verified by invasive moisture meter readings and core samples. Core samples should be gravimetrically analyzed to ascertain that moisture content is acceptable even if the roof appears to be uniformly dry.
Infrared inspection of flat roofs and proper equipment selection are two of the many topics covered in the Infraspection Institute Level I Certified Infrared Thermographer® training course. For more information or to register for a course, visit Infraspection Institute online or call us at 609-239-4788.
Visit Infraspection Institute Web Site
![]()
Using a Blower Door During an IR Inspection
Tip written by: Infraspection Institute
Data obtained during infrared inspections can often be improved by incorporating other tools. When it comes to building inspections, a blower door can be useful in detecting air leakage sites and helping to gauge the airtightness of a building.
Air leakage is often a major source of energy loss in buildings. Although an infrared imager can help detect evidence of air leakage sites, it cannot pinpoint all air leakage sites nor can it quantify the amount of air leakage occurring. Many thermographers overcome these limitations by utilizing a blower door in conjunction with their infrared inspection.
A blower door consists of an instrumented, high volume fan that is temporarily placed in a doorway to create a positive or negative pressure within a building. In depressurized mode, the blower door simulates a wind blowing equally on all sides of the building. Conducting an infrared inspection with the building depressurized enables a thermographer to detect air leakage sites that would not be visible under natural conditions. With special software, it is possible to estimate the relative leakage of a structure as well as the total area of all leak sites.
A blower door can provide a thermographer with some advantages; however, there are challenges associated with their use. Using a blower door during an infrared inspection represents a “worst case” scenario and may not be indicative of natural conditions. This may invalidate thermal imagery that is destined for use in a legal case. Since blower doors can cause backdrafts from fireplaces, stoves, and heating equipment, they should be operated only by persons who are properly trained in their application and use.
Infrared inspection of building envelopes is one of the many topics covered in the Infraspection Institute Level I Certified Infrared Thermographer® training course. For more information or to register for a course, visit Infraspection Institute online or call us at 609-239-4788.
Visit Infraspection Institute Web Site
![]()
Care & Maintenance of Fire Resistant Clothing
Tip written by: Infraspection Institute
Many thermographers are aware of the OSHA and NFPA standards requiring the use of Fire Resistant Clothing. Aside from proper use, care and maintenance are of utmost importance for maintaining the effectiveness of FRC.
Fire Resistant Clothing is required Personal Protective Equipment for many who work in high temperature areas or near energized electrical equipment. If your job requires the use of FRC, there are several important things of which you should be aware.
- FRC is not fireproof. It is designed to protect the wearer from burns by resisting ignition during brief periods of high temperature exposure such as electrical arc flashes.
- FRC effectiveness can be compromised by age, wear, contamination with flammable materials and the attachment of name patches or embroidery.
- FRC can be rendered ineffective by improper cleaning or laundering. FRC should be laundered separately from other garments and in accordance with manufacturer’s recommendations and the requirements of ASTM Standard F1449.
FRC should always be worn as the outer-most garment. If worn over other layers of clothing, the undergarments should be made of natural fiber and completely covered by the FRC. Before wearing FRC, be certain to understand its proper application and limitations and how to use and maintain it properly.
Thermographer safety and the use of PPE are two of the many topics covered in the Infraspection Institute Level I Certified Infrared Thermographer® training course. For more information or to register for a course, visit Infraspection Institute online or call us at 609-239-4788.
Visit Infraspection Institute Web Site
![]()
Emissivity Settings for Building Inspections
Tip written by: Infraspection Institute
A common question among thermographers who perform infrared inspections of buildings is, “What emissivity setting should I use?” While this might seem like a straightforward question, the answer is not that simple.
Recent years have seen a dramatic increase in the use of thermography as a building diagnostics tool. While many applications are qualitative, there are occasions when quantifying temperature can be useful. In order to accurately perform non-contact temperature measurements, one must input the correct emittance value into a radiometer’s computer.
While many equate emissivity to values published in emittance tables, emissivity is a dynamic characteristic that is influenced by several factors. These include: wavelength, object temperature, viewing angle, target shape, and surface condition. Each of these factors can vary between projects or during a given inspection.
Further compounding the challenge is the fact that not all imagers are created equal. Imagers lacking corrective inputs for atmospheric attenuation and/or reflected temperature often require an exaggerated emittance value be utilized.
When performing an infrared inspection of buildings, keep the following in mind:
- For qualitative inspections performed with an imaging radiometer, leave the imager’s E control set to 1.0. If possible, turn off all temperature measurement tools.
- In general, dielectric materials will have a relatively high emittance; shiny surfaces and glass will be quite reflective.
- Viewing angle and reflected temperature can greatly influence the effective emittance of a material. In particular, smooth-surface roof membranes and building sidewalls can be quite reflective when imaged at low viewing angles often associated with ground-based inspections.
Lastly, emittance values obtained from published tables can introduce significant temperature measurement errors. Whenever possible, one should calculate emittance values with the subject imager and cross verify observed temperatures with contact thermometry.
Visit Infraspection Institute Web Site
![]()
Tornado Safety
Tip written by: Infraspection Institute
With the onset of warm weather, tornado season has arrived. In an average year, tornadoes in the US cause 80 fatalities and 1500 injuries. Knowing what to do before and during a tornado is crucial for survival.
Tornadoes are nature’s most violent storms. Spawned from powerful thunderstorms, tornadoes can cause fatalities and devastate a neighborhood in seconds. A tornado appears as a rotating, funnel-shaped cloud that extends from a thunderstorm to the ground with whirling winds that can reach 300 miles per hour. Damage paths can be in excess of one mile wide and 50 miles long. Every state is at some risk from this hazard.
Some tornadoes are clearly visible, while rain or nearby low-hanging clouds obscure others. Occasionally, tornadoes develop so rapidly that little, if any, advance warning is possible. The best defense against tornadoes is to be alert to weather conditions and be ready to seek shelter.
Before a tornado, be alert to changing weather conditions.
- Listen to NOAA Weather Radio or to local newscasts for the latest information
- Watch for approaching storms
- Know the danger signs:Dark, often greenish sky, Large hail,Large, dark, low-lying or rotating clouds, Loud roar, similar to a freight train
- If you are in a structure, go to a pre-designated shelter area or the center of an interior room on the lowest building level. Get under a sturdy table and use your arms to protect your head and neck. Do not open windows.
- If you are in a vehicle, get out immediately and go to the lowest floor of a sturdy, nearby building or a storm shelter. Mobile homes, even if tied down, offer little protection from tornadoes.
- If you are outside with no shelter, lie flat in a nearby ditch or depression and cover your head with your hands. Beware of flying debris and the potential for flooding.
-
- Do not post anything you would not (or should not) say in public
- Always refrain from using foul, profane, or vulgar language
- Do not badger others or attack their personal beliefs
- Avoid over exposure. Chronic posting or posting ‘round the clock gives the impression that you have nothing better to do.
- Keep in mind that posts can be viewed worldwide across different languages and cultures. Humor and witticism rarely translate well; sarcasm is often magnified.
- May contain a hazardous or potentially hazardous atmosphere
- May contain a material which can engulf an entrant
- May contain walls that converge inward or floors that slope downward and taper into a smaller area which could trap or asphyxiate an entrant
- May contain other serious physical hazards such as unguarded machines or exposed live wires
- Must be defined by the employer who must inform exposed employees of the existence and location of such spaces and their hazards
- Do not enter permit-required confined spaces without being trained and without having a permit to enter
- Review, understand and follow employer’s procedures before entering permit-required confined spaces and know how and when to exit
- Before entry, identify any physical hazards
- Before and during entry, test and monitor for explosive hazards as necessary
- Use employer’s fall protection, rescue, air monitoring, ventilation, lighting and communication equipment according to entry procedures
- Only qualified persons should be allowed near energized equipment
- Treat all devices and enclosures as though they are energized
- Never touch enclosures or devices without proper PPE
- Do not lean on or use electrical enclosures as work tables
- Always follow appropriate safety rules
- Know what to do in case of an accident
For more information on tornadoes and tornado safety, visit the NOAA website.
Visit Infraspection Institute Web Site
Netiquette and Your Online Image
Tip written by: Infraspection InstituteFirst impressions not only count but they can last a long time. Bad impressions can last forever especially if their source is constantly in public view on an internet message board.
Humans leave their mark everywhere they go. They leave fingerprints on the things they touch, footprints in the sand where they walk, and personal impressions on those they meet. A less considered type of impression is an ‘internet footprint’ which is created whenever a person posts to public message boards or blogs.
Web posts often make permanent impressions on those who read them. Web posts that are timely, accurate, and professional can serve to help others and create a positive image for their authors. Bad or inappropriate posts can cause permanent damage and even harm one’s business. When posting on the net, following a few simple rules or netiquette can help to avoid creating a bad impression in cyberspace.
Lastly, remember to think before you hit the ‘send’ button. Web posts often have an unintended permanence and are available for the world to see. Webmasters are rarely under any obligation to remove or edit posts regardless of how unflattering they may be.
Visit Infraspection Institute Web Site
Permit-Required Confined Spaces
Tip written by: Infraspection InstituteInfrared inspections performed in commercial and industrial settings may require entry into confined spaces in order to inspect equipment. In this Tip, we cover the basics for working safely in confined spaces.
According to OSHA, “A confined space has limited openings for entry or exit, is large enough for entering and working, and is not designed for continuous worker occupancy. Confined spaces include underground vaults, tanks, storage bins, manholes, pits, silos, underground utility vaults and pipelines.
Permit-required confined spaces are confined spaces that:
What to do:
Lastly, maintain contact at all times with a trained attendant either visually, via phone, or by two-way radio. This monitoring system enables the attendant and entry supervisor to order you to evacuate and to alert appropriately trained rescue personnel to rescue entrants when needed.”
Thermographer safety is one of the many topics covered in the Infraspection Institute Level I Certified Infrared Thermographer® training course. For more information including course locations and dates, visit Infraspection Institute or call us at 609-239-4788.
For more complete information on workplace safety, visit the OSHA website.
Visit Infraspection Institute Web Site
A Hidden Danger in Electrical Systems
Tip written by: Infraspection InstituteAlthough thermography is a non-contact test, preparing for an infrared inspection of electrical equipment often requires manual preparation of switchgear components. Unwary thermographers and their assistants can be injured by making contact with cabinets or component surfaces that have become accidentally or unintentionally energized.
Switchgear enclosures and components are generally designed to prevent their surfaces from becoming energized. Under certain circumstances, switchgear enclosures and other dielectric surfaces can become unintentionally energized to significant voltage levels. This potentially lethal condition may be caused by improper wiring, faulty equipment, or contamination due to dirt or moisture.
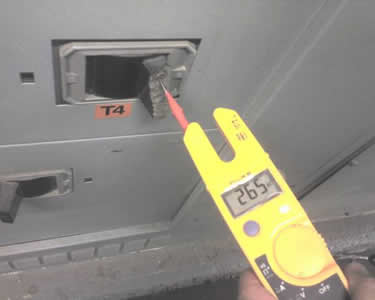
The image below shows a potential of 265 volts AC between a molded case circuit breaker and ground. This condition was discovered after an unprotected worker received a shock by touching the phenolic breaker handle.
Whenever working on or near energized electrical equipment, keep the following in mind:
Remember ~
There are old thermographers and
There are bold thermographers; however,
There are no old, bold thermographers.Thermographer safety is one of the many topics covered in the Infraspection Institute Level I Certified Infrared Thermographer® training course. For more information including course locations and dates, visit Infraspection Institute online or call us at 609-239-4788.
If you see an approaching tornado or are under a tornado WARNING, seek shelter immediately.