2005
January 10, 2005
Sponsored by:
![]()
Detecting Electrical System Overloads
Statistically, overloaded circuits are the second most common cause of exceptions found during infrared inspections of electrical systems. Although overloads are quite common, they can be tricky to accurately diagnose.
As electrical current flows through a conductor, heat is generated. As circuit load increases, so does the amount of heat. Electrical circuits are designed so that loads will not exceed the circuit’s ability to safely carry a sustained load and the amount of heat associated with such load.
Typically, overcurrent protection devices such as fuses or circuit breakers are designed to protect circuits from overload conditions. These devices will interrupt the circuit when the current reaches a predetermined level for a specified period of time.
Serious problems such as fires can be caused by sustained overloads. Such overloads may be caused by: improperly sized wiring, and improperly sized or defective overcurrent protection. Fortunately, a thermal imager can be used to detect the thermal patterns associated with sustained overloads.
When using a thermal imager to detect potential overloads, one should keep the following in mind:
- Overloaded conductor(s) will be uniformly warm throughout entire length
- For polyphase circuits, all conductors may be uniformly warm
- Depending upon ambient conditions and imager settings, overloaded circuits may not appear remarkably warmer than adjacent circuits
Because an infrared imager cannot measure electrical current, suspected overloads must be confirmed with an ammeter while observing all requisite safety precautions. For greatest accuracy, a true RMS sensing ammeter is recommended. Circuits found to be overloaded should be immediately investigated for cause and corrected.
January 17, 2005
Sponsored by:
![]()
How Dust Creates Full Size Thermal Imagery
When performing an infrared inspection of the interior of a building, you may be able to visually observe full-size thermal images without your thermal imager. The cause of this phenomenon is simple dust and dirt normally found within most buildings.
Many buildings employ cavity wall details in the construction of interior spaces. When the exterior of framed walls are exposed to cold temperatures, areas with diminished R values will cause the interior surfaces of the wall to cool. Such cold areas may be caused by framing members or wall cavities with missing or damaged insulation.
If interior humidity levels are high and outdoor temperatures sufficiently low, moisture will condense on the wall surfaces within the occupied spaces. Once moisture condenses on the wall surfaces, dust and smoke particles can collect in these areas and will remain once the wall surface has dried.
Thermal patterns caused by dust and condensation are readily observed for light-colored walls with smooth surfaces such as drywall coated with smooth latex paint. The intensity of the resulting dust patterns will be dependent upon humidity levels, wall temperatures, and the amount of particulates within the air.
Typically dust patterns are more intense within areas occupied by smokers, within kitchens, near woodstoves or fireplaces, or in areas where candles are burned. Over time, dust patterns can become quite pronounced and will often clearly show every framing member and insulation deficiency within the wall.
January 24, 2005
Sponsored by:
![]()
Detecting Delamination of Stucco
With aging infrastructure becoming an increasing concern in many communities, more attention is being focused on the maintenance of building facades. Under the right conditions, thermal imaging can detect evidence of delaminated stucco or concrete finishes on the exterior of masonry buildings.
Over time, buildings that utilize concrete stucco for exterior finishes are subject to failure. One of these failures involves the stucco delaminating from its substrate. Delaminated stucco is a serious safety concern as it can cause serious injury to pedestrians should it fall from any significant height.
When concrete stucco delaminates from its substrate, an air pocket is formed between the stucco finish and the substrate. Because this air pocket acts as an insulator, it will change the thermal capacity and/or thermal conductivity in the area of the delamination. Under the correct weather conditions, thermal imaging can detect evidence of delaminated areas.
In order to detect evidence of delaminated areas using thermal imaging, a temperature differential must be present. Typically, infrared inspections of concrete stucco are performed during evening hours following a sunny day. As an alternative, infrared inspections may also be performed during midday under solar loading conditions. Thermal patterns associated with delaminated stucco will generally be amorphous in shape and will typically appear as cold spots during post-sunset inspections or as hot spots during midday inspections.
When performing infrared inspections of concrete stucco finishes, keep the following in mind:
- Subject surfaces should be clean and dry
- Wall surfaces must be heated uniformly. Areas in shadow or shade may not produce accurate data
- IR inspections are qualitative in nature. Compare similar areas to each other noting any inexplicable temperature differences
Once the infrared inspection has been completed, all thermal anomalies should be investigated for cause and appropriate corrective measures taken.
January 31, 2005
Sponsored by:
![]()
Why Imagers & Radiometers Disagree
As the awareness of non-contact temperature measurement has increased, spot radiometers have become common tools in the workplace. Discrepancies frequently arise when temperatures taken with spot radiometers are compared to temperatures obtained with an imaging radiometer.
Advances in technology and increased sales volume have allowed several manufacturers of spot radiometers to offer a number of models priced below $100. Lower cost, combined with a greater awareness of infrared thermometry, has allowed most maintenance personnel to incorporate spot radiometers into their toolboxes.
When a thermographer reports temperatures obtained with an imaging radiometer, maintenance personnel will frequently attempt to cross-verify reported temperatures with a spot radiometer. In such situations, discrepancies are common as the spot sizes of imaging radiometers and spot radiometers often vary widely. In order to ensure measurement accuracy and avoid discrepancies, one should bear the following in mind:
- For accurate temperature measurement, radiometers must be operated correctly and in accordance with manufacturer’s instructions
- Radiometer accuracy can degrade over time or with physical stress
- Spot radiometers will generally have spot measurement sizes that are larger than imaging radiometers
- When spot measurement sizes vary between instruments, reliable cross-verification is not possible
To avoid discrepancies, personnel who utilize infrared radiometers should be trained in the proper use of their test equipment along with its limitations. Personnel must also understand how the characteristics of infrared instruments affect the accuracy of observed temperatures. Lastly, using cross-verification of temperatures should be avoided when radiometer capabilities differ from each other.
February 07, 2005
Sponsored by:
![]()
Inspecting Service Entrance Cables
When performing infrared inspections of electrical systems, many thermographers tend to focus their attention on outdoor substations and overhead electric lines. Unexpected failures can occur when service entrance cables are overlooked.
Service entrance cables provide a critical link between outdoor electric supply and a building’s indoor electrical equipment. Like other parts of the electrical system, these conductors are subject to loose or deteriorated connections which can cause unexpected interruptions in electrical power. Fortunately, such loose connections can often be detected with a thermal imager.
When inspecting service entrance cables, one should bear the following in mind:
- Prior to inspection, ascertain that service cables are under adequate load
- When possible, inspect cable connections at both ends. Emissivity issues aside, in most cases connections should be the same temperature as cable conductors
- On long cable runs, be certain to inspect any inline splices for hotspots
- To avoid the effects of solar loading, inspect cable assemblies early in the morning, on a cloudy day or at night
Because it is impossible to predict time to failure based upon temperature, inexplicable temperature rises should be investigated for cause as soon as possible. Doing so can help to avoid unexpected downtime and improve the reliability of a facility’s electrical distribution system.
For more information on infrared inspections of electrical systems or to obtain a copy of the Guideline for Infrared Inspection of Electrical and Mechanical Systems, contact Infraspection Institute at 609-239-4788.
February 14, 2005
Sponsored by:
![]()
Using an Isotherm Feature
The more things change, the more they remain the same. This timeless observation is especially true when referring to the isotherm feature found on today’s modern thermal imagers.
The isotherm feature found on modern thermal imagers is somewhat of a relic having been around for over 25 years. In simple terms, an isotherm feature allows a thermographer to visually highlight areas exhibiting a similar apparent temperature on the imager’s monitor screen.
Originally designed for the monochrome imagers of the 1970’s, an isotherm is a user-definable, high-contrast overlay generated by an imager’s on-board computer or within image processing software. Prior to the advent of imagers with multi-color displays, the isotherm feature was a necessity for defining areas exhibiting similar temperatures. For other imagers, it was a requisite part of measuring temperature.
With modern thermal imagers capable of providing multi-color imagery and direct temperature measurement, it would seem that the isotherm is a feature due for extinction. There are, however, several instances where an isotherm may still be useful. Among these are:
- The ability to define areas operating within a defined temperature range
- A preset temperature alarm that automatically appears when an object exceeds user-defined temperature limits
- A highlight color that defines hot/cold areas on monochrome images
One should be aware that accurate use of an isotherm is dependent upon proper use of the imager. When using an isotherm, one should practice proper measurement techniques giving particular consideration to viewing angle, spot measurement size and emissivity settings.
February 21, 2005
Sponsored by:
![]()
From the Top Down
“From the top down” describes an approach for managing companies. It may also describe an effective way to perform infrared inspections.
During the performance of infrared inspections of electro/mechanical equipment in high-rise facilities, efficiently moving between floors can be a challenge. Waiting for elevators can be especially time consuming; climbing stairs with tools and instruments can be physically taxing.
One solution is to begin the infrared inspection at the uppermost floor or roof level. Upon completing the inspection of all equipment on the subject floor, proceed to the next lower floor via the stairwell. Doing so usually requires less than a minute, compared to the lengthy wait often required to catch an elevator.
- When using stairways to move between floors, make certain that:
- Affected personnel are notified of the inspection activities
- Inspectors have keys or doorway lock combinations to enter occupied spaces from the stairwell
- Fire/security alarms will not be tripped whn moving into or out of stairwells
- Tripping hazards are not created by test equipment or tools
Upon leaving a subject floor via the stairwell, check to ensure that doorways close completely and lock in accordance with site security requirements. For more information on performing infrared inspections of electrical and mechanical systems, contact Infraspection Institute at 609-239-4788 or visit us online at: www.infraspection.com.
February 28, 2005
Sponsored by:
![]()
Measurement Accuracy Specifications
“A man’s got to know his limitations.” Clint Eastwood popularized this quote in a 1972 film; this sage observation can also be applied to infrared equipment.
When stating the potential accuracy of infrared thermometers, many manufacturers state radiometer accuracy as “± 2%”. The significance of this specification is often poorly understood causing many to overestimate the accuracy of non-contact temperature measurements.
An accuracy statement of “± 2%” is actually an abbreviated statement. The full statement is “± 2% of target temperature or 2º C, whichever is greater”. The full statement is required since measurement accuracy generally decreases with lower temperature targets. Furthermore, an accuracy of “± 2%” would place accuracy at 0% when measuring targets operating at 0º!
When considering an accuracy statement, it is also important to note that manufacturers derive accuracy specs under laboratory conditions using high-emittance, blackbody simulators in a controlled environment. As a result, manufacturers derive accuracy specs under “best case” conditions which may not be possible to duplicate in a given work environment.
To help ensure measurement accuracy, be certain to:
- Always measure perpendicular to target
- Correctly set radiometer inputs for emittance, reflected temperature, distance and humidity
- Ensure target size is adequate for subject radiometer’s spot measurement size
Lastly, real-world challenges can create situations where it is not possible to measure temperatures to the accuracy level promised by an instrument’s spec sheet. These challenges include, but are not limited to, hot or cold ambient temperatures, and the use of different lenses or filters. Whenever accurate infrared temperature measurement is not possible, one should consider using contact thermometry instead.
![]()
Temperature Measurement & Low E Paints
When performing IR in a building it is now even more advisable to check the emissivity of the wall and ceiling surfaces if temperature measurement is going to be done.
There are currently paints being sold as low emissivity that are touted as energy saving approaches. They may well be, but they will certainly affect how your camera sees the wall! So, if you need T measurements, be safe and sure — check the emissivity first!
This Tip of the Week was provided by:
Jack Kleinfeld, President
Kleinfeld Technical Services, Inc.
www.KleinfeldTechnical.com
![]()
Why Headers Appear Cool
In business, it is frequently said that cooler heads prevail. When performing infrared inspections of building interiors, window and door headers are often more prevalent.
Headers are a common construction detail found within building walls that utilize frame construction. Headers are horizontal framing members that are typically located at the top of window and/or door openings. In load bearing walls, headers are typically constructed of framing members that are stronger than vertical framing members.
When fabricating headers in wood frame construction, it is common to utilize framing members that are wider than vertical members. These are then often doubled in thickness and placed at the top of the window or door opening. Because headers are typically wider and/or double thickness, there is usually less cavity space for insulation to be installed wherever headers are present. In these circumstances, it is normal to see greater energy loss wherever headers are present when compared to a properly insulated wall cavity.
When performing an infrared inspection of framed walls from the interior of a building with cold outdoor temperatures, headers will typically appear cooler than insulated wall cavities. Observed thermal patterns will reverse should the same inspection scenario exist with warm outdoor temperatures.
For best results, a minimum inside/outside temperature differential of 10ºC is recommended when inspecting buildings with framed wall construction. To obtain a copy of the industry standard, Guideline for Infrared Inspection of Building Envelopes and Insulated Roofs, contact Infraspection Institute at 609-239-4788.
![]()
A Bird’s Eye View
When performing infrared inspections of large structures or systems, it is often difficult to see “the big picture”. For some systems, performing an infrared inspection from an aircraft may provide a solution.
Large structures such as industrial roofs, buried steam systems and pole-mounted electric power lines can be difficult and time consuming to inspect from the ground. Often, a thermographer’s field of view is limited to a small portion of the subject system making qualitative comparisons more difficult. For systems spread over a wide geographic area, maneuvering over the ground can require a considerable amount of time.
An alternative to ground-based infrared inspections is to perform them from an aircraft. Airborne infrared inspections provide a macro view of the subject system and can reduce inspection time by eliminating ground-based obstacles.
Both fixed-wing aircraft and helicopters can be used as platforms for conducting an aerial infrared inspection. Infrared inspections may be conducted utilizing a hard-mounted infrared imager or, in some cases, a portable imager aimed through an open window or doorway. When selecting an infrared imager for a specific project, keep the following in mind:
- Amount of resolution required for clear imagery at altitude
- Compatibility of imager with aircraft type
- Imager’s ease of use from within an aircraft. For lengthy projects, remote-controlled, fixed-mount imagers provide less stress for a thermographer.
Due to the logistics and costs associated with aerial infrared inspections, one may wish to consider hiring an experienced consultant who specializes in aerial infrared inspections.
![]()
Beware of Message Boards
As Internet communication has increased, so too has the number of message boards and web logs offering opinions and advice on thermography. Unfortunately, you can’t always believe everything you read.
Message boards and web logs or “blogs” have become popular forums for the exchange of information on a wide variety of topics. With most message boards, individuals can post information to a public website on a wide variety of topics. Most message boards offer real-time posting and do not restrict membership.
Because message boards are usually offered at no charge, they are attractive to anyone looking for quick access to information. Unfortunately, the information provided is frequently incomplete, inaccurate, or misleading.
When referring to a message board for technical information, keep the following in mind:
- Message boards frequently operate with little or no supervision
- Message board content is usually not edited for accuracy
- Message board posts may be anonymous or under a fictitious name
Lastly, message board editors are not obligated to remove inaccurate information. Selective editing of posted information by a message board administrator does not mean that all posts are checked for accuracy or bias. When visiting a message board, the best advice is to treat posted information with conditional acceptance until its accuracy can be verified.
![]()
Understanding Imager Resolution
Resolution is one of the most important objective specifications for a thermal imaging system. Due to a lack of standardization, this term is used in a variety of ways, many of which can be confusing or misleading.
Simply stated, resolution describes the capability of a thermal imager to clearly depict a target. Imager resolution is determined by an interdependent set of circumstances, the most important of which are described below.
- Detector: Some manufacturers offer total pixel count of the detector as a measure of resolution. Resolution generally increases with the number of pixels; however, pixel viewing angle (IFOV) also affects detector resolution. Meaningful IFOV data are frequently unavailable.
- Optics: Changing lenses affects an imager’s ability to clearly resolve a target at a given distance. Generally, telescopic lenses increase optical resolution; wide angle lenses decrease resolution.
- Signal-to-noise ratio: Generally, higher ratios equate to increased image resolution. Imagers with poor ratios will provide imagery that is grainy, thereby compromising image quality.
- Display Monitor: To maximize performance, the pixel count of an imager display monitor should equal, or exceed the number of detector pixels. Compact or monocular displays can severely limit resolution. Use of a high resolution monitor cannot compensate for low detector resolution.
When considering an imager for purchase, be certain to try the imager under the same circumstances that you will encounter in the future. Because there is no objective method to determine imager resolution, one should physically compare subject imagers to each other.
![]()
Air Travel With Your IR Imager
While a thermographer is the most important part of any infrared inspection, no thermographer can get very far without a working imager. This week’s Tip includes some time-tested suggestions to ease air travel with an infrared imager.
Few experiences are more frustrating than traveling to a distant jobsite and discovering that your infrared equipment has been either delayed or damaged in transit. Such experiences can result in project delays or costly repairs.
When traveling by air, hand carrying your imager is the best way to help ensure that it will arrive with you and in good working order. Fortunately, most modern infrared imagers are sufficiently small to be treated as carry-on luggage. When hand carrying your imager on aircraft, keep the following in mind:
- Ensure that your imager’s carrying case does not exceed maximum size for carry-on luggage
- Be certain that your imager case does not contain prohibited items such as tools or pocketknives
- Ascertain the number of carry-on items that your chosen airline allows
- Expect potential delays when passing through security checkpoints due to additional screening
- Request security personnel take extra care when performing manual searches of your equipment or its cases
Lastly, be certain to check Customs regulations when traveling internationally. Many countries restrict the import/export of infrared equipment; others may require that an independent customs agent be hired to get expensive test equipment in/out of the subject country.
The Expert Witness & Thermography
In a court of law, a situation may arise where evidence involves infrared thermography. This Tip of the Week provides some advice for practicing thermographers who may be called to testify.
Either the defense or the prosecution will submit thermographic evidence to the court which supports their case. The other side may decide to secure the services of a thermographer to review the evidence and hopefully submit a report that supports their case. If the initial report supports their case they may ask the thermographer to appear in court and be accepted as an expert witness.
Appearing in a court of law is not for the faint of heart or someone who is not comfortable with public speaking. A few things need to be considered when appearing in court as the expert witness.
- Make sure that you have reviewed all the evidence and background that was provided to you prior to your initial report. This evidence forms the basis of questioning from both sides if you are accepted as an expert witness.
- Assemble a package of your credentials and experience. One of the parties wants you there and the other one does not. The side that does not want you there will do everything they can to discredit your credentials. It needs to be in a format that the judge can review and make sense of quickly.
- Be prepared to wait, Justice is blind and it can also be very slow.
- Keep your cool when being cross examined. Don’t take it personally; the prosecutor is just doing their job.
- Don’t be afraid to ask for the question to be rephrased or to say “I don’t understand the question” This is helpful to give you time to think or to collect thoughts.
- Speak up, look people in the eye. It is important to speak with authority in a clear concise voice.
- Get paid up front according to the scope of work. If for whatever reason things don’t go well for your client they may not want to pay.
- Listen carefully to the questions being asked and keep a mental note of your answers. When being cross examined you will be asked the same question several different ways at different times.
- After appearing in court think about what has transpired. What went well, what would you do differently the next time? Spend some time and put down on paper a summary of your testimony.
- Unless totally familiar with standards, equipment specifications, or a procedure don’t lock yourself in to a specific number. The other side may bring that back and impeach you for being inaccurate.
Visit the Apex Infrared Web Site.
![]()
Building Envelope Inspections – Which Way Do We Go?
Infrared inspections of building envelopes have many uses. Of paramount importance is a logical inspection route that covers all subject areas and provides report data that can be easily followed.
Infrared inspections of building envelopes may be performed to detect evidence of thermal deficiencies and/or latent moisture. Typically, infrared inspections cover the exterior walls, windows, doors, and ceilings or roof of the structure. Depending upon the reason for the inspection, the inspection may be performed from either an interior or exterior vantage point. Regardless of vantage point, complete coverage all subject surfaces is critical to inspection success.
One method of helping to ensure complete coverage is to begin the inspection at a recognizable reference point such as a main doorway or other easily identified feature. From this starting point, the inspection is conducted for all subject surfaces of the building while moving in a clockwise fashion.
Moving in a clockwise fashion allows a thermographer to move in a logical and predetermined fashion around the building. This practice will work equally well when working from either the interior or exterior of the building. When thermal imagery is recorded to videotape, clockwise routes can help a viewer to better understand recorded data when viewing the tape at a later time.
For more information or to obtain a copy of the Guideline for Infrared Inspection of Building Envelopes & Insulated Roofs, contact Infraspection Institute at 609-239-4788 or visit us online at www.infraspection.com.
![]()
Negative Findings Versus No Problems
When documenting an infrared inspection with no detectable exceptions, thermographers should be aware that there is a big difference between reporting “no problems” versus “negative findings”.
Infrared inspections may be performed for a wide variety of reasons including condition assessment, quality assurance and predictive maintenance. In its simplest form, thermography detects, displays and records thermal images and temperatures across the surface of an object. In many cases, thermal anomalies are indicative of deficiencies, changes, or undesirable conditions within the object or system being inspected. Typically, such conditions are reported with a thermal image and a description of the anomaly.
Upon completing infrared inspections during which no anomalies are detected, thermographers will frequently report that the subject system has “no problems”. From a liability standpoint, this can increase a thermographer’s risk since there may exist problems that are simply not detectable by thermography. Most importantly, a proclamation of “no problems” may leave an end user with a false sense of security regarding the condition or integrity of the subject system.
Since it is not possible for thermography to detect all potential problems within a given system or object, it is advisable for a thermographer to report “negative findings” when no anomalies are detected. This statement is direct, to the point, and in accordance with terminology utilized in other types of scientific testing.
Although the difference between “no problems” and “negative findings” may seem small, the proper use of terminology can help to prevent costly and embarrassing misunderstandings.
![]()
Detecting Defective Lighting Ballasts
Lighting ballast failure may present more than an inconvenience; in some cases, it may present a fire hazard. Under the right conditions, an infrared imager may be used to detect overheated ballasts.
Lighting ballasts are dry-type transformers commonly found within fluorescent and HID light fixtures. Because ballasts are usually direct-mounted to the interior of the fixture casing, surfaces adjacent to ballasts frequently operate at nearly the same temperature. In the case of fluorescent fixtures, ballasts are usually in direct contact with the top surface of the fixture.
Properly functioning ballasts will operate up to several degrees above ambient air temperature. Defects such as short circuits or defective wiring can cause a ballast to significantly overheat. If ballast temperatures are sufficiently high, a fire may result.
By using an infrared imager to inspect fixture surfaces adjacent to ballasts, it is possible to rapidly detect evidence of overheated ballasts. When applying thermal imaging to installed fixtures, keep the following in mind:
- Ascertain how construction of subject fixtures will affect observed temperatures
- Plan inspection to afford clear line-of-sight to fixture surface
- Ensure fixtures are properly lamped and under load during inspection
- Allow sufficient time for fixtures to achieve thermal equilibrium
- Investigate excessively warm fixtures for cause
Whenever fixture construction or installation requires inspections from an elevated platform or vantage point, be certain to follow all applicable safety regulations including fall protection. For information on infrared training and certification, contact Infraspection Institute at 609-239-4788 or visit us online.
![]()
Pest Detection in Structures
Thermal imaging is one of the newest tools for the pest management professional. As with most applications, thermography for pest detection is not “simply point and shoot”.
Worldwide, pest management is a multi-billion dollar business annually. Traditionally, pest inspectors have relied on visual and physical inspections of structures and facilities when hunting for their quarry. Inspections were limited to locations accessible to the inspector and, in the absence of visual indications, could potentially miss infestations or prime conditions conducive to same.
As technology has progressed, pest inspectors have turned to additional forms of detection in the form of electronic sensors such as microwave and acoustic emission detectors. In the hands of a trained professional, these tools can greatly enhance an inspection; however, they are contact instruments and test data are limited to relatively small areas.
Thermal imaging provides an alternative to contact testing when evidence of pest infestation will cause a change in the surface temperature of the subject structure. For infestations that do not cause a change in surface temperature, it may be possible to employ active thermography to create a detectable Delta T by actively heating or cooling the subject structure or timing the inspection when an adequate Delta T is present.
For pest detection, successful application of thermal imaging requires a trained and experienced operator with knowledge of infrared theory and heat transfer, the structure being inspected, and the thermal signatures associated with likely pests or their activities. Most importantly, all thermal data should be verified by independent means.
![]()
Offering Infrared Inspection Services
The ever-increasing awareness of thermography causes many to consider offering infrared inspection services through new or existing business ventures. In general, the time has never been better than the present for starting an infrared consulting business or adding infrared inspection services to an existing company’s services.
The advent of lower cost technology has increased the number of commercial thermal imagers being offered while reducing the cost for same. This, combined with a greater awareness of the technology, has served to increase the demand for infrared inspection services.
During the past two years, the lower cost for infrared imagers and software has been an inducement for many large companies to purchase equipment; it has also attracted a number of entrepreneurs to the industry as well. Despite the fact that infrared equipment has become cheaper and the number of infrared consultants has increased, there remains a shortage of experienced, competent thermographers. From all market indications, this shortage of quality thermographers should provide favorable business opportunities for the next several years.
Prior to offering infrared inspection services, one should consider the following for your intended market area:
- Current demand for infrared inspection services
- Present competitive offerings and pricing
- Company’s strengths and current services
- Types of infrared inspections to be offered
- How new services will be marketed
Lastly, once a decision has been made to offer infrared inspection services, thermographers should obtain quality training and certification before they purchase infrared inspection equipment. For more information on training or certification services, contact Infraspection Institute at 609-239-4788.
![]()
Pricing Infrared Inspection Services
A well-known Zen riddle is, “What is the sound of one hand clapping?” A perpetual thermographer’s enigma is, “What are infrared inspection services worth?” This week’s Tip addresses some key considerations when evaluating prices for infrared inspection services.
Better, faster, cheaper – these powerful words are often used in advertising when attempting to attract new customers. Unfortunately, they fail to address the issue of quality – often one of the most important aspects of professional services such as thermography.
In determining prices for any service, one must determine all costs associated with providing services to one’s clients within a given time frame along with the amount of profit desired. The sum of these numbers, divided by the number of billable hours or days that can be sold during the same time period will yield an hourly or daily price. Depending upon how a company is structured and the desired profit margin, these numbers can vary widely.
When considering pricing for infrared inspection services, ask yourself the following questions:
- What services or features are prospects willing to pay for?
- How will the offered services add value to your client’s operation?
- What unique advantages can your company provide?
Once you have established pricing and begun to market your services, be prepared to justify your prices to prospects. Clients will often spend more for services if they can be convinced that they will receive better quality and value. Consistently having the lowest price will not win every order and can compromise a company’s longevity.
Tool for Measuring Reflected Temperature
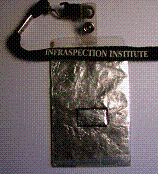 In order to measure reflected temperature, thermographers often utilize a piece of aluminum foil that has been crumpled, re-flattened, and wrapped around a piece of cardboard. The crumpling of the aluminum foil creates multiple angles on the foil surface necessary to measure an average reflected temperature which is entered into the radiometer’s computer.
Using a crumpled foil reflector raises a couple of concerns. Firstly, the aluminum foil is conductive and possibly an arc hazard when working near energized electrical equipment. Secondly, the reflector is often thrown away at the end of each job requiring that a new one be made for the next project.
Here is a small and versatile solution that you can add to your tool kit.
- Cut out a small piece of cardboard the size of an ID card
- Crumple and re-flatten a piece of aluminum foil and wrap around the cardboard
- Acquire a blank ID card holder with a slot for a lanyard holder
- Cut a small a 1”x 1.5” rectangle in the center of the front face
- Seal completed reflector into ID card holder with crumpled foil visible though rectangular opening
- Attach a nonconductve safety lanyard to help prevent dropping
This provides a permanent and inexpensive tool for measuring reflected temperature. For safety, do not let this tool hang from around your neck or otherwise dangle from your body. Always keep reflector tool in a secure location that protects the foil surface when not in use.
Tip and images provided by:
Harley Denio, Oregon Infrared
503-628-7212
PO Box 6252
Aloha, Oregon. 97007
www.oregoninfrared.com
![]()
How to Use Spot Size Ratios
With awareness of infrared technology at an all time high, point radiometers have become a common tool in a wide variety of industries. Understanding how to properly apply spot size values is imperative for accurate temperature measurement.
For non-contact radiometers, manufacturers typically supply spot size values. These values are usually expressed as a ratio such as 50:1. Spot size ratios allow one to calculate the minimum target size for a given distance or the maximum distance for a given target size. The formulae for these calculations are as follows:
Distance to Target ÷ Spot Ratio = Minimum Target Size
Example: Using a radiometer with a spot ratio of 50:1, calculate minimum target size at 25″ from a target
Solution: 25″ ÷ 50 = 0.5″
Target Size x Spot Ratio = Maximum Distance
Example: Using a radiometer with a spot ratio of 50:1, calculate maximum distance for measuring a 1″ target
Solution: 1″ x 50 = 50″
It should be noted that non-contact radiometers are subject to minimum focus distances. Prior to using the above formulae, ascertain the minimum focus distance for your radiometer. The formulae contained herein are only applicable at or beyond a radiometer¹s minimum focus distance.
Lastly, spot size ratios supplied by manufacturers are frequently quoted at 90% radiance (accuracy) or less. The Guideline for Measuring Distance/Target Size Values for Quantitative Thermal Imaging Cameras provides a simple procedure for accurately calculating spot ratio values for imaging radiometers. To obtain a copy, contact Infraspection Institute at 609-239-4788.
![]()
Verify Proper Temperature Scale
The devil is in the details. One of the details of accurate temperature measurement is ensuring that your imager or software is set to the proper temperature scale.
Nearly all imaging radiometers and infrared imaging software programs allow a user to select temperature measurement scales. Selection of desired temperature scale is usually made via hot keys or through pull-down or pop-up menu selections. Typical temperature scale choices include Celsius or Fahrenheit.
Frequently, imaging radiometers and software are programmed to initialize with specific settings including temperature scale. Some models may be programmed to initialize with user-defined settings each time they are started. Depending upon system design, these settings may be corrupted over time, or be lost when an internal battery dies or an imager is serviced by the manufacturer.
Because of the significant difference in Fahrenheit and Celsius scales, it is imperative that a thermographer check his/her imager or software for proper scale prior to, and during each use. This is especially true in facilities where several thermographers share an infrared imager and/or software or where multiple applications are performed using the same equipment. Utilizing an incorrect temperature scale can lead to misdiagnosis of problems or assigning an inappropriate repair priority.
The Guideline for Infrared Inspection of Electrical and Mechanical Systems provides temperature limits and several methods for assigning repair priorities to operating electrical and mechanical equipment. To obtain a copy of the Guideline, contact Infraspection Institute at 609-239-4788.
![]()
Incidental Finds
The paths of thermographers can lead in many directions within the course of a single day. Whether inspecting equipment in accordance with an established route or trying to find the shortest way to the next piece of equipment, we may pass by numerous pieces of equipment. Some might be familiar; others might be an encounter of the first kind. In addition to our thermal imaging, we maintian a sharp eye for visual anomalies as well.
In the routes that my partner and I complete on a daily basis, there are numerous pieces of equipment that we pass by that are not part of our schedule. Over time we have learned to be sensitive to things that are out of the ordinary. Remember the old railroad warning: “Stop, Look, and Listen”? The stop part applies to the scanner but the assistant should be in the look and listen mode observing not only the item(s) scanned, but also the surrounding environment.
On many occasions we have found exceptions that do not pertain to our field; nevertheless, we make a point to record them and advise appropriate personnel. We have even gone so far as to generate what we call an “incidental file.” Whenever we come across one of these “incidentals” we’ll snap a picture, notify the right person(s) about what we saw or heard, and then place the info into our incidental folder.
Having a record of these kind of finds is good PR and helps in selling your services, and it may help to prevent a catastrophic event that otherwise might have gone unnoticed.
Submitted by
John Pavlic
General Motors Lordstown Metal Center
Warren, OH